Advertisement
Mr IRONSTONE FURNITURE
TM
GYLD01-V1.4-20210605
Mr IRONSTONE is a Trademark of GG home&Beyond,Inc
ASSEMBLY INSTRUCTIONS
MODEL LD01
DO NOT TIGHTEN THE SCREWS UNTIL OUR INSTRUCTION NOTICES YOU TO DO SO
Contact Us!
Let Us Serve You Before You Return This Product!
Contact our friendly customer service team first for help
mrironstone@hotmail.com
www.mr-ironstone.com
Helpful Hints
PEOPLE NEEDED FOR ASSEMBLY:1-2
ESTIMATED ASSEMBLY TIME:0.5 HOUR
1
Advertisement
Table of Contents

Related Manuals for Mr IRONSTONE LD01


Summary of Contents for Mr IRONSTONE LD01
- Page 1 Mr IRONSTONE FURNITURE GYLD01-V1.4-20210605 Mr IRONSTONE is a Trademark of GG home&Beyond,Inc ASSEMBLY INSTRUCTIONS MODEL LD01 DO NOT TIGHTEN THE SCREWS UNTIL OUR INSTRUCTION NOTICES YOU TO DO SO Contact Us! Let Us Serve You Before You Return This Product! Contact our friendly customer service team first for help...
-
Page 2: Assembly Overview
ASSEMBLY OVERVIEW ② ② ② ② ② ②... -
Page 3: Parts List
PARTS LIST THE PART NUMBER CAN BE FOUND ON THE SIDE OF THE PART, EITHER STAMPED OR ON A STICKER ITEMS ARE NOT SHOWN TO SCALE. IF THERE ARE ANY MISSING PARTS OR DAMAGED PARTS, PLEASE EMAIL US AT mrironstone@hotmail.com WITH YOUR ORDER # AND MODEL # .THE PART WILL BE SHIPPED WITHIN 2 WORKING DAYS. -
Page 4: Hardware List
HARDWARE LIST EXTRA HARDWARE INCLUDED FOR YOUR CONVENIENCE ITEMS ARE NOT SHOWN TO SCALE. DESCRIPTON ① M6X25mm READ THE INSTRUCTION MANUAL BEFORE ASSEMBLING -OPEN THE HARDWARE AS NEEDED ② M6 Foot -ASSEMBLE IN AN AREA WITH PLENTY OF SPACE -READ EACH STEP BEFORE BEGINNING CONSTRUCTION -NEVER FORCE THE SCREWS OR FITTINGS -KEEP THIS MANUAL FOR FUTURE REFERENCE ③... - Page 5 ASSEMBLY INSTRUCTIONS (LD01) STEP 1 Lay down the Middle Desktop (H) back side up on the floor. A�ach Middle Frame (E) to Middle Desktop (H) using three Screws ① and �ghten the screws to 50% �ghtness. ③X1 ①X3 ① ①...
- Page 6 ASSEMBLY INSTRUCTIONS (LD01) STEP 2 Place the desktops as shown. A�en�on: please make sure the desktops (F) are in the right direc�on. WARNING: Do NO T Over-�ghten the Bolts/ Screws. Failure to do so may result in collapsing the tubing.
- Page 7 ASSEMBLY INSTRUCTIONS (LD01) STEP 3 A�ach Leg Frames (B) to Middle Frame (E) using four Screws ⑤ and �ghten the screws to 50% �ghtness. ⑤X4 ③X1 ⑤ ⑤ ⑤ ⑤ WARNING: Do NO T Over-�ghten the Bolts/ Screws. Failure to...
- Page 8 ASSEMBLY INSTRUCTIONS (LD01) STEP 4 ① A�ach two Leg Frames (A) to Desktops (F) using four Screws and �ghten the screws to 50% �ghtness. ①X4 ③X1 ① ① ① ① WARNING: Do NO T Over-�ghten the Bolts/ Screws. Failure to...
- Page 9 ASSEMBLY INSTRUCTIONS (LD01) STEP 5 ① A�ach four Bars (J) to Middle Frames (E) and Leg Frames (A) using eight Screws and �ghten the screws to 50% �ghtness. ①X8 ③X1 ① ① ① ① ① ① ① ① WARNING: Do NO T Over-�ghten the Bolts/ Screws. Failure to...
- Page 10 ASSEMBLY INSTRUCTIONS (LD01) STEP 6 A�ach two Lower Frames (C) to Leg Frames (A) and Leg Frames (B) using eight Screws ① and �ghten the screws to 50% �ghtness. ①X8 ③X1 ① ① ① ① ① ① ① ① WARNING: Do NO T Over-�ghten the Bolts/ Screws.
- Page 11 ASSEMBLY INSTRUCTIONS (LD01) STEP 7 Tighten the three Screws ① on Middle Desktop (H) to 100% �ghtness. ③X1 100% 100% ① ① 100% ① WARNING: Do NO T Over-�ghten the Bolts/ Screws. Failure to do so may result in collapsing the tubing.
- Page 12 ASSEMBLY INSTRUCTIONS (LD01) STEP 8 ⑤ A�ach Connec�on Frame (D) to Leg Frames (B) using two Screws and �ghten the screws to 50% �ghtness. ⑤X2 ③X1 ⑤ ⑤ WARNING: Do NO T Over-�ghten the Bolts/ Screws. Failure to do so may result in collapsing the tubing.
- Page 13 ASSEMBLY INSTRUCTIONS (LD01) STEP 9 ② A�ach six Feet to Leg Frames (A) and (B). Please make sure Desktops (F) and Middle Desktop (H) are seamless and properly matched and �ghten all screws as shown below. ②X6 ③X1 ② ②...
- Page 14 ASSEMBLY INSTRUCTIONS (LD01) STEP 10 A�ach Monitor Shelf Brackets (I) to Monitor Shelf (G) using four Screws ④ and �ghten the screws. ③X1 ④X4 ④ ④ ④ ④ STEP 11 Install Monitor Shelf to the Le� or Right Desktop as you like, using four Screws ④ and �ghten the screws.
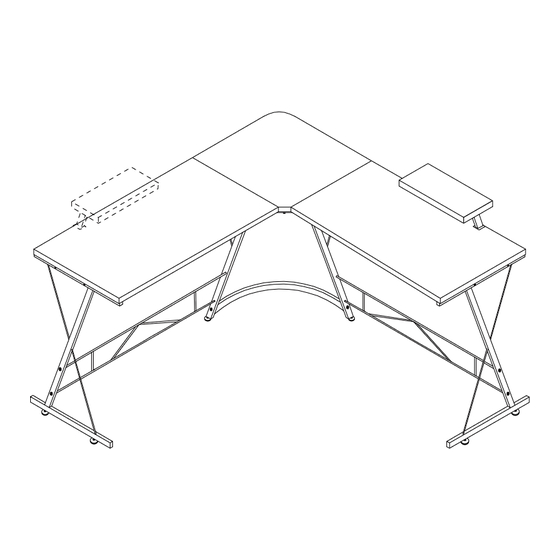
- Page 15 ASSEMBLY INSTRUCTIONS (LD01) STEP 12 Please make sure that all the screws are 100% �ghtened. CONGRATULATIONS! Assembling compete! A�en�on: the monitor shelf can be installed on both right side and le� side on the desktop. WARNING: Do NO T Over-�ghten the Bolts/ Screws. Failure to...
-
Page 16: Safety And Maintenance
This warranty does not cover the cost of transporta�on or labor. In no event shall Mr IRONSTONE be liable in either tort or contract for any loss or direct, special, incidental, consequen�al, or exemplary damages. This limited warranty does NOT apply to end-user customers for rental purposes.
Need help?
Do you have a question about the LD01 and is the answer not in the manual?
Questions and answers