Table of Contents
Advertisement
Quick Links
Mr IRONSTONE FURNITURE
TM
GYSB05-V2.3-20220511
Mr IRONSTONE is a Trademark of GG home&Beyond,Inc
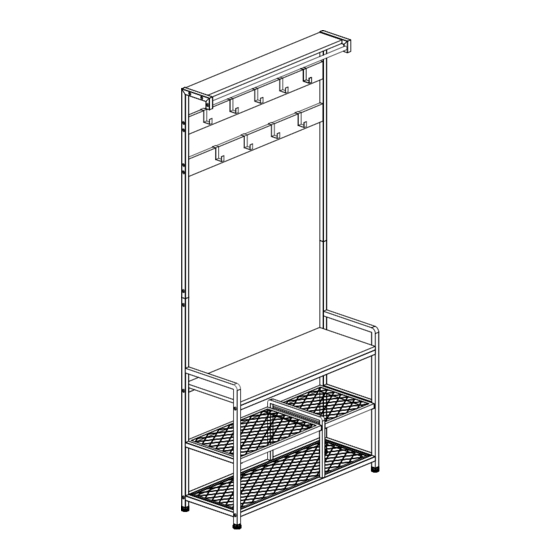
ASSEMBLY INSTRUCTIONS
MODEL SB05
Contact Us!
Let Us Serve You Before You Return This Product!
mrironstone@hotmail.com
www.mr-ironstone.com
Helpful Hints
PEOPLE NEEDED FOR ASSEMBLY:1-2
ESTIMATED ASSEMBLY TIME:0.5 HOUR
1
Advertisement
Table of Contents

Related Manuals for Mr IRONSTONE SB05


Summary of Contents for Mr IRONSTONE SB05
- Page 1 Mr IRONSTONE FURNITURE GYSB05-V2.3-20220511 Mr IRONSTONE is a Trademark of GG home&Beyond,Inc ASSEMBLY INSTRUCTIONS MODEL SB05 Contact Us! Let Us Serve You Before You Return This Product! mrironstone@hotmail.com www.mr-ironstone.com Helpful Hints PEOPLE NEEDED FOR ASSEMBLY:1-2 ESTIMATED ASSEMBLY TIME:0.5 HOUR...
-
Page 2: Assembly Overview
ASSEMBLY OVERVIEW Installation Tip: Only tighten all the screws to 50% tightness in the beginning, to make sure all the screws can align with the holes, and then tighten the screws fully after all parts are joined. T6x40mm M6x35mm M6x12mm M6x12mm M6x30mm M6x35mm... -
Page 3: Parts List
PARTS LIST THE PART NUMBER CAN BE FOUND ON THE SIDE OF THE PART, EITHER STAMPED OR ON A STICKER ITEMS ARE NOT SHOWN TO SCALE. IF THERE ARE ANY MISSING PARTS OR DAMAGED PARTS, PLEASE EMAIL US AT mrironstone@hotmail.com WITH YOUR ORDER # AND MODEL # .THE PART WILL BE SHIPPED WITHIN 2 WORKING DAYS. -
Page 4: Hardware List
HARDWARE LIST EXTRA HARDWARE INCLUDED FOR YOUR CONVENIENCE ITEMS ARE NOT SHOWN TO SCALE. DESCRIPTON M6X35mm READ THE INSTRUCTION MANUAL BEFORE ASSEMBLING -OPEN THE HARDWARE AS NEEDED -ASSEMBLE IN AN AREA WITH PLENTY OF SPACE M6X30mm -READ EACH STEP BEFORE BEGINNING CONSTRUCTION -NEVER FORCE THE SCREWS OR FITTINGS M6X12mm -KEEP THIS MANUAL FOR FUTURE REFERENCE... - Page 5 ASSEMBLY INSTRUCTIONS (SB05) STEP 1 to 2 Side Frames (A). WARNING: Do NOT Over-tighten the Bolts / Screws. Failure to do so may result in collapsing the tubing.
- Page 6 ASSEMBLY INSTRUCTIONS (SB05) STEP 2 A�ach two Sliding Guide (M) to Side Frame (A) as shown. A�en�on: Please make sure the triangle holes on the side frame and the middle frame line up. WARNING: Do NOT Over-tighten the Bolts / Screws. Failure to...
- Page 7 ASSEMBLY INSTRUCTIONS (SB05) STEP 3 A�ach two Sliding Guide (N) to Middle Frame (E) as shown. WARNING: Do NOT Over-tighten the Bolts / Screws. Failure to do so may result in collapsing the tubing.
- Page 8 ASSEMBLY INSTRUCTIONS (SB05) STEP 4 Push the shelves inward along the guide rails as shown. WARNING: Do NOT Over-tighten the Bolts / Screws. Failure to do so may result in collapsing the tubing.
- Page 9 ASSEMBLY INSTRUCTIONS (SB05) STEP 5 A�ach 2 L Bars (D) to two Side Frames (A) with 2 Connec�ng pieces (J), using 12 Screws Tip: The pieces (J) are installed inside the bars (D) and frames (A). WARNING: Do NOT Over-tighten the Bolts / Screws. Failure to...
- Page 10 ASSEMBLY INSTRUCTIONS (SB05) STEP 6 A�ach Top Bar (K) to L Bars (D) with 2 Screws WARNING: Do NOT Over-tighten the Bolts / Screws. Failure to do so may result in collapsing the tubing.
- Page 11 ASSEMBLY INSTRUCTIONS (SB05) STEP 7 PLEASE MAKE SURE TO FIX THE PRODUCT ON THE WALL! Tighten all screws. ----------- -----------...
-
Page 12: Safety And Maintenance
SAFETY AND MAINTENANCE Mr IRONSTONE FURNITURE Mr IRONSTONE is a Trademark of GG home&Beyond,Inc...
Need help?
Do you have a question about the SB05 and is the answer not in the manual?
Questions and answers