Table of Contents
Advertisement
Quick Links
Advertisement
Table of Contents

Related Manuals for Yolink SirenFob


Summary of Contents for Yolink SirenFob
- Page 1 SirenFob YS3607-UC Installation & User Guide Revision Mar. 20, 2023...
-
Page 2: Table Of Contents
. Firmware Updates . Factory Reset . Troubleshooting . Warnings . Warranty . FCC Statement . Contact Us If you have completed the set-up of your SirenFob using the quick start guide, you can proceed to section H SirenFob App Settings... -
Page 3: Welcome
Welcome! Thank you for purchasing YoLink products! We appreciate you trusting YoLink for your smart home & automation needs. Your 100% satisfaction is our goal. If you experience any problems with your installation, with our products or if you have any questions that this manual does not answer, please contact us right away. -
Page 4: Before You Begin
QR code: Your SirenFob connects to the internet via a YoLink hub (Speaker Hub or the original YoLink Hub), and it does not connect directly to your WiFi or local network. In order for remote access to the device from the app, and for full functionality, a hub is required. -
Page 5: In The Box
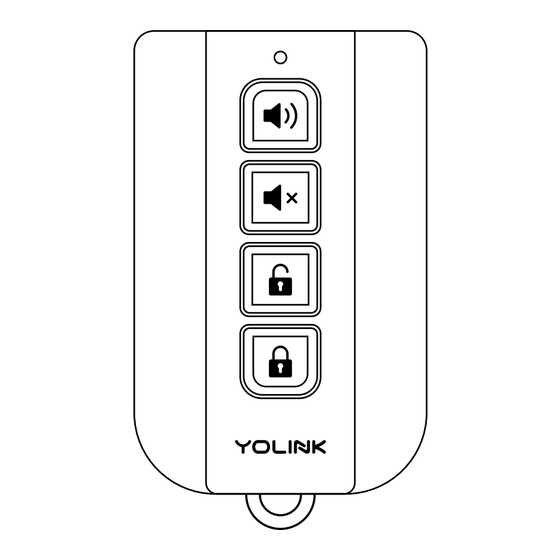
In the Box Quick Start Guide SirenFob AAA Batteries (2) Installed Get to Know Your SirenFob Status LED (See LED Behaviors) Start Alarm Button Press to Turn On the Siren(s) Stop Alarm Button Press to Turn Off the Siren(s) Mute Button... -
Page 6: Power Up
Get to Know Your SirenFob, Continued LED & Beep Behaviors Blinking Red Once, Blinking Green Twice Then Green Once Connecting to Cloud Device Power Up Quick Blinking Green Blinking Red And Green Control-D2D Pairing in Alternately Progress Restoring to Factory... -
Page 7: Install The App
Install the App If you are new to YoLink, please install the app on your phone or tablet, if you have not already. Otherwise, please proceed to the next section. Scan the appropriate QR code below or find the “YoLink app” on the appropriate app store. -
Page 8: Add Your Fob To The App
Add Your Fob to the App 1. Tap Add Device (if shown) or tap the scanner icon: Scanner icon 2. Approve access to your phone’s camera, if requested. A viewfinder will be shown on the app. 3. Hold the phone over the QR code so that the code appears in the viewfinder. - Page 9 Add Your Fob to the App, Continued 4. You can change the device name and assign it to a room later. Tap Bind device. 5. If successful, the screen will appear as shown. Tap Done.
-
Page 10: Sirenfob App Settings
SirenFob App Settings In the app, tap on the SirenFob icon, then tap on the 3 dots in the upper right corner, to view the fob’s Details screen. Your fob’s Details screen should be similar to the one shown below. -
Page 11: Sirenfob Operation
SirenFob Operation SirenFob Use & Applications: After pairing your SirenFob to one or more YoLink siren products (YoLink Siren Alarm, Outdoor Alarm Controller, Outdoor Alarm Controller 2, etc.) you can control them with your SirenFob. Alarm devices, such as the YoLink Vibration Sensor or Motion Sensor, can be paired to your siren or sirens. - Page 12 (provided by a YoLink hub), any app settings made, such as for alert notifications, will be carried out. Use care to not use the SirenFob to disarm your vehicle alarm devices, and at the same time use the app to arm them and activate the siren(s) or trigger other automations that may conflict with your desired operation.
- Page 13 Protection System: Pair a Motion Sensor to a Siren Alarm. Place them in your hotel room. Pair the Siren Alarm to a SirenFob. Press the Unmute (Locked Padlock) button to arm the Motion Sensor and Siren Alarm. If motion is detected by the sensor, the Siren Alarm will sound/activate.
-
Page 14: Control-D2D Device-To-Device Pairing
(this is not done in the app). The steps to pair your SirenFob to one or more siren devices are as follows: 1. On the SirenFob, press and hold the Start Alarm button for 5 to 10 seconds, until the LED flashes green, then release the button. - Page 15 Press for 5-10 Seconds Until the LED Flashes Green Your SirenFob is now paired to your siren device. Pair additional siren devices, if needed. Test your SirenFob. Press the Start Alarm to turn on the siren(s), then press the Deactivate Button to silence the siren(s).
- Page 16 Control-D2D Device-to-Device Pairing, Continued Unpair Your SirenFob: 1. On the SirenFob, press and hold the Start Alarm button for 10 to 15 seconds, until the LED flashes green, then red, then release the button. 2. On the siren device, press and hold the SET button for 10 to 15 seconds, until the status LED flashes green, then red.
-
Page 17: Battery Replacement
Battery Replacement Using a small Phillips screwdriver, remove the housing screw. Carefully place it to the side. Remove the back shell. You may find it easier to pry open the case using a fingernail, or a slotted screwdriver. Start at the bottom of the fob, at the keyring loop. - Page 18 Battery Replacement, Continued Remove the old batteries. Install two new alkaline AAA batteries. (Do not mix old and new batteries) 2 x AAA Reassemble the fob and tighten the screw. Test the operation of your fob.
-
Page 19: Firmware Updates
Firmware Updates Your YoLink products are frequently being improved, with new features and functions added over time. It is periodically necessary to make changes to your fob’s firmware. For optimal performance of your fob, and to give you access to any improvements made to your fob’s model, these firmware updates should be... - Page 20 If you use your SirenFob without an associated YoLink hub, firmware updates can not be made on your fob.
-
Page 21: Factory Reset
Factory Reset When directed by customer support, and/or as an attempt to resolve a problem with your fob, it may be necessary to perform a factory reset. Factory resetting your fob returns it to the factory default programming and settings. This is a simple process: Hold the Unmute button for 20 to 30 seconds, until the LED blinks red and green... -
Page 22: Troubleshooting
Troubleshooting If your fob does not operate as expected, if the fob has worked before, but stopped working, check and replace the batteries, if needed. If the fob has not worked before, perform the pairing process as previously explained, then test the fob again. -
Page 23: Warnings
Do not allow your fob to get wet or be submerged in water or other liquids. Promptly dry off your fob if it does get wet. The SirenFob is intended generally for use in indoor environments or safe from the elements. Do not leave your fob outside and/or where it it may be exposed to extreme hot or cold environments. -
Page 24: Warranty
Warranty 2 Year Limited Electrical Warranty YoSmart Inc. warrants to the original user (“customer”) of this product that it will be free from defects in materials and workmanship, under normal use, for 2 years from the date of purchase. This warranty does not apply to devices that have been improperly installed, modified, put to a use other than designed, or subjected to acts of God (such as floods,... -
Page 25: Fcc Statement
FCC Statement This device complies with part 15 of the FCC Rules. Operation is subject to the following two conditions: (1) This device may not cause harmful interference, and (2) this device must accept any interference received, including interference that may cause undesired operation. - Page 26 - Consult the dealer or an experienced radio/TV technician for help. The device has been evaluated to meet general RF exposure requirement. The device can be used in portable exposure condition without restriction. PRODUCT NAME: SIRENFOB PARTY: YOSMART, INC. TELEPHONE: 831-292-4831 MODEL NUMBER: YS-3607-UC...
-
Page 27: Contact Us
Support Home Page Finally, if you have any feedback or suggestions for us, please email us at feedback@yosmart.com Thank you for trusting YoLink! Eric Vanzo Customer Experience Manager 15375 Barranca Parkway Ste. J-107 | Irvine, California 92618 © 2023 YOSMART, INC IRVINE, CALIFORNIA...
Need help?
Do you have a question about the SirenFob and is the answer not in the manual?
Questions and answers