Advertisement
Quick Links
Advertisement

Related Manuals for Brickhouse Security Spark Nano 7


Summary of Contents for Brickhouse Security Spark Nano 7
- Page 1 Spark Nano 7 User’s Guide...
-
Page 2: What's Inside
What’s Inside Spark Nano 7 Wall Charger... -
Page 3: Optional Accessories
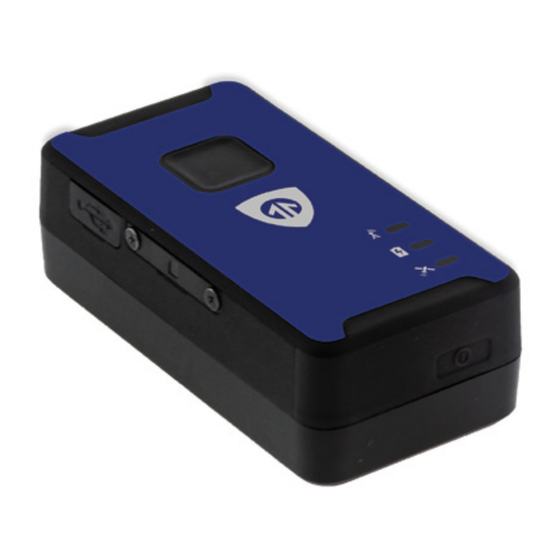
Optional Accessories Weatherproof Magnetic GPS Box Reduces the risk of physical damage to your device... - Page 4 Spark Nano 7 Power Button Charging Port Panic Button Cell LED (Green) Power (Red) GPS LED (Blue)
- Page 6 Cell LED: Green Light A fast flash indicates searching for network. A slow flash indicates the device is registered on network. When the the light is not lit, the device modem is not looking for network. Power LED: Red Light A solid red power indicator means the charging cable is inserted and the charging cycle is complete.
- Page 7 you have not charged the device for a long time and the light does not light up when the device is plugged in, please allow at least 6 hours of charge, and then try to power the device on. GPS LED: Blue light A fast flash indicates searching to get a GPS fix.
-
Page 8: Getting Started
The first step in using your is to charge it. To charge, plug the AC Spark Nano 7 adapter into a wall outlet. Then, gently insert the mini-USB charging end into the charging port of your device. Ensure the mini-USB ends are properly aligned. - Page 9 plugging the unit in to power will power it on. The power light will light up briefly indicating power on. To power off the unit, hold down the power button for around 3 seconds. You’ll see the power light begin to flicker indicating it will power off soon.
- Page 10 Avoid placing the device in the trunk of a vehicle. It may or may not report from a glove compartment or underneath a seat. This interference can vary from vehicle to vehicle, however, as all automobiles are constructed differently. If you want to track covertly, the Weatherproof Magnetic GPS Box may be the best solution for you.
- Page 11 Navigation Arrows Change Map View Zoom Bar Dashboard Last Known Location...
- Page 12 View, if available. will appear where a tracker transmitted BrickHouse Security shield icon most recently. Click on an icon to bring up a pop-up box. This will show your tracker’s name, the distance it has traveled on this trip, what direction it was moving in, speed, battery information, and start and stop locations.
- Page 14 More tab is not currently active. Future updates to the platform will utilize this tab. tab allows you to create quick geofences, based on the GeoFence location you are currently viewing and route the device was following. Use the Circular GeoFence radio button to create a perimeter around the location you have selected.
- Page 15 When you’re done, press the Create Geofence button to save. tab will display the most recent Geofence, Speed, Panic, or Power Alerts alerts that have been triggered. Video Links tab is not currently active. Future updates will take advantage of this tab. Live Tracker will open up a separate window displaying your devices’...
- Page 17 Using the Dashboard allows a user to choose from which dates information can Calendar display. Any date that has tracking information will be highlighted. Simply click on that date to display information. To choose multiple days, click on the Date Range button, input a start and end date, and press Search.
- Page 18 Click on any individual breadcrumb to see detailed information. The BrickHouse Security shield icon represents the start and stop of a trip, green circles mean the device was moving with the arrow indicating direction, and red octagons indicate stops.
- Page 19 Alerts section lets you manage what kinds of alerts your device will create and how you will be notified. Click the Geofence button to manage your geofences. The Geofence Alert Configuration tab lets you choose when and where alerts will be sent. Select the device you would like to edit by checking the box next to it.
- Page 20 In the Create New Geofence tab you can create geofences around any area in different shapes. Navigate to the area on the map you would like to create a geofence. Click on the Circle, Polygon, or Route button. It is suggested that all geofences be in at least a .2 mile radius, or at least 1 city block around an area to allow for GPS drift.
- Page 21 Assign Geofence tab allows you to activate and deactivate geofences. Select a device from the dropdown menu to see what geofences are currently active. Click on an Assigned Geofence to view and edit its configuration. Click the Remove link to deactivate a geofence. Hit Save once you have finished making changes.
- Page 22 choose the icon you would like to appear on the map to denote a panic alert. If you would like to receive emailed alerts, enter your email address into the Email Address bar. If you would prefer to receive alerts via text message, press the + button and enter your phone information.
- Page 23 Search Export to Excel...
- Page 24 Start/Stop reports will list trips between stopping points, with starting and ending locations, as well as speed information, trip duration, stop time, and the distance traveled. button will show you all alerts generated during the specified Alert History time and where they occurred. button includes individual locations information such as: location, Full History time of transmission, battery life, speed, and distance from its previous locations.
- Page 25 Support To review FAQs, as well as other support materials for your device and the BrickHouse Security Tracking platform, click on the Help link in the upper right corner of the screen. Live support is available Monday through Friday between the hours of 9am and 8pm EST.
Need help?
Do you have a question about the Spark Nano 7 and is the answer not in the manual?
Questions and answers