Advertisement
Quick Links
Advertisement

Related Manuals for Brickhouse Security LiveWire VOLT


Summary of Contents for Brickhouse Security LiveWire VOLT
- Page 1 LiveWire VOLT User’s Guide...
- Page 2 What’s Inside LiveWire VOLT device Double-Sided Tape Quick Start Guide...
-
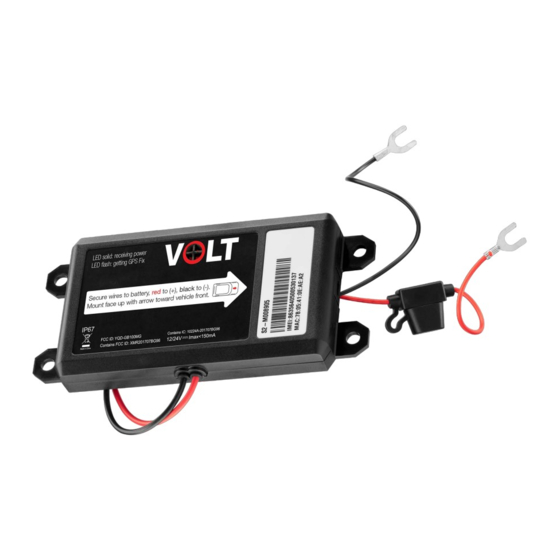
Page 3: Black Wire
(Power/GPS indicator) Black Wire (-) Negative Connect to Ground Red Wire (+) Positive Connect to DC 8-32 V Screw Mounts (optional) We recommend the enclosed double-sided tape to mount the unit. Many cars do not have ports for the screw mounts near the battery. - Page 4 The red LED indicates multiple statuses. Fast Flash: cables are connected, device is powered, device is searching for the a cellular connection. Solid Red: powered, connected. The device has a GPS fix (successful connection). The light will remain on during normal device operation. Slow Flash: a slow steady red blink will indicate a problem getting a GPS fix.
-
Page 5: Getting Started
Getting Started You will have received an email containing your default login information; use this to connect to the platform, configure your device, and view tracking information (see details later in this manual). The first step in using your GPS device is to connect the positive and negative wires to the battery terminals. - Page 6 Customizing and Tracking Your Device Via a Web Browser _______________________________________________ To start tracking, open a browser window and go to www.BrickhouseSecurity.com. Hover your cursor over "Login" at the top right of the website, click on GPS. This will take you to the Login Page, where you will log into the Locate GPS platform using the credentials that were provided via email Upon first visit, you will be prompted to change your password.
- Page 7 User Settings ___________ In order to change settings, click on your username in the right corner of the top panel. You will find the ‘User Settings’ option in the dropdown menu. It is important to configure these options: • Indicate your time zone. Set Daylight Savings Time, if applicable.
- Page 8 User Settings Interface ___________________...
- Page 9 Enable Unit Visibility _________________ Before editing a unit, make sure that your devices are being displayed on the Monitoring tab as well as on the Map. To enable this visibility, please follow the steps below: First, click on the 'All' button as Next, check boxes next to your units.
- Page 10 Edit Unit Name and Icon ____________________ You can edit the unit properties (including name and icon) by clicking on the wrench to the right of the unit. From this same menu, clicking on the Icon To change the name, type it into the tab to update the look of your vehicle.
- Page 11 Monitoring Tab ______________ The Monitoring Tab is the Locate GPS platform's main interface. When viewed on a desktop browser, it consists of two areas: the work area on the left (shown below) and the map on the right. From either area, you can click on a unit's icon to see additional information, center the unit on the map, see whether it's moving or stationary, run a quick report, or execute commands (if available for that unit's particular device).
- Page 12 Hovering over a unit on the map will show you the last time it reported and its current location, direction, and speed. To watch over a specific unit, click on the bullseye icon in the work area (#1 on previous page) or directly on the map.
- Page 13 (1) Click the magnifying glass icon to search for an address, unit or geofence. (2) Click the eye icon to select the layers you would like to be visible on the map. (3) Click this icon to select your map source. (4) Zoom in and out of the map by clicking the +/- icons or dragging the bar.
- Page 14 Tracks Tab The Tracks section allows you to see your tracking history on the map: (1) Select a unit (2) Select whether you would like it to be a single line or separated by trip (color) (3) Select the line thickness and icons you would like to overlay on the track (4) Choose a time interval or enter a specific range (5) Click the directional arrow to move along the track or the play icon for a Google Street View playback (if available for the locations visited)
- Page 15 Reports Tab ___________ The Locate GPS tracking platform comes preloaded with some default report templates that have been customized to suit your needs. See below for instructions on how to execute a report and the next page for how to read and export the data. (1) Select the report type (2) Select the device you would like to run the report on (3) Click on a predefined time interval or enter your own...
- Page 16 Below is an example of how the "Trips & Stops" report looks once its executed within the platform. (1) This is where you navigate between the different sections of the report. (2) You can click on the eye icon for each trip to make its Track appear on the map. (3) Click on one of these icons to email, print, or export the report in PDF or XLS format.
- Page 17 Geofences A Geofence is a virtual perimeter around a predefined area that can be utilized in a variety of ways on the Locate GPS tracking platform. You can use it to be notified if your device has entered or exited that area or run a historical report on all visits and time spent within the area.
- Page 18 To locate the area where you would like to create your first geofence, either manually drag the map to that destination or search for a specific address by clicking the magnifying glass icon on the map. Next, click on the "Geofences" tab followed by the "New" button, and then: (1) Add a name and description.
- Page 19 (1) Check the boxes next to geofences to make them visible on the map. (2) Here you can see how many devices are currently within each geofence. (3) Click the wrench icon to edit an existing geofence. (4) Delete a geofence you don't need anymore by clicking on the X icon.
- Page 20 Notifications __________ Notifications are used to alert you based on predetermined triggers, like geofence entry or exit, speeding, or excessive idling. You can be notified by email, text message, mobile app notification, or all of the above. To create a new alert, go to the Notifications tab and then click "New." Check the boxes to select the devices you would like this specific...
- Page 21 You will then see the following window. Here you will select the trigger type that will activate your notification. Depending on your device type and use-case, not all of these will be useful for you. Once you click Next, the settings on the next couple of pages will depend on which notification type you selected.
- Page 22 Here you will decide what actions you would like the platform to take if any of the parameters you've selected in the previous windows are triggered. address, phone # (+1 followed by a 10 digit number), and/or mobile app notification. To receive an app notification, you will have to select your app in this window under the "Application"...
- Page 23 Next, you will be asked to enter the text you'd like to see when you receive the notification. The text will automatically be different based on the notification type. We recommend leaving this as-is.
- Page 24 This is the final window of the notification creation process. The only required field is the name, but you can also choose to add a description, choose a time interval for when the notification is in force, or enter the maximum number of times you would like that notification to be triggered.
- Page 25 Once you have created all your notifications, you will see them listed in the work area on the left. You can manage your existing notifications here. Below are descriptions for each column. (1) Enable/disable a notification (2) See what actions have been set up when this notification is triggered (3) Shows you how many times a notification has been activated (4) Shows you how many devices the notification is applied to (5) Edit an existing notification by clicking on the wrench icon...
- Page 26 Getting to Know your BrickHouse Locate GPS Mobile App _______________________________________________ The BrickHouse Locate GPS mobile app is available on the Google Play and iOS App Store and can provide you with the same advanced tracking functionality as the web-based GPS platform. The app can be used on any smart phone or device that runs on Android or iOS.
- Page 27 Download the BrickHouse Locate GPS mobile application from your iOS App Store or Google Play store. Please have your login credentials ready to access the platform through the mobile application. These are identical to your web credentials you received in your email upon purchase or activation. First time users: it is recommended to have already logged into the web platform to reset your initial password before using the app.
- Page 28 Login Screen _____________ Enter the same username and password you use on the web platform to login to the mobile app...
- Page 29 Unit Selection The first step is to click on the eye icon in the top right corner of the screen. From there, you will need to select the devices you'd like to have appear. You have the option to select all, select individually, or match whatever current settings were used in the web platform.
- Page 30 App Settings Page ________________ Tap on the "More" button at the bottom right corner of your screen. You will reach the page shown here. Choose your map source and decide whether you'd like certain things to be visible on the map, such as unit icons and names, geofences and zoom buttons.
- Page 31 Map View ________________ Tap on the "Map" icon to reach the map screen shown to the right. Navigate the map by manually dragging it or using the zoom buttons on the bottom (if enabled in the visibility settings). Bring up detailed information about a specific device by tapping on its icon or searching for it by name in the search box on top.
- Page 32 Tracking your Device __________________ This page shows you the most current tracking information for the device you selected. You should be on the "Info" tab labeled (1) on the right. Shows us the latest data, including the device's current location, last time it reported, its speed, as well as information from the last trip tracked, such as the length and distance of the trip.
- Page 33 Tracking your Device (Historical Data) _______________________________ To see the tracking history of your device, tap on the "History" tab. From here, you can see all the trips and stops that your device made on a particular day. For each trip, you'll see the duration, distance, and average speed.
- Page 34 Report Execution _______________ The app also allows you to run any report that's available on the web interface of the Locate GPS platform. To run a report, select the report Template, Unit and Interval, followed by tapping on the Execute report button.
- Page 35 Thank you for choosing BrickHouse Security for your GPS tracking needs. For further support with the Locate GPS platform or anything else, please reach out to us by email, phone, or live chat at BrickHouseSecurity.com. Email: support@brickhousesecurity.com Phone: 800-654-7966 You can also find lots of learning materials including instructional videos on how to use specific features of the Locate GPS platform at: help.brickhousesecurity.com...
Need help?
Do you have a question about the LiveWire VOLT and is the answer not in the manual?
Questions and answers