Advertisement
Quick Links
NOTE: Carefully read entire instructions thoroughly before attempting to install this part.
Parts Included
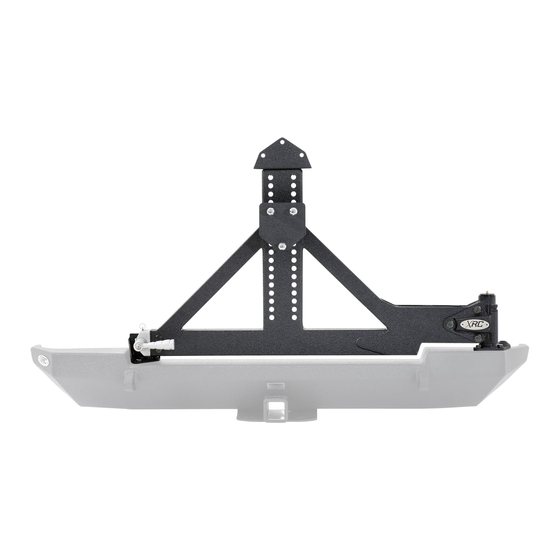
93-5642 TIRE CARRIER
93-2997 TIRE CARRIER PIVOT SHAFT
93-5650 TIRE CARRIER LATCH BRACKET
93-5652 WHEEL MOUNT:
93-5655 WHEEL MOUNT:
90-5658 LATCH SHIM PLATE
90-5659 NUT PLATE:
Latch
93-5661 LOCK OUT BRACKET ASSEMBLY
90-8000 SPACER TUBE
90-6712 HARDWARE PACK:
3/8" X 1" GR. 8 HEX BOLT
3/8" X 1 1/4" GR. 8 HEX BOLT
3/8" X 2 1/2" GR. 8 HEX BOLT
3/8" HARDENED FLAT WASHER
3/8" STOVER NUT
3/8" X 2 1/4" GR. 8 HEX BOLT:
3/8" HEX NUT:
Jam Nut
1/2" X 1 1/2" HEX BOLT GR. 8
1/2" X 3 1/4" HEX BOLT GR. 8
Step 1: Remove the stock spare tire from the vehicle.
Step 2: Unclip the 3rd brake light wiring harness. Unbolt and remove the 3rd brake light
housing from the vehicle.
Step 3: Unclip the passenger side taillight housing wiring harness. Unbolt and remove the
taillight from the vehicle.
Step 4: Unbolt and remove the tire carrier pivot shaft block off plate.
For Technical Support/Warranty Information please call 310-762-9944
Qty
Adjustable Bracket
Stationary Bracket
Tire Carrier
20
Jam Bolt
: Support Plates
Tire Carrier Installation:
Smittybilt, 400 W Artesia, Compton, CA 90220
Installation Instructions:
(Part # SB76654)
87-06 Jeep TJ/YJ XRC Tire Carrier
Parts Included
1
1/2" STOVER NUT
1
1/2" HARDENED FLAT WASHER
90-4214 HANDLE ASSEMBLY
1
90-6689 HARDWARE PACK:
1
90-2940 NYLON WASHER
1
90-4218 CIRCLE CLIP
2
90-4219 LUG NUTS
1
90-4217 ZERK FITTING
1
93-5663 3rd BRAKE LIGHT BRACKET
1
90-6713 HARDWARE PACK:
1
5
3/8" X 1" HEX BOLT GR. 8
6
3/8" STOVER NUT
2
3/8" SAE FLAT WASHER
5/16" X 1" HEX BOLT GR. 8
5/16" USS FLAT WASHER
7
5/16" NYLOCK NUT
1
93-5731 TJ SUPPORT PLATE
1
93-5845 YJ SUPPORT PLATE
4
3
90-5847 NUT PLATE:
7/16" X 1 1/2" GR. 8 HEX BOLT:
Revised 12.09.09
Qty
Handle
3rd Brake Light
YJ Support Plate
YJ Support Plate
7
14
1
1
2
1
3
1
1
1
2
2
4
3
6
3
1
1
1
1
Advertisement

Related Manuals for Smittybilt SB76654


Summary of Contents for Smittybilt SB76654
- Page 1 Step 3: Unclip the passenger side taillight housing wiring harness. Unbolt and remove the taillight from the vehicle. Step 4: Unbolt and remove the tire carrier pivot shaft block off plate. For Technical Support/Warranty Information please call 310-762-9944 Smittybilt, 400 W Artesia, Compton, CA 90220...
- Page 2 1/2” X 3 1/4” pinch bolts, hardware in the (2) pinch bolt holes. For TJ models only: in the remaining support plate hole, insert the 1/2” X 3 1/4” bolt, sleeve (90-8000) and hard- For Technical Support/Warranty Information please call 310-762-9944 Smittybilt, 400 W Artesia, Compton, CA 90220...
- Page 3 1/2” bolt 1/2” bolts & 1/2” Washer Tire Carrier Nylon Brace Washer 93-5642 YJ Support Plate Pivot 93-5845 Shaft (Fig C2) YJ 93-2997 90-4214 Handle Assembly For Technical Support/Warranty Information please call 310-762-9944 Smittybilt, 400 W Artesia, Compton, CA 90220...
- Page 4 NOTE: The size of the spare tire will determine the mounting height of the bracket. If possible, it is better to have the tire fit tighter against the straight edge/tire carrier to avoid excess vibration. For Technical Support/Warranty Information please call 310-762-9944 Smittybilt, 400 W Artesia, Compton, CA 90220...
- Page 5 Install the Zerk fitting (90-4217) into the top of the pivot shaft (93-2997). (Fig. C) NOTE: Do not over tighten the Zerk fitting. 90-4219 Lug Nuts (Fig G) For Technical Support/Warranty Information please call 310-762-9944 Smittybilt, 400 W Artesia, Compton, CA 90220...
- Page 6 9. Step 17: Reinstall the passenger side taillight using the previously removed OE hardware. Step 18: Installation of the tire carrier is now complete. For Technical Support/Warranty Information please call 310-762-9944 Smittybilt, 400 W Artesia, Compton, CA 90220...
- Page 7 Step 3: Once the OE 3rd brake light plastic housing has been properly trimmed, place it flush against the back 3rd brake light bracket (93-5663). Use the (3) holes in the bracket as a For Technical Support/Warranty Information please call 310-762-9944 Smittybilt, 400 W Artesia, Compton, CA 90220...
- Page 8 It is recommended to have this done by an experienced electrical installer. Step 6: Installation of the third brake light assembly is now complete. For Technical Support/Warranty Information please call 310-762-9944 Smittybilt, 400 W Artesia, Compton, CA 90220...
- Page 9 In order to protect the finish you should wax your product on a regular basis with pure carnauba automotive wax. Do not use any types of soap, polish or was that contains abrasive that could damage the finish. For Technical Support/Warranty Information please call 310-762-9944 Smittybilt, 400 W Artesia, Compton, CA 90220...
-
Page 10: Limited Warranties
Subject to the duration and conditions of the limited warranty stated below, Smittybilt warrants to the original retail purchaser that its products are free from defects in material and workmanship. All other warranties and representations express or implied, are hereby dis- claimed, including fitness for merchantability and buyer’s intended use or purpose.
Need help?
Do you have a question about the SB76654 and is the answer not in the manual?
Questions and answers