Advertisement
Quick Links
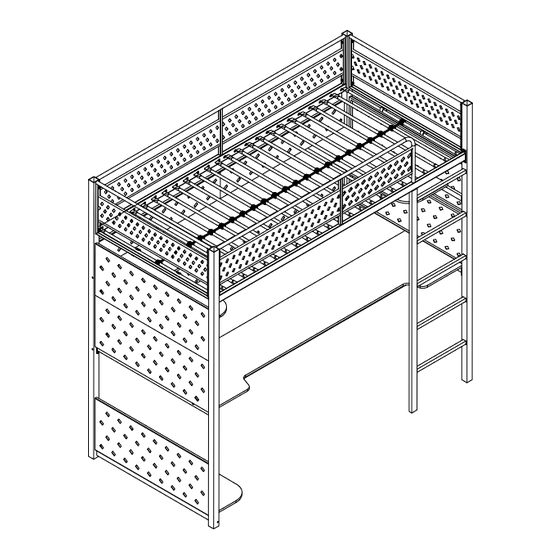
X ROCKER GAMING BUNK BED
IMPORTANT – READ CAREFULLY – RETAIN FOR FUTURE REFERENCE
Dimensions
Width - 197.2cm
Depth - 95.7cm
Height - 183cm
Need Help ? Contact X Rocker at :
www.xrockeruk.com/pages/support
IMPORTANT: You must Keep your original retail receipt as proof of purchase.
SXJ05 -20210415
7118801 - 9306080
1
Advertisement

Related Manuals for X Rocker GAMING BUNK BED


Summary of Contents for X Rocker GAMING BUNK BED
- Page 1 IMPORTANT – READ CAREFULLY – RETAIN FOR FUTURE REFERENCE Dimensions Width - 197.2cm Depth - 95.7cm Height - 183cm Need Help ? Contact X Rocker at : www.xrockeruk.com/pages/support IMPORTANT: You must Keep your original retail receipt as proof of purchase. SXJ05 -20210415 7118801 - 9306080...
- Page 2 Safety and Care Advice Important Please read these instructions fully before starting assembly Check you have all the Make sure you have enough Assemble on a soft level components and tools listed on space to layout the parts before surface to avoid damaging the the following pages.
- Page 3 Safety and Care Advice Important Please read these instructions fully before starting assembly WARNING THE MATTRESS SURFACE LEVEL SHOULD NOT BE ABOVE THIS LINE Important: Please note the maximum mattress height is indicated on the vertical bar on the left hand side of the opening at the top of the ladder.
- Page 4 Components - Panels Please check you have all the panels listed below 15 x48 14a x24 16 x 23...
- Page 5 Components - Panels Please check you have all the panels listed below 2 Post 02 x 1 1 Post 01 x 1 3 Post 03 x 1 4 Post 04 x 1 5 Side Rail x 2 12 Front Guard Rail x 1 13 Rear Guard Rail x 1 7 End Guard Rail x 2 16 Slat Spacer x 23...
- Page 6 Components - Panels Please check you have all the panels listed below Bottom Shelf x 1 50c Right Shelf x 1 50b Left Shelf x 1 54a Desk Support Rail 02 x 2 53 Side Mesh Panel x 5 52 Rear Mesh Panel x 2 55b Left Shelf Support Frame x 1 54b Desk Support Rail 01 x 3 55a Main Shelf Support x 1...
- Page 7 Components - Fittings Components - Fittings Please check you have all the panels listed below Please check you have all the panels listed below Note: The quantities below are the correct amount to complete the assembly. In some cases more fittings may be supplied as required.
- Page 8 Assembly Instructions Step 1 Step 1 Attach End Guard Rail to Post 01 and Post 02 with 75 % M6 X30 mm L X 1 Step 2 Attach End Guard Rail to Post 03 and Post 04 with 75 % M6 X 30 mm L X 1...
- Page 9 Assembly Instructions Step 1 Step 3 Attach Rear Guard Rail to Post 02 and Post 03 with 75 % M6 Plastic M6 Metal M6 Spring washer washer washer M6 X 30 mm L X 1 Step 1 Step 4 Insert Ladder into Post 04 with...
- Page 10 Assembly Instructions Step 5 a:Attach Front Guard Rail to Post 01 with , and Post 04 with b:Attach Ladder to Front Guard Rail with 75 % M6 Plastic M6 Metal M6 Spring washer washer washer L X 1 M6 X 30 mm M6 X 25 mm M6 X 17 mm Step 6...
- Page 11 Assembly Instructions Step 7 a: Attach Left Shelf Support Frame to Post01 and Post 02 with b: Attach Right Shelf Support Frame to Post and Post 04 with c: Attach Main Shelf Support to Post 02 and Post 03 with 75 % M6 X 17 mm M6 X 60 mm...
- Page 12 Assembly Instructions Step 9 Attach Desk Support Rail 01 to Desk Support Rail 02 54b x3 with 54a x2 75 % M6 X 38 mm L X 1 Step 10 a:Attach Desk Support Rail to Side Rail with b:Attach Desk Support Rail to Post 02 Post 03 with...
- Page 13 Assembly Instructions Step 1 Step 11 a:Attach Lower Shelf Support to Bottom Shelf with b:Attach Pad to Lower 57 x2 75 % Shelf Support M6 X 38 mm L X 1 Step 12 Attach Lower Shelf Support to Post 01 and Post 02 with 75 %...
- Page 14 Assembly Instructions Step 13 a: Attach Left Shelf Left Shelf Support Frame with b: Attach Right Shelf Right Shelf Support Frame with c: Attach Main Shelf Main Shelf Support with 75 % L X 1 M6 X 38 mm DX11 Step 14 Twist the X cover to open the cable grommet.
- Page 15 Assembly Instructions Step 15 Attach Rear Desktop Desk Support Rail 01 with 75 % L X 1 M6 X 38 mm Step 16 Attach Front Desktop to Desk Support Rail 01 with 75 % L X 1 M6 X 38 mm...
- Page 16 Assembly Instructions Step 17 Attach Side Mesh Panel 53 x2 to Post 03 and Post 04 with 75 % The edgefolds on mesh panels should be towards inside of bed. M6 X 17 mm L X 1 Step 18 Attach Side Mesh Panel 53 x3 to Post 01 and Post 02...
- Page 17 Assembly Instructions Step 19 a:Attach Rear Mesh Panel to Post 02 and Post 52 x2 with b:Attach Rear Mesh Panel together with 52 x2 The edgefolds on mesh panels should be towards outside of bed. 75 % M6 X 17 mm L X 1 MX 1 NX10...
- Page 18 Assembly Instructions Step 20 a: Secure the Slats Rear Guard Rail Front Guard Rail b: Secure the Plastic Plug to Rear Guard Rail 15 x48 and Front Guard Rail...
- Page 19 Assembly Instructions Step 21 Secure Slat Spacer 16 x23 Slats Step 22 Attach Bracket to End 31 x4 Guard Rail with 7 x2 75 % M6 X 17 L X 1...
- Page 20 Assembly Instructions Step 23 Assembly is complete 100%...
- Page 21 For your safety, it is imperative to fix your furniture to the wall. Please source the right wall mounting hardware according to the nature of wall.
- Page 22 A Guide to Wall Mounting & Fixings …… ι Important: When drilling into walls always 土 豆 check that there are no hidden wires or pipes etc. If pla ;tic wall plugs Make SU e that the screws and wall plugs being used 「...
Need help?
Do you have a question about the GAMING BUNK BED and is the answer not in the manual?
Questions and answers