Advertisement
Available languages
Available languages
Quick Links
INSTRUCTIONS
INTERIOR DOOR
HANDLE
15761
BEFORE YOU BEGIN:
• Always wear proper safety
equipment when performing repairs.
• Ensure at your point of purchase
that this part fits your exact
vehicle configuration.
• Reference the appropriate service
manual for your vehicle. If you do
not have a service manual, and do
not have the training or experience
to perform the necessary
procedures correctly, seek the
services of a qualified technician.
NEED HELP?
Please call our Technical Support
team for assistance from our team of
certified automotive experts.
1-866-933-2911
© 2023 No reproduction in whole or in part without prior written approval.
15761_Instructions
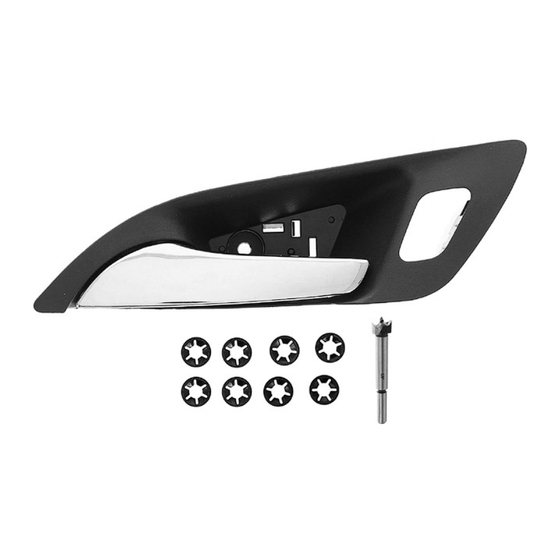
KIT CONTENTS
•
Interior door handle
•
Drill bit
•
Push nuts (Qty: 8)
INSTRUCTIONS
STEP 1:
Remove door panel. Place on soft surface to
prevent damage. Remove vapor barrier for reuse.
STEP 2:
Push on two indicated tabs to remove bowl
handle trim. A slotted screwdriver or pick can be
used if necessary.
STEP 3:
Drill six indicated plastic welds with included
Forstner bit. Place center of Forstner bit in center
of plastic weld and drill deep enough ONLY to
break plastic weld. Alternatively, other tools may
be employed to minimize damage to door panel.
STEP 4:
Remove door handle by applying pressure to back
of handle assembly.
Dorman Products, Inc. Corporate Office and Customer Service: 1-800-523-2492.
Disclaimer: It is impossible in these instructions to account for all possible circumstances or situations that you may experience when at-
tempting to install this product. Please consult with a qualified auto technician before attempting to perform any work you are not qualified to
do. Automobiles can be hazardous to work on; be sure to take all necessary safety precautions. Failure to do so may result in property damage
or personal injury. Certain motor vehicle standards and performance requirements may apply to your motor vehicle (such as Federal Motor
Vehicle Safety Standards by the National Highway Traffic Safety Administration). Be sure that your work is performed in accordance with such
standards and that you do not disable any motor vehicle safety feature.
STEP 4 (CONT.):
STEP 5:
Using a slotted screwdriver or pick, remove door
lock switch while keeping constant pressure on
door lock buttons to aid in removal. Install door
lock switch on new door handle.
STEP 6:
Remove plastic cover from new door handle and
slide door handle into door panel, rear side first.
STEP 7:
Install included push nuts on six exposed posts
on rear side of door panel, where original plastic
welds were located. Use flat nose pliers or 9mm
socket to press push nuts into place.
STEP 8:
Install original bowl handle trim on new
door handle.
STEP 9:
Install vapor barrier on door panel. Install door
panel on vehicle.
PAGE 1 OF 3
Advertisement

Related Manuals for Dorman 15761


Summary of Contents for Dorman 15761
- Page 1 1-866-933-2911 Dorman Products, Inc. Corporate Office and Customer Service: 1-800-523-2492. Disclaimer: It is impossible in these instructions to account for all possible circumstances or situations that you may experience when at- tempting to install this product. Please consult with a qualified auto technician before attempting to perform any work you are not qualified to do.
- Page 2 Instale el panel de la puerta en el vehículo. 1-866-933-2911 Dorman Products, Inc. Oficina Corporativa y Servicio a Clientes: 1-800-523-2492. Descargo de responsabilidad: Es imposible que estas indicaciones tengan en cuenta todas las posibles circunstancias o situaciones en las que se puede encontrar al intentar instalar este producto. Consulte con un técnico de automóviles calificado antes de intentar realizar cualquier trabajo para el que no esté...
- Page 3 Installez le panneau de porte sur le véhicule. 1-866-933-2911 Dorman Products, Inc. Siège social et service à la clientèle : 1 800 523-2492. Avis de non-responsabilité : Il est impossible dans ces instructions de tenir compte de toutes les circonstances ou situations possibles que vous pourriez rencontrer en essayant d’installer ce produit.
Need help?
Do you have a question about the 15761 and is the answer not in the manual?
Questions and answers