Advertisement
USER MANUAL
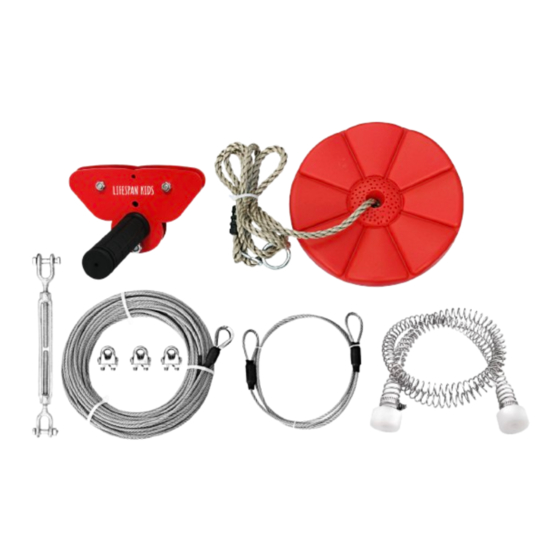
Woomera Flying Fox Kit
with Monkey Swing
WARNING: The disassembled product may contain small parts
which pose a choking hazard to children under 3.
IMPORTANT:
This product may contain sharp points and small parts prior to assembly. The owner's manual contains
safety, assembly, use and maintenance instructions. This product must be assembled by an adult who
has read and understood these instructions. Keep the packaging away from children and dispose of all
packaging before use.
For the installer and your children's safety, it is important to fully read and understand the instructions
and safety hazards before commencing the assembly of the product.
NOTE:
This manual should not be used to guide your purchasing decision. Your product, and the contents
inside its carton, may vary from what is listed in this manual. This manual may also be subject to
updates or changes. Updated manuals are available through our website at www.lifespankids.com.au.
Find the Digital
Manual Online
Advertisement
Table of Contents

Related Manuals for LifeSpan Kids Woomera Flying Fox Kit with Monkey Swing


Summary of Contents for LifeSpan Kids Woomera Flying Fox Kit with Monkey Swing
- Page 1 USER MANUAL Woomera Flying Fox Kit with Monkey Swing Find the Digital Manual Online WARNING: The disassembled product may contain small parts which pose a choking hazard to children under 3. IMPORTANT: This product may contain sharp points and small parts prior to assembly. The owner’s manual contains safety, assembly, use and maintenance instructions.
-
Page 2: Table Of Contents
TABLE OF CONTENTS I. WARNING II. SAFETY INSTRUCTIONS III. ASSEMBLY INSTRUCTIONS IV. MAINTENANC V. WARRANTY... -
Page 3: Warning
I. WARNING WARNING: Choking Hazard This product contains small parts. Do not allow children under 3 years of age near the parts or the assembly area. WARNING: Choking Hazard This product contains small parts that if swallowed can cause injury or death. Keep small children away. Do not wear a helmet as it may become tangled with rope and cause injury or death. -
Page 4: Safety Instructions
II. SAFETY INSTRUCTIONS BE SAFE! ALWAYS FOLLOW THESE RULES! • To be set up and installed by an Adult. • Adult supervision is always required. • No recommended for children under 8 years of age. • Maximum weight 250lbs (113kg). •... - Page 5 CABLE ATTACHMENT HEIGHT GUIDELINE Assuming a level course, lets start at the end. The Finish Point (FP) should be at least 2 feet higher than the tallest rider, so let’s assume the rider is 5 feet, to the FP should be 7 feet off the ground. The Start Point (SP) height needs to be higher of course to create a safe Drop.
-
Page 6: Assembly Instructions
III. ASSEMBLY INSTRUCTIONS P A R T S L I S T P A R T S L I S T 1. 1 Trolley size 5.9in (15cm) x 3.74in (9.5cm) with sealed ball bearing pulleys providing smooth operation. 2. 1 Main cable 95 foot (29m), 3/16in (.48cm) galvanized steel cable, with looped eye on one end. 3. - Page 7 S E T U P STEP 1 The shorter ‘Sling’ cable is used to wrap around the tree that will be used as the Starting Point at a height computed from the Height Guideline. After fully extending the turnbuckle, attach it to the two loops on the ends of the sling cable and tighten the bolt and nut.
- Page 8 STEP 4 Tune the zip line by tightening the turnbuckle, which will tighten up the line. Note: after the first rider has used the Zip line, re-torque the clamps as a precaution against loosening. STEP 5 Launching platform must be stable and not prone to rocking. It should be tall enough to allow the shortest riders to easily reach the trolley.
- Page 9 CABLE ASSEMBLY 1. Carefully follow instructions enclosed. 2. Make sure that trees, or other uprights selected for fastening cable ends, will safely support the full weight of anyone using zip line. 3. As a safety measure, it is recommended that all cable clamps and other connections be checked after a half hour’s running time and at regular intervals thereafter.
- Page 10 BRAKING SYSTEM Take the end of your zip line and insert the cable through the hole in the Spring Brake. IMPORTANT: Be sure to put the Spring brake between the trolley and the End Point. Attach your zip line to the end point (see sip line instructions). Place the spring brake on the End Point side and keep a safe distance from the End Point.
- Page 11 TEST THE BRAKE Using the 200lbs (90.7kg) weight attached to the trolley, test the brake to see if working properly. Run the weight attached to the trolley down to where it engages the Spring Brake. It should slow the trolley down gradually and to and complete stop BEFORE it reaches the end point. If it reaches the end point, simply move the anchor bag back up and parallel to the course until the brake blocks stop prior to the finish point.
- Page 12 FINE TUNE- UP Stress test before using. The rider should never hit the Finish Point U-Clamps. When testing, if the trolley hit the U-clamps, lower the Start Point or raise the Finish Point slightly. The rider should slow down past the mid-point as the sag in the cable comes into play. •...
-
Page 13: Maintenanc
IV. MAINTENANCE SAFETY FIRST! CHECK YOUR INSTALLATION BEFORE EACH USE. • Bring the rope and swing inside whenever the temperature drops below 32 degrees Fahrenheit (0 degrees Celsius). • Before Every use, check the trolley, steel line, rope, knot, support and all connections for any hint of deterioration, excess wear, rope fraying, breaks or sharp edges and replace as necessary. -
Page 14: Warranty
If you have purchased this product from the Official Lifespan Kids website, please visit www.lifespankids.com.au/warranty-form For support outside of warranty, if you wish to purchase replacement parts or request a repair or service, please visit www.lifespankids.com.au/warranty-form and fill in our Repair/Service Request Form or... - Page 16 w w w . li f e s p anki ds . c o m . a u...
Need help?
Do you have a question about the Woomera Flying Fox Kit with Monkey Swing and is the answer not in the manual?
Questions and answers