Table of Contents
Advertisement
Quick Links
Nutrunners
Valid from Serial No. B-00000-000000 to C-99999-999999
Models:
CP8603
CP8603C
CP8603CQ
CP8603TC
CP8613
CP8613C
CP8613CQ
CP8613TC
CP8613 WOB
CP8613C WOB
CP8613CQ WOB
CP8613TC WOB
CP8626
CP8626C
CP8626CQ
CP8626TC
CP8641
CP8641C
CP8641CQ
CP8641TC
CP8681
CP8681C
CP8681CQ
CP8681TC
Read all safety warnings and instructions.
Failure to follow the safety warnings and instructions may result in
electric shock, fire and/or serious injury.
Save all warnings and instructions for future reference.
6151570380
6151570390
6151570400
6151570410
6151570000
6151570010
6151570020
6151570070
6151570340
6151570350
6151570360
6151570710
6151570030
6151570040
6151570050
6151570080
6151570060
6151570070
6151570080
6151570690
6151570090
6151570190
6151570200
6151570700
WARNING
Product Informations
Printed Matter No. 6159990070
Date: 2024-04. Issue No. 02
Advertisement
Table of Contents

Related Manuals for Chicago Pneumatic CP86 Series


Summary of Contents for Chicago Pneumatic CP86 Series
- Page 1 Product Informations Printed Matter No. 6159990070 Date: 2024-04. Issue No. 02 Nutrunners Valid from Serial No. B-00000-000000 to C-99999-999999 Models: CP8603 6151570380 CP8603C 6151570390 CP8603CQ 6151570400 CP8603TC 6151570410 CP8613 6151570000 CP8613C 6151570010 CP8613CQ 6151570020 CP8613TC 6151570070 CP8613 WOB 6151570340 CP8613C WOB 6151570350 CP8613CQ WOB 6151570360...
-
Page 2: Table Of Contents
Summary Product information ........................2 General information ......................... 2 Website ........................... 2 For Connected and Connected Quality versions tools ..............2 Product description ........................3 Installation instructions ........................ 4 Tool power supply........................4 Insert the battery........................4 Remove the battery......................... 4 Install the reaction bar. -
Page 3: Product Information
• Save all safety information and instructions for future reference. Website Log in to Chicago Pneumatic: www.cp.com. You can find information concerning our products, accessories, spare parts and published matters on our website. For Connected and Connected Quality versions tools To unblock all functionalities of CP86 “Connected”... -
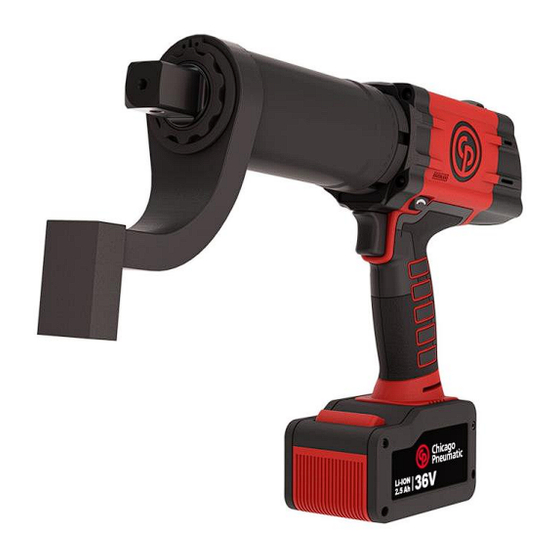
Page 4: Product Description
Product description 1. Second trigger 2. Principal trigger 3. Display screen 4. Settings buttons 5. Reporting LEDs 6. Reverse button 7. Reaction bas s-type (delivered with the tool) 8. Handle (gripping surface) p. 3... -
Page 5: Installation Instructions
Installation instructions Tool power supply. On delivery, the battery CP36XP25 (8940176068) is in deep sleep mode. To wake up the batteries remove white protective sticker, and plug the battery to CP charger CP18-36CH (8940176069) To get more information on the battery charger, refer to the Product Instructions: 8940176811. To get more information on the battery pack, refer to the Product Instructions: 8940176810. -
Page 6: Install The Reaction Bar
Install the reaction bar. Install the socket. p. 5... -
Page 7: Operating Instructions
Operating instructions p. 6... - Page 8 Starting the tool Fit the tool with a suitable socket. Set the appropriate program on the tool. Hold the tool by means of the handle, place the reaction bar on a suitable reaction point and apply to the fastener to be tightened. WARNING Risk of Injury As the reaction force increases in proportion to the tightening torque, there is a risk of severe bodily injury of the operator as a result of unexpected behavior of the tool.
-
Page 9: Operating The Tool
Operating the tool. 1. Tool name 2. Battery level 3. Target torque 4. Type of application* 5. Action for the buttons 6. Buttons (x3) * Types of application: Forward mode. Neutral. Reverse mode. p. 8... -
Page 10: Mode
Mode Forward mode. Reverse mode. Neutral position. In neutral position, you have this message on the display. p. 9... -
Page 11: Torque Set Up
Torque set up. Reduce target torque, in forward mode. ➔ ➔ Increase target torque, in forward mode. ➔ ➔ In reverse mode. p. 10... -
Page 12: Stand-Alone Tools Menu
Stand-alone tools menu. To enter the menu, press the central button for 2-3 seconds. To scroll through the menu, press the right (or left) button. ➔ ➔ ➔ ➔ To return to the main page, press the central button when you're in the "Back" screen. p. -
Page 13: Maintenance Menu
Maintenance menu. To enter the maintenance menu, press the central button when you're in this screen. To scroll through the menu, press the right (or left) button. Values are the global values. ➔ ➔ ➔ ➔ To return to the main page, press the central button when you're in the "Back" screen. p. -
Page 14: Tool Infos Menu
Tool infos menu. To enter the tool infos menu, press the central button when you're in this screen. To scroll through the menu, press the right (or left) button. ➔ ➔ ➔ ➔ To return to the main page, press the central button when you're in the "Back" screen. p. -
Page 15: Select Unit Menu
Select unit menu. To change the unit, press the central button when you're in this screen. ➔ ➔ To return to the main page, scroll to the "Back" screen, and press the central button. ➔ ➔ p. 14... -
Page 16: Troubleshooting
Troubleshooting Usage Why? One of the triggers has been released during tightening. Torque or angle achieved is shown. Flashing between the two screens. Solution: Maintain both triggers until end of tightening. ➔ Why? Torque higher than maximum authorized or angle not achievable because of tool capacity exceeded. -
Page 17: Maintenance
Maintenance Why? The nutrunner needs a maintenance due to time of operation. Default threshold: 3600s. Solution: Contact your service center. Why? The nutrunner needs a maintenance due to too many drops. Default threshold: 5. Solution: Contact your service center. Why? The nutrunner needs a maintenance due to number of tightening. - Page 18 Battery Why? Level of battery is under 25%. Solution: Replace battery by fully loaded battery as soon as possible (refer to battery wake up procedure if needed) Immediately charge the low battery to prevent it from going into deep discharge. Battery level: 76% <...
- Page 19 Other Why? The tool cannot communicate with the battery. Solution: Check if you are using the right battery (8940176068). Check the pins of the battery connector and the tool connector. Contact your service center. Why? Triggers have been used in bad order. Solution: Press the second trigger and maintain (1), then press main trigger (2) and...
-
Page 20: Faq
Tool doesn’t start. 1. Check that your Battery is awake. 2. Check Battery charge level. 3. Press both triggers to reset the boot. 4. If the problem occurs again, contact your CP representative for support. Your tool cannot connect to CPLinQ. 1. -
Page 21: Service & Maintenance
Service & maintenance Overhaul and preventive maintenance are recommended at regular intervals. Maintenance should be performed by qualified personnel only. Website Information concerning our Products, Accessories, Spare Parts, exploded views and Published Matters can be found on the CP website. Please visit: www.cp.com. The use of spare parts other than those originally supplied by the manufacturer may result in a drop in performance or in increased maintenance and level of vibration and in the full cancellation of the manufacturer’s liability.
Need help?
Do you have a question about the CP86 Series and is the answer not in the manual?
Questions and answers