Table of Contents
Advertisement
Quick Links
M153-2 殿部筋肉内注射シミュレーター(装着型)
取 扱 説明書
この製品での注射実習には
「水」
必ず
また、針先の曲がった注射器は使用しないでください!
※「水」は「水道水」または「注射用蒸留水」をお使いください。
1 はじめに ・・・・・・・・・・・・・ 1
2 製品内容 ・・・・・・・・・・・・・ 1
3 取り扱い上の注意点 ・・・ 2
4 かんたん準備ガイド ・・・ 3
下記の URL および右の QR コード
ことができます。使い方を動画で紹介していますのでご参照ください。
●株式会社坂本モデル 「 "でんちゅう" くんライト」 紹介ページ
https://www.sakamoto-model.co.jp/product/injection/m153_2/
※「 QR コード」は ( 株 ) デンソーウェーブの登録商標です。
ライト ト
ライ
※
を使用してください!
※
から弊社 HP の製品紹介ページを見る
The English edition starts from page 12.
もくじ
5 使い方 ・・・・・・・・・・・・・ 5
6 お手入れ・保管 ・・・・・ 8
7 困ったときは ・・・・・・・ 9
8 仕様 ・・・・・・・・・・・・・・・ 10
蒸
蒸
薬
薬
薬
薬
留
留
水
水
210910
Advertisement
Table of Contents

Related Manuals for Sakamoto Model Buttockmate Right M153-2


Summary of Contents for Sakamoto Model Buttockmate Right M153-2
-
Page 1: Table Of Contents
The English edition starts from page 12. M153-2 殿部筋肉内注射シミュレーター(装着型) ライ ライト ト 取 扱 説明書 この製品での注射実習には 蒸 蒸 「水」 薬 薬 薬 薬 必ず ※ を使用してください! 留 留 水 水 また、針先の曲がった注射器は使用しないでください! ※「水」は「水道水」または「注射用蒸留水」をお使いください。 もくじ 1 はじめに ・・・・・・・・・・・・・ 1 5 使い方 ・・・・・・・・・・・・・ 5 2 製品内容 ・・・・・・・・・・・・・ 1 6 お手入れ・保管 ・・・・・ 8 3 取り扱い上の注意点 ・・・ 2 7 困ったときは ・・・・・・・ 9 4 かんたん準備ガイド ・・・ 3 8 仕様 ・・・・・・・・・・・・・・・ 10 下記の... -
Page 2: 1 はじめに
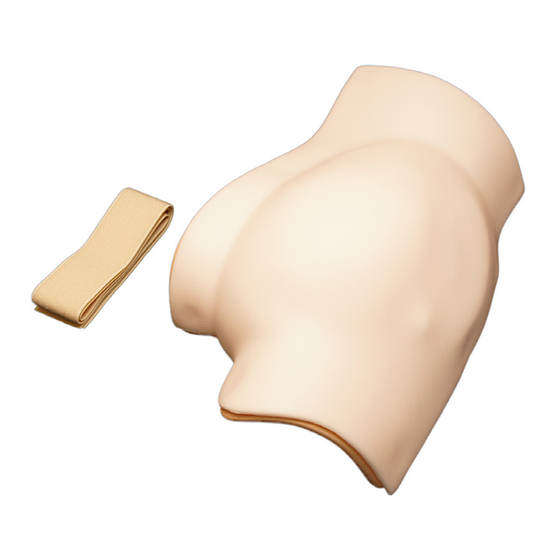
1 はじめに 「 “でんちゅう” くんライト」 をお買い上げいただきありがとうございます。 この取扱説明書には、製品を安全にお使いいただくための注意事項と取り扱い方を記載し ています。本書をよくお読みのうえ、製品を安全にお使いください。 また、お読みになったあとは、いつでも見られるところに保管してください。 ご購入後、すみやかに内容物をご確認いただき、万一不足や破損がありましたら弊社まで ご連絡ください。 2 製品内容 本体 ×1 装着用ベルト ×1 単4形乾電池 ×2 ベビーパウダー ×1 本体の構成部品 表皮カバー センサー部 吸水スポンジ ボディー - 1 -... -
Page 3: 3 取り扱い上の注意点
3 取り扱い上の注意点 製品を安全にご使用いただくため、必ず下記をお守りください。 (特に重要な箇所にマーキング( )を記しています) ● やさしく取り扱ってください ・カッター、ハサミ、針など、鋭利なもので触れないでください。 (注射エリアには注 射針を刺すことができます。また、筋肉部に針を刺しても使用上支障はありません) ・強い力で引っ張ったりひねったりしないでください。 ・強い衝撃を加えないでください。 ● 針先が新しい注射器を使用してください 針先が曲がったり傷んだりしている注射器を使用すると、内部の破損や表皮の劣化の 原因になります。 ● 注射する液体は必ず「水」を使用してください 水以外の液体を使用すると故障や異臭の原因になります。 水は「水道水」または「注射用蒸留水」をお使いください。 ● 注射可能な部位以外に注射をしないでください 内部の構造上、注射可能な範囲に制限があります。注射エリアおよび筋肉部以外 の部位に注射をすると製品を破損する恐れがあります。 ( 「 4 かんたん準備ガイド」 (P.3 ~ 4 )参照) ● 製品に異常があるときは使用しないでください 製品を使用中に異常がある場合はすぐに使用を中止し、電池を取り出したあと、弊社 までご連絡ください。そのまま使用すると事故につながる恐れがあります。 ● ボールペンなどで書き込まないでください 表皮カバーにボールペンなどで書き込むとインクがしみ込んで消せなくなります。 ● 製品を分解・改造しないでください 使用する上で取り外す部分以外は分解しないでください。また、製品を改造しないで... -
Page 4: 4 かんたん準備ガイド
4 かんたん準備ガイド 「 “でんちゅう” くんライト」 の仕組みと開始方法を説明しています。 ご使用の前に 「取り扱い上の注意点」 ( P.2) を必ずお読みください。 ボディーから表皮カバーを取り外します。 面ファスナー (8 箇所) 表皮カバー 電池ボックス センサー部 ( ) 筋肉部 注射 エリア 面ファスナー (8 箇所) ボディー < こんなことができます > 以下の注射部位確認と注射 実習ができます! ・クラークの点 ・四分三分法による確認 ・ホッホシュテッターの部位 - 3 -... - Page 5 電池カバーを開け、付属の電池を入れて閉めます。 電池カバー 矢印の方向に 注 意 スライド 電池の + /−を 正しく組み付け 単4形乾電池 てください。 (2 本) ボディーの裏側にある電源ボタンを ON にします。 スピーカー 面ファスナー 面ファスナー 面ファスナーで装着する 表皮カバーをボディーに戻します。 装着用ベルト(面ファスナー) 装着者の腰に装着用ベルトを 巻き、 でんちゅうくん ライトを 装着します。 注 意 ・伏臥位または側臥位で装着してください。 面ファスナー - 4 -...
-
Page 6: 5 使い方
5 使い方 ■ 準備 (本体) ■ 実 習 の準備 以下のものを用意してください。 ・注射器 ・・・・・・・・・・・ 注射針のゲージは 21 ~ 25G が使用できます。 ※推奨は 21 ~ 23G です。 ※ 20G 以下(0.9mm 以上)は使用しないでください。 ・注射する液体 ・・・・「水」 (水道水または注射用蒸留水) ■ 実 習 (製品の動作) 「4 かんたん準備ガイド」 (P.3)にしたがって正しく装着できていることを確認し、実 習を行ってください。 本製品は、以下の注射部位確認と注射実習ができます。 ・クラークの点 ・四分三分法による確認 ・ホッホシュテッターの部位... - Page 7 ■ 吸水スポンジの片付けと交換方法 片付けをする場合や、破損などにより吸水スポンジを新しいものに交換する場合は、以下の 手順で吸水スポンジを脱着してください。 1 電源スイッチを OFF にします。 表皮カバーとセンサー部を取り外し、吸水スポンジを取り出します。 ボディー センサー部 (注射エリア) 吸水スポンジ タブを持って 引っ張る <再利用する場合> 吸水スポンジを絞ってから乾燥させてください。 吸水スポンジ <交換する場合> 新しい吸水スポンジを用意してください。 - 6 -...
- Page 8 吸水スポンジをボディーに取り付けます。 ボディー 吸水スポンジ センサー部をボディーに取り付け、 スナップボタン (3 箇所) を 留めます。 センサー部 ボディー 部 (3箇所) を パチンと留める スナップボタン (3箇所) ポイント センサー部を取り付ける際は、スナップボタンを確実に留めてください。 3 箇所すべてのボタンが留まっていないと、 判定ランプとチャイム音が動作しません。 表皮カバーを取り付けます。 片付ける場合は、 「お手入れ・保管」にしたがい、適切に保管し てください。 - 7 -...
-
Page 9: 6 お手入れ・保管
6 お手入れ・保管 以下の注意点を守って、製品を適切にお手入れ・保管してください。 ●保管前に内部の水分を乾燥させてください 各部の水分をよくふき取り、内部を完全に乾燥させるため半日から1日程度、陰干し してください。水分が残ったまま保管すると異臭の原因になります。 ●表面の汚れは柔らかい布で軽くふき取ってください ・ひどい汚れは、水でうすめた中性洗剤かアルコールをふくませた布でふき取り、 乾いた布でふきあげてください。 ・ベンジン、シンナー、溶剤は使用しないでください。製品の破損や表皮の劣化につな がる恐れがあります。 ・ 表皮カバーにボールペンなどで書き込むとインクがしみ込んで消せなくなります。 ●長期間使わないときは電池を取り外してください 製品の内部で電池の液もれなどが起こった場合、故障の原因になります。 ●表皮カバーの保護・べたつき防止のためにベビーパウダーを塗布してください 製品を長期間使用しない場合や表皮カバーにべたつきがある場合は、付属のベビーパ ウダーを塗布してください。 ●高温になる場所、湿気・ほこりの多い場所では保管しないでください 製品を直射日光の当たる場所や暖房器具の近く、油や水分・ほこりの多い場所で保管 すると故障や変質・劣化の原因になります。 ●表皮カバー、センサー、吸水スポンジは消耗品です これらの部品は注射を繰り返し行うことで劣化していきます。その際は、それぞれ別 売の交換部品をご購入のうえ交換してください。 - 8 -... -
Page 10: 7 困ったときは
7 困ったときは 症 状・状 況 対 処 参照ページ ・電池が正しく入っているか確 認してください。 「4 かんたん準備ガイド」 (電池が入っていない、または (P.3 ~ 4) 判定ランプが光らない + / -が逆になっている可能性 「5 使い方」 (P.7) があります) ・センサー部が正しく取り付られ ているか確認してください。 (スナップボタンが外れている可 「4 かんたん準備ガイド」 能性があります) (P.3 ~ 4) チャイム音が鳴らない ・新しい電池に交換してください。 「5 使い方」 (P.7) (電池残量が少ない可能性があり ます) 新しい電池に交換してください。 「4... -
Page 11: 8 仕様
8 仕様 電 源 単 4 形乾電池 DC 3 V 重 量 1.78 kg 寸 法 W 43 cm × D 25 cm × H 13 cm 寸法(箱) W 46 cm × D 29 cm × H 15 cm - 10 -... - Page 12 - 11 -...
- Page 13 URL or the QR code* at right. The page includes a video that you can watch which shows how to use the product. ● Sakamoto Model Corporation's Introductory page for the "Buttockmate Right" https://www.sakamoto-model.com/product/injection/m153_2/ * QR code is a registered trademark of Denso Wave Inc.
- Page 14 In addition, after reading the manual, keep it in a safe place where it can be referred to at any time later on. After purchasing the product, check the package contents carefully to make sure that nothing is missing or broken. If you notice any problems, contact Sakamoto Model. 2 Product contents Main unit X 1...
- Page 15 ● There are limits to the effectiveness of simulator training. This product is a simulator capable of supporting advanced medical training. However, Sakamoto Model does not guarantee that training using this product will provide the same level of expertise as actual treatment.
- Page 16 4 Quick Preparation Guide This guide describes the mechanism and how to start using the "Buttockmate Right". Be sure to read the "Cautions on use" (P.14) before using this product. Remove the skin cover from the body. Fastener (8 places) Skin cover Battery compartment Sensor ...
- Page 17 Open the battery compartment cover, insert the accessory batteries, and then close the cover. Battery compartment Slide in the CAUTION cover direction of Insert the the arrow batteries so that AAA-size batteries the polarities (2 pcs.) are correct. Press the power button on the underside of the body to turn on the power.
- Page 18 5 How to use ■ 準備 (本体) ■ Preparation for training Prepare the following items. ・Syringe・・・・・・・・・・Injection needles with a gauge of between 21G and 25G can be used. * Between 21G and 23G is recommended. * Do not use needles which are 20G or less (0.9 mm or more). ・Injection liquid・・・・Water (either tap water or distilled water for injection use) ■...
- Page 19 ■ Putting away and replacing the absorbing sponge When putting away the absorbing sponge or replacing it with a new one because it has become damaged, remove it by following the procedure given below. 1 Turn off the power switch. Remove the skin cover and sensor area, and then take out the absorbing sponge.
- Page 20 Insert the absorbing sponge into the body. Body Absorbing sponge Install the sensor area to the body, and then fasten the snap buttons (3 places). Sensor area Body Fasten the area (3 places) with a punch. Snap buttons (3 places) T I P Securely fasten the snap buttons when installing the sensor area.
- Page 21 6 Cleaning and storage Be sure to observe the following when cleaning and storing the product. ● Dry out the inside of the product before storing it. Thoroughly wipe off the water from all parts, and then let the product stand for about half a day to a day to allow the inside to fully dry out.
- Page 22 「5 How to use」 when the power is turned (P.18 - 19) Stop using the product and There is a disagreeable contact Sakamoto Model. ― odor. (The inside of the main unit may be corroded.) If any problems are not fixed when the remedies given above are carried out, contact Sakamoto Model.
- Page 23 8 Specifications Power supply AAA-size batteries DC 3 V Weight 1.78 kg Dimensions W 43 cm×D 25 cm×H 13 cm Dimensions W 46 cm×D 29 cm×H 15 cm (packaging) - 22 -...
- Page 24 ● 製品内容の一部は他メーカーのものを使用しており、 製品名称などが商標登録 (TM、 ®) されてい る場合があります。 ● Some of the components used in this product are manufactured by other companies, and product names, etc. for these components may be trademarks or registered trademarks of the manufacturers. 京都市左京区下鴨東高木町34 O v e r s e a s S a l e s D e p a r t m e n t 〒606-0865 1 - 9 - 2 9 , S e n b a h i g a s h i , M i n o h C i t y, 075-701-1135...
Need help?
Do you have a question about the Buttockmate Right M153-2 and is the answer not in the manual?
Questions and answers