Table of Contents
Advertisement
Quick Links
LARGE CHARCOAL BARBECUE
GFCSBBQL
Please scan the QR code for step by step video assembly
instructions. Alternatively, you can visit:
bbqs.georgeforeman.co.uk. From here, please select the
product that you are looking to build and view the 'How
To' video located at the bottom of the page.
WARNING: PLEASE ENSURE YOU HAVE READ
THROUGH THE SAFETY AND OPERATING
INSTRUCTIONS BEFORE USE.
PLEASE RETAIN INSTRUCTIONS FOR FUTURE REFERENCE
For Customer Services and Spare Parts please call 0345 209 7461
Or visit us at bbqs.georgeforeman.co.uk
Advertisement
Table of Contents

Related Manuals for George Foreman GFCSBBQL


Summary of Contents for George Foreman GFCSBBQL
- Page 1 LARGE CHARCOAL BARBECUE GFCSBBQL Please scan the QR code for step by step video assembly instructions. Alternatively, you can visit: bbqs.georgeforeman.co.uk. From here, please select the product that you are looking to build and view the ‘How To’ video located at the bottom of the page.
-
Page 2: Table Of Contents
CONTENTS Page(s) Safety Instructions BBQ Parts List & Feature Diagram BBQ Assembly 8-18 Lighting your BBQ Food Safety Cleaning Instructions Guarantee and Customer Services Notes GFCSBBQL... -
Page 3: Safety Instructions
CAUTION - if meat has been cooked sufficiently the meat juices should be clear in colour and there should be no traces of pink/red juices or meat colouring. • After cooking with your BBQ always clean the grill cooking surfaces and utensils. GFCSBBQL... - Page 4 WARNING - Failure to follow instructions could result in death, serious bodily injury and/or property loss. Carbon Monoxide Do Not use in Do Not Use Do Not Use in Use in Open Poisoning Hazard Motor Homes Indoors Tents Spaces GFCSBBQL...
- Page 5 Do not use these materials to light or relight also. • DO NOT store the barbecue until the fire is completely out and surfaces are cold; also do not store the barbecue with ashes or combustible materials inside. GFCSBBQL...
-
Page 6: Bbq Parts List & Feature Diagram
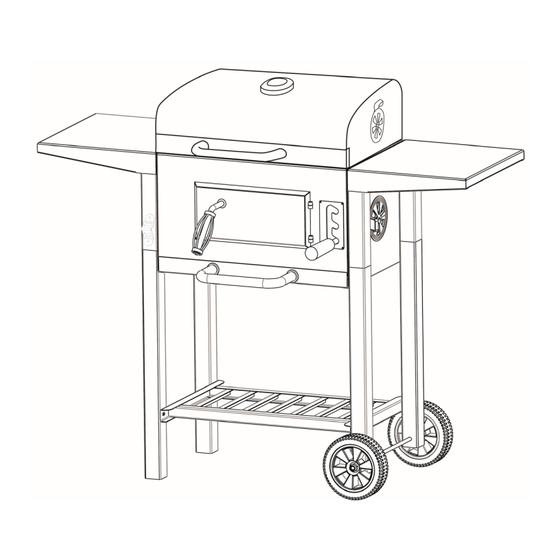
M6 Nut Ash tray Pin Bolt Upper cooking grid Cooking grid Adjustment pole bracket You will also need (not included): Phillips head screwdriver Adjustable wrench Wrench ATTENTION: Check that all parts listed on this page are present prior to assembly GFCSBBQL... - Page 7 FEATURE DIAGRAM GFCSBBQL...
-
Page 8: Bbq Assembly
• Attach the air vents (2) onto the main body (1), using 4 each of the “B” Screws, “C” Washers, and “D” Nuts. • Ensure the screws are placed on the outside of the main body and the nuts and washers are placed on the inside of the main body. • 4 PCS 4 PCS 4 PCS GFCSBBQL... - Page 9 Lay the main body (1) on a flat surface as shown below and attach the left bottom legs (3) and right bottom legs (4) onto the main body (1). Secure in place using 8 each of the “A” Screws, as displayed in the diagram below. 8 PCS GFCSBBQL...
- Page 10 STEP 3 – Attaching the bottom shelf • Secure the bottom shelf (5) to the left bottom legs (3) and right bottom legs (4), using 4 each of the “A” Screws, as displayed in the diagram below. 4 PCS GFCSBBQL...
- Page 11 • Place the remaining wheel (6) onto the other end of the axle (7), and secure using 1 each of the “F” Washers and “E” Nuts, as shown in the diagram below. 2 PCS 2 PCS GFCSBBQL...
- Page 12 STEP 5 – Attaching the shelves • Attach the shelves (8) onto the main body (1) by sliding them onto the upper legs as shown. Secure in place using 4 each of the “A” Screws, as displayed in the diagram below. 4 PCS GFCSBBQL...
- Page 13 • Secure the Adjustment Pole Bracket (19) to the Adjustment Pole (10) using 1 “G” Bolt, as displayed in the diagram below. 1 PC 1 PC GFCSBBQL...
- Page 14 BBQ ASSEMBLY STEP 7 – Inserting the charcoal tray • Insert the Adjustable Charcoal Tray (11) into the Main Body (1) as shown below. GFCSBBQL...
- Page 15 Then use the Adjustment Pole Bracket (19) to secure the assembled adjustment pole to the brackets on the side of the Adjustable Charcoal Tray (11), using 1 each of the “I” Bolts, and “J” Nuts, as displayed in the diagram below. 4 PCS 1 PC 1 PC GFCSBBQL...
- Page 16 Ensure that handle is correctly aligned before securing; when locked the handle should be pointing down while the locking piece protrudes upwards. • Attach the Door (14) to the Main Body (1) by slotting it into the hinges. Handle cap 4 PCS GFCSBBQL...
- Page 17 Ensure the bottle opener is correctly aligned before securing; the bottle opener should be flat along the top, and then angled towards the leg underneath. • Slide the constructed ash tray into the space at the bottom of the main body. 2 PCS GFCSBBQL...
- Page 18 Insert the Upper Cooking Grid (17), into the Main Body (1) by securing it in the holes supplied, as shown in the diagram below. • Then insert both of the Cooking Grids (18), into the Main Body (1) , as demonstrated in the diagram below. Your BBQ is now assembled. GFCSBBQL...
-
Page 19: Lighting Your Bbq
WARNING: Accessible parts will be hot – avoid touching the BBQ while hot, however if it is necessary, make sure to wear oven gloves when touching the barbecue. WARNING: Do not extinguish with water as this may damage the barbecue. GFCSBBQL... -
Page 20: Food Safety
• To check whether meat, particularly poultry, is cooked, pierce the flesh with a skewer or fork; the juices should run clear. Ensure the product is piping hot throughout. GFCSBBQL... -
Page 21: Cleaning Instructions
Avoid using abrasive cleaners, wire wool, and brushes as these may scratch the surface. • When not in use this barbecue should be stored in a dry location, such as a garage or shed, or under a waterproof cover. GFCSBBQL... -
Page 22: Guarantee And Customer Services
It must be used for domestic purposes only and for its intended use. • This guarantee does not cover wear and tear, damage, misuse or consumable parts. This does not affect your statutory rights. For Customer Services & Spare Parts please call 0345 209 7461 Or visit us at bbqs.georgeforeman.co.uk GFCSBBQL... -
Page 23: Notes
NOTES GFCSBBQL... - Page 24 Made by Product Care Trading Limited under license from Spectrum Brands (UK) Limited. Product Care Trading Limited, Wigan, WN2 4AY/PCT (NI) Ltd, Belfast, BT5 5AD. George Foreman is the registered trademark of Spectrum Brands (UK) Ltd. The ‘wheelie bin’ symbol is known as the 'Crossed-out wheelie bin Symbol'.
Need help?
Do you have a question about the GFCSBBQL and is the answer not in the manual?
Questions and answers