Table of Contents
Advertisement
Quick Links
Advertisement
Table of Contents

Related Manuals for Axis C8110


Summary of Contents for Axis C8110
- Page 1 AXIS C8110 Network Audio Bridge User manual...
-
Page 2: Solution Overview
• AXIS Audio Manager Edge — Audio management software for small systems. Comes pre-installed on all audio devices with a firmware equal to or higher than 10.0. AXIS Audio Manager Edge user manual •... -
Page 3: Installation
AXIS C8110 Network Audio Bridge Installation Installation To watch this video, go to the web version of this document. help.axis.com/?&piaId=72748§ion=solution-overview Download the installation guide (pdf): • axis.com/products/axis-c8110/support#support-resources... -
Page 4: Get Started
Get started Find the device on the network To find Axis devices on the network and assign them IP addresses in Windows®, use AXIS IP Utility or AXIS Device Manager. Both applications are free and can be downloaded from axis.com/support. - Page 5 Secure passwords Important Axis devices send the initially set password in clear text over the network. To protect your device after the first login, set up a secure and encrypted HTTPS connection and then change the password. The device password is the primary protection for your data and services. Axis devices do not impose a password policy as they may be used in various types of installations.
-
Page 6: Additional Settings
One way to detect and record sound is to connect a microphone to the line-in connection on the audio bridge. For outdoor environments, you can use the AXIS TU1002-VE Microphone Kit. To watch this video, go to the web version of this document. - Page 7 To learn more, check out our guide Get started with rules for events. Play audio when a camera detects motion This example explains how to set up the audio device to play an audio clip when an Axis network camera detects motion.
- Page 8 2.10 From the Condition list, select a video motion detection alternative under Applications. Note If there are no options for video motion detection, then go to Apps, click AXIS Video Motion Detection and turn on motion detection. 2.11 From the Action list, select Send notification through HTTP.
- Page 9 AXIS C8110 Network Audio Bridge Additional settings 4. Next to the SIP account, click > Edit. 5. Under DTMF, click + DTMF sequence. Under Sequence, enter "1". 7. Under Description, enter "stop audio". 8. Click Save. 9. Go to System > Events > Rules and click + Add a rule.
- Page 10 AXIS C8110 Network Audio Bridge Additional settings 8. Click Save. Answer the SIP call automatically after the audio clip has ended: 1. Go to Settings > System > Events > Rules and add a rule. 2. Type a name for the rule.
-
Page 11: Learn More
The Session Initiation Protocol (SIP) is used to set up, maintain and terminate VoIP calls. You can make calls between two or more parties, called SIP user agents. To make a SIP call you can use, for example, SIP phones, softphones or SIP-enabled Axis devices. -
Page 12: Nat Traversal
NAT traversal Use NAT (Network Address Translation) traversal when the Axis device is located on an private network (LAN) and you want to access it from outside of that network. Note The router must support NAT traversal and UPnP®. -
Page 13: The Web Interface
Locate device: Plays a sound that helps you identify the speaker. For some products, the device will flash a LED. Device info Shows the device information, including AXIS OS version and serial number. Upgrade AXIS OS: Upgrade the software on your device. Takes you to the Maintenance page where you can do the upgrade. Time sync status... - Page 14 Shows what kind of access to the device that is active, what encryption protocols are in use, and if unsigned apps are allowed. Recommendations to the settings are based on the AXIS OS Hardening Guide. Hardening guide: Link to AXIS OS Hardening guide where you can learn more about cybersecurity on Axis devices and best practices.
-
Page 15: Audio Clips
AXIS C8110 Network Audio Bridge The web interface Echo cancellation: Turn on to remove echoes during two-way communication. Audio clips Add clip: Add a new audio clip. You can use .au, .mp3, .opus, .vorbis, .wav files. Play the audio clip. - Page 16 AXIS C8110 Network Audio Bridge The web interface Recordings Click to filter the recordings. From: Show recordings done after a certain point in time. To: Show recordings up until a certain point in time. Source : Show recordings based on source. The source refers to the sensor.
-
Page 17: Time And Location
• Activate license with a key: If the app requires a license, you need to activate it. Use this option if your device doesn’t have internet access. If you don’t have a license key, go to axis.com/products/analytics. You need a license code and the Axis product serial number to generate a license key. - Page 18 AXIS C8110 Network Audio Bridge The web interface Synchronization: Select an option for the device’s date and time synchronization. • Automatic date and time (manual NTS KE servers): Synchronize with the secure NTP key establishment servers connected to the DHCP server.
- Page 19 AXIS C8110 Network Audio Bridge The web interface Fallback to static IP address if DHCP isn’t available: Select if you want to add a static IP address to use as fallback if DHCP is unavailable and can’t assign an IP address automatically.
- Page 20 One-click cloud connection One-click cloud connection (O3C) together with an O3C service provides easy and secure internet access to live and recorded video from any location. For more information, see axis.com/end-to-end-solutions/hosted-services. Allow O3C: • One-click: This is the default setting. Press and hold the control button on the device to connect to an O3C service over the internet.
- Page 21 Authentication failed: Sends a trap message when an authentication attempt fails. Note All Axis Video MIB traps are enabled when you turn on SNMP v1 and v2c traps. For more information, see AXIS OS Portal > SNMP. • v3: SNMP v3 is a more secure version, which provides encryption and secure passwords. To use SNMP v3, we recommend you to activate HTTPS, as the password is then sent through HTTPS.
- Page 22 When configured without a CA certificate, server certificate validation is disabled and the device tries to authenticate itself regardless of what network it is connected to. When using a certificate, in Axis' implementation, the device and the authentication server authenticate themselves with digital certificates using EAP-TLS (Extensible Authentication Protocol - Transport Layer Security).
- Page 23 AXIS C8110 Network Audio Bridge The web interface • Key agreement connectivity association key: Enter the connectivity association key (CAK). It should be either 32 or 64 hexadecimal characters long. The CAK must be manually configured in the connectivity association and must match on both ends of the link to initially enable MACsec.
- Page 24 To install test software or other custom software from Axis on the device, you need a custom signed AXIS OS certificate. The certificate verifies that the software is approved by both the device owner and Axis. The software can only run on a specific device which is identified by its unique serial number and chip ID.
- Page 25 AXIS C8110 Network Audio Bridge The web interface Add SSH account: Click to add a new SSH account. • Restrict root access: Turn on to restrict functionality that requires root access. • Enable SSH: Turn on to use SSH service.
- Page 26 AXIS C8110 Network Audio Bridge The web interface Scopes: Optional scopes that could be part of the token. Client secret: Enter the OpenID password Save: Click to save the OpenID values. Enable OpenID: Turn on to close current connection and allow device authentication from the provider URL.
- Page 27 AXIS C8110 Network Audio Bridge The web interface Loud ringer : When a SIP call is made to the audio device, a pre-defined audio clip is played as long as the rule is active. You must enable SIP for the audio device.
- Page 28 RSA is the preferred method during negotiation, followed by ECDSA, ED25519, and DSA. Make sure to enter the right MD5 host key that is used by your SFTP server. While the Axis device supports both MD5 and SHA-256 hash keys, we recommend using SHA-256 due to stronger security over MD5. For more information on how to configure an SFTP server with an Axis device, go to the AXIS OS Portal.
- Page 29 IoT integration and is used in a wide variety of industries to connect remote devices with a small code footprint and minimal network bandwidth. The MQTT client in Axis device software can simplify integration of data and events produced in the device to systems which are not video management software (VMS).
- Page 30 AXIS C8110 Network Audio Bridge The web interface Password: Enter a password for the username. Client ID: Enter a client ID. The client identifier is sent to the server when the client connects to it. Clean session: Controls the behavior at connection and disconnection time. When selected, the state information is discarded at connect and disconnect.
- Page 31 AXIS C8110 Network Audio Bridge The web interface Use default topic prefix: Select to use the default topic prefix, that is defined in the device topic prefix in the MQTT client tab. Include topic name: Select to include the topic that describes the condition in the MQTT topic.
- Page 32 AXIS C8110 Network Audio Bridge The web interface SIP setup assistant: Click to set up and configure SIP step by step. Enable SIP: Check this option to make it possible to initiate and receive SIP calls. Allow incoming calls: Check this option to allow incoming calls from other SIP devices.
- Page 33 AXIS C8110 Network Audio Bridge The web interface Accounts All current SIP accounts are listed under SIP accounts. For registered accounts, the colored circle lets you know the status. The account is successfully registered with the SIP server. There is a problem with the account. Possible reasons can be authorization failure, that the account credentials are wrong, or that the SIP server can’t find the account.
- Page 34 DNS. Windows SMB/CIFS names are not supported. • Network share: Enter the name of the shared location on the host server. Several Axis devices can use the same network share since each device gets its own folder.
- Page 35 AXIS C8110 Network Audio Bridge The web interface Write protect: Turn on to stop writing to the network share and protect recordings from being removed. You can’t format a write-protected network share. Retention time: Select how long to keep recordings, to limit the amount of old recordings, or to comply with regulations regarding data storage.
- Page 36 When you create an ONVIF account, you automatically enable ONVIF communication. Use the account name and password for all ONVIF communication with the device. For more information see the Axis Developer Community at axis.com. Add accounts: Click to add a new ONVIF account.
- Page 37 AXIS C8110 Network Audio Bridge The web interface Audio encoder : Select the audio encoding format for your configuration. • Select configuration: Select a user-defined configuration from the list and adjust the audio encoding settings. The configurations in the drop-down list act as identifiers/names of the audio encoder configuration.
- Page 38 AXIS C8110 Network Audio Bridge The web interface Port Name: Edit the text to rename the port. Direction: indicates that the port is an input port. indicates that it’s an output port. If the port is configurable, you can click the icons to change between input and output.
-
Page 39: Plain Config
AXIS OS upgrade: Upgrade to a new AXIS OS version. New releases can contain improved functionality, bug fixes, and completely new features. We recommend you to always use the latest AXIS OS release. To download the latest release, go to axis.com/support. - Page 40 AXIS OS version after the upgrade. • Autorollback: Upgrade and confirm the upgrade within the set time. If you don’t confirm, the device reverts to the previous AXIS OS version. AXIS OS rollback: Revert to the previously installed AXIS OS version.
-
Page 41: Troubleshooting
Check the current AXIS OS version AXIS OS determines the functionality of our devices. When you troubleshoot a problem, we recommend that you to start by checking the current AXIS OS version. The latest version might contain a correction that fixes your particular problem. -
Page 42: Technical Issues, Clues And Solutions
Axis device. Check all cabling and reinstall the device. Possible IP address conflict The static IP address in the Axis device is used before the DHCP server sets a dynamic address. with another device on the... - Page 43 AXIS C8110 Network Audio Bridge Troubleshooting Media clips are played with A sound file is recorded with a certain gain. If your audio clips have been created with different different volumes gains, they will be played with a different loudness. Make sure that you use clips that have the...
-
Page 44: Specifications
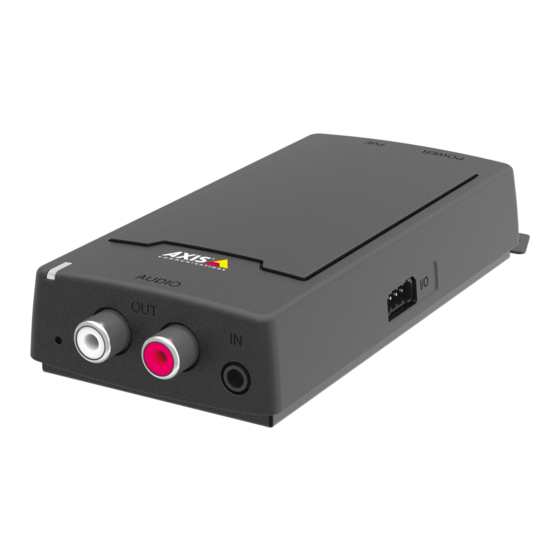
AXIS C8110 Network Audio Bridge Specifications Specifications Product overview Power connector (DC) Network connector SD memory card slot Status LED indicator Control button RCA connector Audio-in connector I/O connector LED Indicators Status LED Indication Unlit Unlit for normal operation. Green Steady green for normal operation. - Page 45 The product shall be connected using a shielded network cable (STP). All cables connecting the product to the network shall be intended for their specific use. Make sure that the network devices are installed in accordance with the manufacturer’s instructions. For information about regulatory requirements, see the Installation Guide at www.axis.com. I/O connector Use the I/O connector with external devices in combination with, for example, motion detection, event triggering, and alarm notifications.
- Page 46 AXIS C8110 Network Audio Bridge Specifications DC ground DC output 12 V, max 50mA I/O configured as input I/O configured as output RCA connector 1 White connector 2 Red connector Audio output Audio out (left) Audio out (right)
-
Page 47: Api Commands
AXIS C8110 Network Audio Bridge API commands API commands VAPIX® is Axis’ own open API (Application Programming Interface). You can control almost all functionality available in Axis devices through VAPIX®. To get access to the complete VAPIX® documentation, join Axis Developer Community at axis.com/developer-community Enter the commands in a web browser, and replace <deviceIP>... - Page 48 AXIS C8110 Network Audio Bridge API commands Disable FTP Request http://<deviceIP>/axis-cgi/param.cgi?action=update&Network.FTP.Enabled=no Example: Enable SSH Request http://<deviceIP>/axis-cgi/param.cgi?action=update&Network.SSH.Enabled=yes Example: Disable SSH Request http://<deviceIP>/axis-cgi/param.cgi?action=update&Network.SSH.Enabled=no...
- Page 49 User manual Ver. M9.2 AXIS C8110 Network Audio Bridge Date: June 2024 © Axis Communications AB, 2022 - 2024 Part no. T10176479...
Need help?
Do you have a question about the C8110 and is the answer not in the manual?
Questions and answers