NutriMill Classic - Grain Mill Manual
- Owner's manual & user manual (17 pages) ,
- Quick start manual (2 pages) ,
- Owner's manual (12 pages)
Advertisement
Overview

Locking Pin
This knob at the back of the mill firmly holds the mill unit to the base. It can be removed with a twist to separate sections for storage, cleaning, or for use with the NutriMill Classic optional Flour Bagger accessory.

*Inlet grommet and filter should be replaced every 2 years or as needed.
Introduction
This product is superbly engineered, innovatively designed, and built with lasting quality. Thanks for choosing this well crafted high speed flour mill. We know you will enjoy it for years to come. After all, it is a NutriMill®.
Welcome to the NutriMill® Family.
Eating whole grains on a regular basis may help to prevent prevent cardiovascular disease, stroke, heart attacks, and clogged arteries. Freshly ground flours offer the most nutritional value. The fresher the flour, the more nutritious and better tasting your food will be.
NutriMill® – Giving you Superior Equipment for Healthy Meals™.
Fresh is always better!
Technical Information:
Milling Heads: Stainless Steel
Housing: ABS plastic
Motor: 10 Amps; 1200 W
Measurements: 12"x12"x13"
Weight: 14 lbs.
Flour Fineness: Adjustable - Fine to Medium Coarse
Hopper Capacity: 13 cups
HOUSEHOLD USE ONLY
THE FIRST TIME YOU USE YOUR NUTRIMILL® CLASSIC
Take the hopper extension ring out of the flour bowl. Mill at least 2 cups of wheat or rice, then discard the flour and clean the bowl. This will eliminate any contaminates the mill may have obtained in the manufacturing process. Make sure you use clean grain. Your warranty does not cover foreign object damage from plastics, metals, rocks or any other materials that could get into and damage the milling heads. Proper care of your mill will ensure a reliable milling experience for many years to come.
NOTE - YOU MAY PERIODICALLY MILL ABOUT 3 CUPS OF WHITE RICE ON A COARSE SETTING TO CLEAN THE MILLING HEADS AND REMOVE ANY POSSIBLE LEFTOVER PARTICLES.
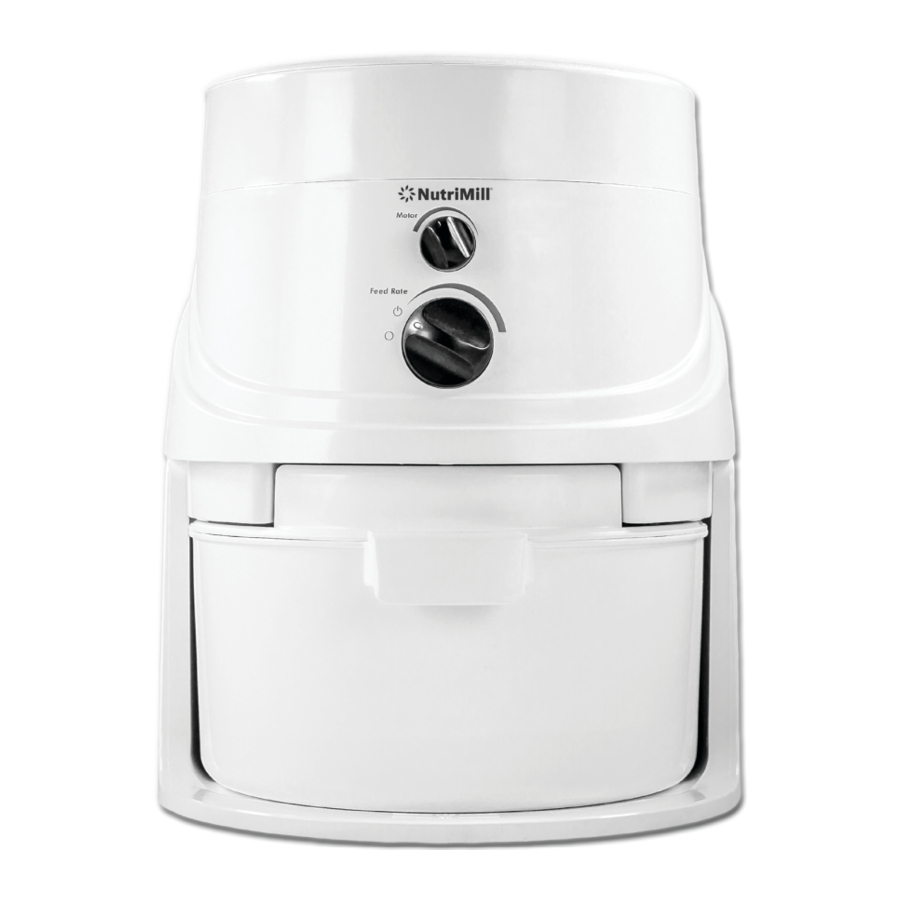
NUTRIMILL® TEXTURE CONTROL KNOB GUIDE
The Motor Speed Control Knob (Upper Knob):

- The motor speed allows you to determine and have greater control of the texture of your flour or meal.
- For finer flour, upper knob should remain to the left (high speed).
- For very coarse flour and medium fine corn meal, knob should be set to the far right, which slows the motor speed.
- For heavy flour & dense textured breads, select a middle setting.
- Try different settings to achieve the texture you want. Adjust texture for desired results in the future based on your experience.
![]()
WE DO NOT RECOMMEND MILLING FLOUR THAT HAS ALREADY BEEN MILLED. THIS MAY CAUSE PROBLEMS IN YOUR MILLING UNIT.

The Grain Feed Rate Knob (Lower Knob):
- This is the ON-OFF switch and controls grain flow into the mill. This affects the fineness of the grind. (While the mill is off and no grain is in the hopper, you can look under the inlet cover and see how this valve opens and closes. Instructions for doing this are given).
- Turning the knob all the way to the left will turn off the mill.
- For finer flour, set the knob toward 11:00 – 12:00 (most grains will not flow at less than a 10:00 position on the knob).
- For bread flour, set the knob toward the 12:00 – 1:00 position.
- For coarser flour turn the knob toward the right.
- Turning the knob all the way to the right will allow larger grains or beans to start flowing freely.
- Texture results also vary with the kind of grain being milled. Soft grains, such as oats, mill much finer than hard grains. Hard wheat mills more coarsely than soft wheat.
- Larger legumes will mill slowly, while small grains like wheat or millet will mill quickly.
Rice tends to mill more slowly as well.
NOTE: At the very finest setting (the point where grain first begins to flow), the flow may fluctuate. This is normal. Turn the knob a little further to the right for a steady flow. The point where grain begins to flow will vary depending on grain/bean size.
GRAIN INLET COVER
To better understand how your mill works follow these simple steps:
- Unplug mill so motor does not turn on while adjusting grain feed (lower) knob.
- With hopper empty, look under grain inlet cover (located at bottom of hopper). A flashlight may be helpful. Do not touch or disassemble the inlet cover.
- When knob is set to OFF, most grains cannot flow through the inlet.
- Turn lower knob back and forth. You will see the size of the opening into the milling chamber gradually changing.
- As you turn the knob further to the right, inlet size increases. This allows grain to flow more rapidly.
- Depending on size of grain in the hopper, knob setting has a point at which grain begins to flow. (For example, barley or millet will begin to flow into the mill at a setting much further to the left than corn or beans because they are smaller in size.)
- When you find the point where grain begins to flow, turn the knob another 1/4" to the right.
OPERATING INSTRUCTIONS
- Attach Separator Cup -Must be attached when milling.
Align handle on cup with the handle guide on the bowl lid and snap securely into place. This cup collects the finest flour and the flour in the cup is useable. After milling, empty the separator cup each time. - Insert air filter on top of bowl lid -Must be in place when milling.
Clean filter and cavity it fits into after each milling session. Clean filter by tapping out flour. Washing filter is not recomended. - Attach bowl lid to top of flour bowl. Lids twists counterclockwise to lock into place. Bowl lid has a durable rubber gasket that creates a seal and prevents flour leakage. Gasket will have a tight grip, this also happens sometimes during regular use. For tight gaskets, we suggest lubricating the gasket by rubbing on either flour, cornstarch or non-stick cooking spray.
NOTE: Never spray directly on the gasket. Spray only a little on a rag or paper towel and wipe on gasket. You will need to reapply one of the above lubricants, after washing. - Lock on hopper extension ring - (not necessary to use when milling small amounts). The hopper extension ring comes packed in the flour bowl andshould be removed when milling. Extension ring has 3 locking tabs to secure it to the mill. It is best to insert/remove the tabs one at a time. To attach: With mill facing you, insert tab at the front right then move clockwise and insert the next two tabs. To remove: With mill facing you begin with front right tab and move counterclockwise to remove next two tabs.
- Fill hopper with grain and replace lid.
See the 'Grain to Flour' Ratio Guide to learn how much grain should be added. The NutriMill is designed to operate with the lid on for quieter milling. - Plug in machine and turn on lower knob.
NOTE: It is not necessary to start the motor before adding grain. Always start the mill on high speed. You may also stop the milling mid cycle if necessary. - When milling is complete, let mill run for 5 seconds. This eliminates any flour left in the self-cleaning milling chamber. Tapping the lid a few times after milling will help settle the flour in the bowl and release flour from the bottom of the lid. Unplug the machine and wipe or brush away any flour residue from the mill.
We recommend hand-washing the plastic bowl and lid. High-heat dishwashers can warp the plastics. The gasket on the bowl lid will need to be relubricated after washing or dusted with flour.
GRAIN TO FLOUR RATIO
The flour yield from a cup of grain varies with the type of grain and how finely it is milled. Fine milling produces a greater volume of flour than coarse milling.
Adjust the amount of grain you add to the hopper to avoid overfilling the bowl, which may cause the mill to clog. The bowl holds 21 to 22 cups of flour. You will get about 21 cups of flour from 13 cups of hard wheat when milled at a medium texture. This texture is ideal for most breads.
NOTE - Soft grains like oats and beans will produce a greater volume of flour than wheat. With the hopper extension ring in place, fill hopper only 2⁄3 to 3⁄4 full.
PURCHASE QUALITY GRAIN
- Know the source of your grain and purchase it through a reputable dealer. The packaged grain should have been thoroughly cleaned before being packaged. We recommend double or triple cleaned grains.
- The quality of grain will affect the quality of your bread. The bran and wheat germ contained in wheat have a tendency to make bread heavy and unresponsive to yeast. A high protein wheat will balance this, so bread rises properly.
- Make sure grains are dry and do not have a high moisture content. Wet or damp grains may cause your mill to plug up.
- Rotation and use of grains is as important as the rotation and use of your other perishable food items.
GRAIN INFORMATION
- WHEAT - Wheat contains the highest gluten of any grain. Gluten provides the elasticity in dough, causing the bread to rise.
- WHOLE OAT GROATS - A versatile grain that can be used in cereal, cookies, breads, pancakes and waffles. (NOTE: rolled oats will NOT feed into the NutriMill® Classic. Do not mill steel cut oats or rolled oats).
- RYE - An excellent supplementary grain to wheat or in recipes that call for corn or oatmeal as part of the flour. Bread made entirely from rye makes a moist, dense loaf. 2 parts rye to 5 parts wheat will make a great light bread. It has less gluten than wheat.
- RICE - Low in both fat and sodium, high in carbohydrates, and rich in iron and many of the B vitamins. Rice makes delicious breads with a cake-like texture.
- BARLEY - Try barley as a supplement in wheat bread at 1 part barley to 5 parts wheat.
- MILLET - Millet's effect and flavor in bread is similar to corn. 1 part millet to 5 parts wheat is ideal. Too much will make dense bread that separates from its crust. At the right amount, it adds crunchiness.
THE NUTRIMILL® CLASSIC WILL MILL THE FOLLOWING:
GLUTEN-FREE BEANS & PEAS
- Lentils
- Chickpeas (Garbanzo Beans)
- Lima Beans
- Soybeans
- Anasazi Beans
- Mung Beans
- Black Beans
- Kidney Beans
- Navy Beans
- Split Peas
GLUTEN-FREE GRAINS
- Popcorn
- Blue Corn
- Oat Groats
- White Rice
- Brown Rice
- Wild Rice
- Sorghum
- Millet
- Buckwheat
- Quinoa
- Amaranth
GRAINS CONTAINING GLUTEN
- Kamut
- Hard Wheat
- Soft Wheat
- Spelt
- Barley
- Farro
- Rye
- Bulgur Wheat
- Teff
- Kañiwa
USE CAUTION WHEN MILLING THE FOLLOWING:
Fill the hopper no more than ⅔ to ¾ with these as they produce more flour volume.
- Dried Lentils
- Dried Sweet Corn
- Dried Pinto Beans
- Dried Green Beans
- Dried Mung Beans
- Legumes (generally)
- Dried Garbanzo Beans
- Quinoa
- Oat Groats
- Spelt
- Barley
- Soybeans
- Kamut
DO NOT MILL ANY OF THE FOLLOWING
- Oatmeal (Rolled Oats)
- Steel Cut Oats
- Sesame Seeds
- Flax Seeds
- Sunflower Seeds
- Chia Seeds
- Nuts
- Coffee Beans
- Spices
- Goji Beans
- Herbs
- Hemp
- Sugar
- Dried Fruit or Vegetables
- Tapioca
- Chocolate
- Sprouted Grains or Beans (if not thoroughly dried)
Avoid grains and beans that have high oil or moisture content. Non-commercially dried products may cause plugging.
For any grains not listed above, mill only ¼ cup, then test the flour by pinching a small amount between your thumb and finger. If it holds the shape of a pinch and does not fall apart, it contains too much moisture. Do not mill this grain.
Contact us at:
1-800-692-6724 | service@lchef.com
with any questions or concerns you may have with your product.
4196 South 950 East
St. George, Utah 84790
Visit NUTRIMILL.COM to find recipes, accessories, and so much more!
IMPORTANT SAFEGUARDS
Please read all of these instructions thoroughly.
When using electrical appliances, basic safety precautions should always be followed including the following:
- Read all instructions.
- To protect against risk of electrical shock DO NOT immerse cord, plugs, portable appliances, or milling unit in water or other liquid.
- Close supervision is necessary when any appliance is used by or near children.
- Unplug from outlet when not in use, before cleaning, putting on, or taking off parts.
- Avoid contacting moving parts.
- Do not operate with a damaged cord or plug or after the appliance malfunctions, or is dropped or damaged in any manner. Return appliance to the nearest authorized service facility for examination, repair, or electrical or mechanical adjustment.
- The use of attachments not recommended or sold by the manufacturer may cause fire, electric shock, or injury.
- Do not use outdoors.
- Do not let cord hang over edge of table or counter.
- Do not let cord or unit contact hot surface, including the stove.
- Do not unplug from electrical outlet by pulling on the cord. To unplug, grasp the plug and pull.
- Do not put your fingers or other foreign objects into any of the mill's openings while it is in operation.
- Do not leave mill unattended while in use.
- Do not clean by inserting pointed objects into milling chamber or using running water.
SAVE THESE INSTRUCTIONS
NUTRIMILL® CLASSIC SAFETY INSTRUCTIONS
- Always be sure the separator cup is properly attached before milling.
- Always be sure the air filter is in place before milling.
- Always be sure the hopper extension ring is removed from the inside of the bowl before milling.
- Always be sure your flour bowl is positioned correctly before milling.
- Always check your grain for foreign objects before milling. Do not use grain that has not been properly cleaned before packaging / or cleaned by the grain supplier or packager. We recommend purchasing and using grain from a reliable source.
- Do not over-fill the hopper. It is easy to empty the flour canister and continue milling.
- Do not mill damp, wet or oily grains.
- Always clean the filter after milling by tapping out excess flour.
- All service and repairs must be done by an authorized service center or warranty will be void. For service information, see the warranty information on the last page of this manual.
Documents / Resources
References
Download manual
Here you can download full pdf version of manual, it may contain additional safety instructions, warranty information, FCC rules, etc.
Advertisement


Need help?
Do you have a question about the Classic and is the answer not in the manual?
Questions and answers