Einhell PRESSITO (40.204.60) - Hybrid Compressor Manual
- Original operating instructions (134 pages) ,
- Operating instructions manual (14 pages) ,
- Original operating instructions (40 pages)
Advertisement
Layout and items supplied
Layout
(Fig. 1-8)

- Handle
- Accessory storage compartment

- Air hose
- Air hose connection (blowing)

- Compressed air hose with valve adapter
- Battery pack (not supplied)
- Bicycle adapter
- Conical adapter
- Adapter for ball valves

- Selector switch for mains-powered mode/ battery-powered mode
- Display
- Selector switch for compressed air mode/OFF/low-pressure blower mode

- Air hose connection (suction)

- "Reduce pressure" button
- "Unit overpressure" button
- "Increase pressure" button
- Storage compartment for the power cable


Items supplied
Please check that the article is complete as specified in the scope of delivery. If parts are missing, please contact our service center or the sales outlet where you made your purchase at the latest within 5 working days after purchasing the product and upon presentation of a valid bill of purchase. Also, refer to the warranty table in the service information at the end of the operating instructions.
- Open the packaging and take out the equipment with care.
- Remove the packaging material and any packaging and/or transportation braces (if available).
- Check to see if all items are supplied.
- Inspect the equipment and accessories for transport damage.
- If possible, please keep the packaging until the end of the guarantee period.

The equipment and packaging material are not toys. Do not let children play with plastic bags, foils or small parts. There is a danger of swallowing or suffocating!
- Air hose
- Bicycle adapter
- Conical adapter
- Adapter for ball valves
- Original operating instructions
- Safety instructions
Proper use
This device is intended for inflating car, motorcycle and bicycle tires as well as sports balls, water balls, air mattresses and other similar items. In addition the device is also intended for suctioning volumes of air from objects with low pressure, such as water balls, air mattresses and other similar items.
This device is not suitable for tires with very large volumes, such as truck or tractor tires for example.
The equipment can be operated from the mains power supply using the power cable or alternatively in battery-powered mode using a suitable rechargeable battery.
The equipment does not have a charging functionality for the rechargeable battery.
The equipment is to be used only for its prescribed purpose. Any other use is deemed to be a case of misuse. The user / operator and not the manufacturer will be liable for any damage or injuries of any kind caused as a result of this.
Please note that our equipment has not been designed for use in commercial, trade or industrial applications. Our warranty will be voided if the machine is used in commercial, trade or industrial businesses or for equivalent purposes.
Technical data
Weight without battery: approx. 2.2 kg
Protection type: IP X0
Protection class: II / 
Length of compressed air hose: approx. 71 cm
Length of air hose: approx. 31 cm
Data for mains-powered mode
Rated operating voltage and frequency (mains-powered): 220-240V ~ 50 Hz
Rating (compressor compressed air): 90 W
Max. operating pressure (compressor compressed air): 11 bar
Theoretical suction rate (compressor compressed air): 21 liters/min
Output for compressed air at 4 bar: 10 l/min
Output for compressed air at 7 bar: 8 l/min
Rating (low-pressure blower): 90 W
Max. volumetric flow for suctioning (low-pressure blower): 380 l/min
Max. volumetric flow for inflating (low-pressure blower): 400 l/min
Compressor idling speed: 3450 min-1
Blower idling speed: 15000 min-1
Data for operation with a rechargeable battery
Power supply (rechargeable battery): 18 V d.c.
Max. operating pressure (compressor compressed air): 11 bar
Theoretical suction rate (compressor compressed air): 21 liters/min
Output for compressed air at 4 bar: 9 l/min
Output for compressed air at 7 bar: 6 l/min
Max. volumetric flow for suctioning (low-pressure blower): 370 l/min
Max. volumetric flow for inflating (low-pressure blower): 390 l/min
Compressor idling speed: 3450 min-1
Blower idling speed: 15000 min-1
Sound and vibration
The noise emission values were measured in accordance with EN ISO 3744.
LpA sound pressure level: 71.5 dB(A)
KpA uncertainty: 3 dB
LWA sound power level: 82.5 dB(A)
KWA uncertainty: 3 dB
Wear ear-muffs.
The impact of noise can cause damage to hearing.
Keep the noise emissions and vibrations to a minimum.
- Only use appliances which are in perfect working order.
- Service and clean the appliance regularly.
- Adapt your working style to suit the appliance.
- Do not overload the appliance.
- Have the appliance serviced whenever necessary.
- Switch the appliance off when it is not in use.

Residual risks
Even if you use this electric power tool in accordance with instructions, certain residual risks cannot be rules out. The following hazards may arise in connection with the equipment's construction and layout:
- Damage to hearing if no suitable ear protection is used.
The electric power tool generates an electromagnetic field during operation. Under certain circumstances this field may actively or passively impede medical implants. To reduce the risk of serious or fatal injuries, we recommend persons with medical implants to consult their doctor and the manufacturer of the medical implant prior to using the equipment.
Before using the equipment
Before you connect the equipment to the power supply make sure that the data on the rating plate are identical to the supply voltage (if operating from the mains power supply).
Before you connect the equipment to the power supply make sure that the data on the rating plate are identical to the data for the rechargeable battery (if using a rechargeable battery for operation).
- Check the equipment for damage which may have occurred in transit. Report any damage immediately to the transport company which was used to deliver the compressor.
- Make sure that the intake air is dry and dust-free.
- Do not install the compressor in a damp or wet room.
- The compressor may only be used in suitable rooms (with good ventilation and an ambient temperature from +5°C to 40°C). There must be no dust, acids, vapors, explosive gases or inflammable gases in the room.
- The compressor is designed to be used in dry rooms. It is prohibited to use the compressor in areas where work is conducted with sprayed water.
- Operate the equipment only on a firm, level surface.

When using the equipment to inflate objects, check the information and safety instructions provided by the manufacturer.
Charging the LI battery pack
(Fig. 2, 9)

- Remove the battery pack (6) from the handle, pressing the pushlock button (a) downwards to do so.
- Check that your mains voltage is the same as that marked on the rating plate of the battery charger. Insert the power plug of the charger (d) into the socket outlet. The green LED will then begin to flash.

- Push the battery pack (6) onto the battery charger (d).

In "Charger indicator" section you will find a table with an explanation of the LED indicator on the charger.
If the battery pack fails to charge, check for the following:
- voltage at the power socket
- whether there is good contact at the charging contacts of the charging unit.
If the battery pack still fails to charge, send
- the charger and charging adapter
- and the battery pack to our customer service center.
To ensure that items are properly packaged and delivered when you send them to us, please contact our customer service or the point of sale at which the equipment was purchased.
When shipping or disposing of batteries and cordless tools, always ensure that they are packed individually in plastic bags to prevent short circuits and fires.
To ensure that the battery pack provides long service, you should take care to recharge it promptly. You must recharge the battery pack when you notice that the performance of the device drops. Never allow the battery pack to become fully discharged. This will cause it to develop a defect.
Battery capacity indicator
(Fig. 2)
Press the button for the battery capacity indicator (b). The battery capacity indicator (c) will indicate the charge status of the battery by means of 3 LEDs.
All 3 LEDs are lit:
The battery is fully charged.
2 or 1 LED(s) are lit:
The battery has an adequate remaining charge.
1 LED blinks:
The battery is empty, recharge the battery.
All LEDs blink:
The battery temperature is too low. Remove the battery from the equipment, keep it at room temperature for one day. If the fault reoccurs, this means that the rechargeable battery has undergone exhaustive discharge and is defective. Remove the battery from the equipment. Never use or charge a defective battery.
Operation
Changing between mains/battery operation and compressor compressed air/low-pressure blower operation
(Fig. 7)
To change over between mains-powered and battery-powered operation, press the selector switch (10):
- DC/switch to the right:
- The equipment will be supplied with power from the rechargeable battery.
- AC/switch to the left:
- The equipment will be supplied with power from the power cable.
- To change over between compressed air and low-pressure operation, press the selector switch (12):
- Switch to the left: Compressed air operation
- Switch in the middle: OFF
- Switch to the right: Low-pressure operation
Compressor compressed air operation
(Fig. 1a, 1b, 2, 7)
- To inflate objects with compressed air, use the compressed air hose (5).
- Connect the adapter of the compressed air hose to the object you wish to inflate.
- Depending on what you are inflating, also use the adapters (7, 8, 9) or other adapters available from retail stores.
- The pressure at the compressed air hose will be displayed in the display (11).
- The unit of the displayed pressure can be selected with the button (15). The pressure can be displayed in units of [bar], [PSI] or [kPa].
- The button (14) allows the desired pressure to be reduced.
- The button (16) allows the desired pressure to be increased.
- Switch on the equipment by moving the selector switch (12) to the compressed air operation position (see "Changing between mains/battery operation...").
- The compressor will then pump until the preset pressure on the display is reached, then it will switch off.
- Warning! Observe the information supplied by the tire manufacturer and the vehicle manufacturer relating to the recommended tire pressure.
- Warning! This equipment is not calibrated! For a calibrated measurement value, check the actual tire pressure using a calibrated meter after you have inflated the tires yourself, e.g. at a petrol station.
- Just before it is switched off, the pressure which is shown in the display can be 0.05 – 0.2 bar higher than the preselected pressure, because of over-pressure in the air hose.
- Allow the compressor to cool down for about 5 minutes after every 5 minutes of operation in order to prevent overheating.
Low-pressure blower operation
(Fig. 1a, 3, 4)
Suctioning air
(Fig. 3, 7)
- To suction out objects with a large volume until they are empty (e.g. deflating an air mattress, etc.), connect the air hose (3) to the extractor connection (13).
- Connect the air hose to the object you wish to deflate.
- Switch on the equipment by moving the selector switch (12) to the low-pressure operation position (see "Changing between mains/battery operation...").
- Switch off the equipment once the object has been sufficiently deflated.
Inflating
(Fig. 4, 7)
When using the equipment to inflate objects, check the information and safety instructions provided by the manufacturer.
- To inflate objects with a large volume (e.g. inflating an air mattress, etc.), connect the air hose (3) to the inflating connection (4).
- Connect the air hose to the object you wish to inflate.
- Switch on the equipment by moving the selector switch (12) to the low-pressure operation position (see "Changing between mains/battery operation...").
- Switch off the equipment once the object has been sufficiently inflated.
Replacing the power cable
If the power cable for this equipment is damaged, it must be replaced by the manufacturer or its after-sales service or similarly trained personnel to avoid danger.
Cleaning, maintenance and ordering of spare parts
Always take the battery out of the equipment and pull out the power plug before starting any cleaning work.
Cleaning
- Keep all safety devices, air vents and the motor housing free of dirt and dust as far as possible. Wipe the equipment with a clean cloth or blow it with compressed air at low pressure.
- We recommend that you clean the device immediately each time you have finished using it.
- Clean the equipment regularly with a moist cloth and some soft soap. Do not use cleaning agents or solvents; these could attack the plastic parts of the equipment. Ensure that no water can seep into the device. The ingress of water into an electric tool increases the risk of an electric shock.
Maintenance
There are no parts inside the equipment which require additional maintenance.
Ordering spare parts and accessories
Please provide the following information when ordering spare parts:
- Type of unit
- Article number of the unit
- ID number of the unit
- Spare part number of the required spare part
For our latest prices and information please go to www.Einhell-Service.com
 Tip! For good results we recommend high-quality accessories from
 ![]() !
!
www.kwb.eu
welcome@kwb.eu

Storage
Store the equipment and accessories in a dark and dry place at above freezing temperature. The ideal storage temperature is between 5 and 30°C. Store the electric tool in its original packaging.
Charger indicator
| Indicator status | Explanations and actions | |
| Red LED | Green LED | |
| Off | Flashing | Ready for use The charger is connected to the mains and is ready for use; there is no battery pack in the charger |
| On | Off | Charging
|
| Off | On | The battery is charged and ready for use. Action: |
| Flashing | Off | Adapted charging The charger is in gentle charging mode. For safety reasons the charging is performed less quickly and takes more time. The reasons can be:
Action: |
| Flashing | Flashing | Fault Action: |
| On | On | Temperature fault Action: |

Safety regulations
When using the equipment, a few safety precautions must be observed to avoid injuries and damage. Please read the complete operating instructions and safety regulations with due care. Keep this manual in a safe place, so that the information is available at all times. If you give the equipment to any other person, hand over these operating instructions and safety regulations as well. We cannot accept any liability for damage or accidents which arise due to a failure to follow these instructions and the safety instructions.
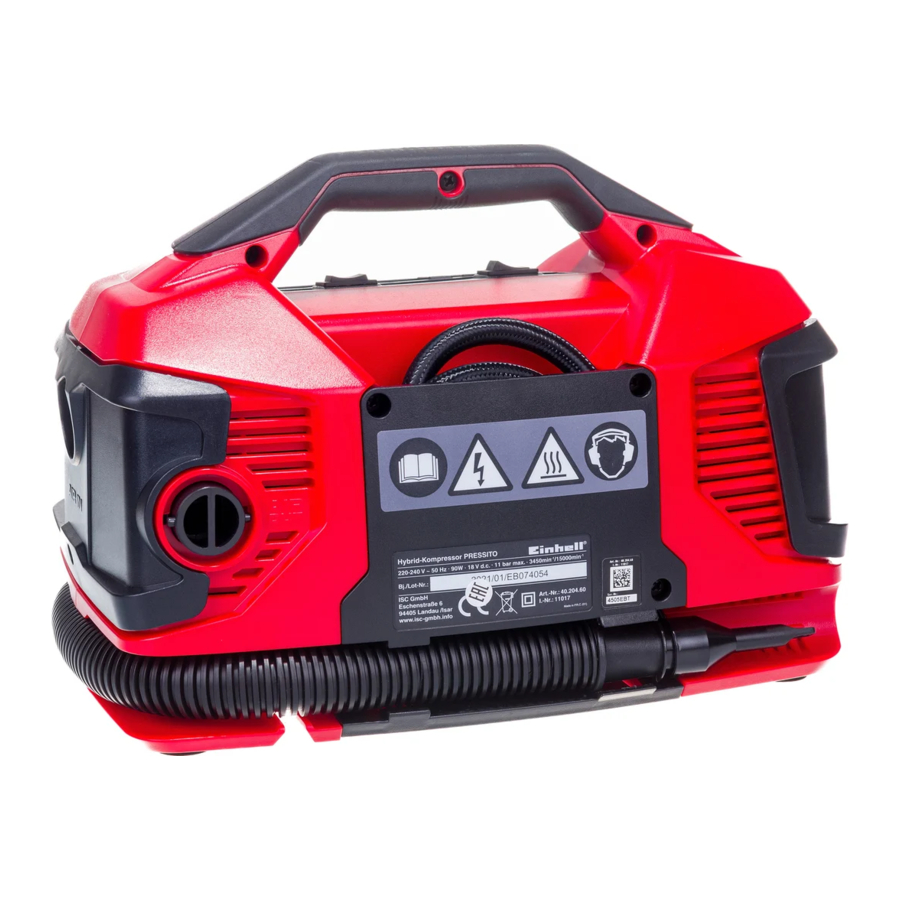
Explanation of the symbols used

![]()
Read the operating instructions to reduce the risk of injury.![]()
Wear ear-muffs. The impact of noise can cause damage to hearing.- Beware of electrical voltage!
- Beware of hot parts!
- Store the batteries only in dry rooms with an ambient temperature of +10°C to +40°C. Place only fully charged batteries in storage (charged at least 40%).
The corresponding safety information can be found in the enclosed booklet.
Read all safety regulations and instructions. Any errors made in following the safety regulations and instructions may result in an electric shock, fire and/or serious injury.
Keep all safety regulations and instructions in a safe place for future use.
Documents / Resources
References
Download manual
Here you can download full pdf version of manual, it may contain additional safety instructions, warranty information, FCC rules, etc.
Download Einhell PRESSITO (40.204.60) - Hybrid Compressor Manual
Advertisement


Need help?
Do you have a question about the PRESSITO and is the answer not in the manual?
Questions and answers