
Related Manuals for Whirlpool WRK6140AUS


Summary of Contents for Whirlpool WRK6140AUS
- Page 1 Health & Safety, Use & Care, Installation Guide and Online Warranty Registration Information Model: WRK6140AUS WRT6140AUS WRT6340AUS WRT9350AUS www.whirlpool.com.au www.whirlpool.co.nz...
-
Page 2: Table Of Contents
CERAMIC COOKTOP USE AND CARE GUIDE Dear User, Thank you for choosing our products. We are sure you will find your new appliance a pleasure to use. Before you use the appliance, we recommend that you read through these instructions carefully and retain for future reference. Design and specification may change due to product development, no prior notice will be given. -
Page 3: Important Safety Instructions
The manufacturer declines any liability for failure to observe these safety instructions, for inappropriate use of the appliance or incorrect setting of controls. Download the complete instruction manual on Whirlpool official website or call the phone number shown on the official website. - Page 4 PERMITTED USE CAUTION: the appliance is not intended to be operated by means of an external switching device, such as a timer, or separate remote controlled system. This appliance is intended to be used in household and similar applications such as: staff kitchen areas in shops, offices and other working environments;...
-
Page 5: Installations
The appliance must be installed and connected in accordance with current regulations. After unpacking the appliance, ensure there is no visible damage. If it has been damaged during transit, DO NOT USE, contact the "seller/ dealer/ Whirlpool After-Sales Service" immediately. SELECTION OF INSTALLATION EQUIPMENT - Cut out the work surface according to the sizes shown in the drawing. - Page 6 Model min. 50 WRK6140AUS WRT6140AUS WRT6340AUS min. 50 WRT9350AUS Under any circumstances, make sure the ceramic cooktop is well ventilated and the air inlet and outlet are not blocked. Ensure the ceramic cooktop is in a good work state. As shown...
- Page 7 INSTALLING THE FOAM GASKET Before inserting the cooktop into the cut-out of the kitchen worktop, the supplied foam gasket (in a plastic bag) must be attached to the bottom side of the ceramic glass. Do not install the cooktop without the foam gasket. The gasket should be attached to the cooktop in the following method: ●...
- Page 8 CONNECTION THE COOKTOP TO THE MAINS POWER SUPPLY The power supply should be connected in compliance with the relevant standard, or a single- pole circuit breaker. The appliance has a large power rating and must be connected to electricity by a Qualified Electrician. Notes: 1.
-
Page 9: Operation Instructions
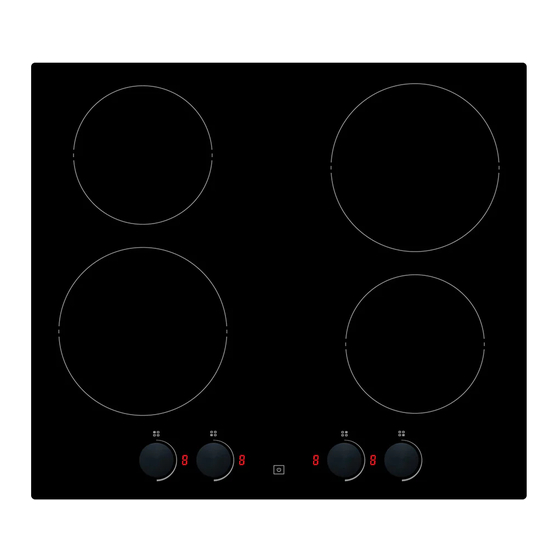
OPERATING INSTRUCTIONS Model: WRK6140AUS 1.(Φ165mm)1200W #1 Cooking Zone 2.(Φ200mm)1800W #2 Cooking Zone 3.(Φ200mm)1800W #3 Cooking Zone 4.(Φ165mm)1200W #4 Cooking Zone 5. ON/OFF Button 6. Knob Control for #1 Cooking Zone 7. Knob Control for #2 Cooking Zone 8. Knob Control for #3 Cooking Zone... - Page 10 Model: WRT6140AUS 1.(Φ165mm)1200W #1 Cooking Zone 2.(Φ200mm)1800W #2 Cooking Zone 3.(Φ200mm)1800W #3 Cooking Zone 4.(Φ165mm)1200W #4 Cooking Zone 5. Control Panel CONTROL PANEL 1. Cooking Zone selection button 2. Timer button 3. Child Lock control button 4. Stop & Go control button 5/6.
- Page 11 Model: WRT6340AUS 1.(Φ165mm)1200W #1 Cooking Zone 2.(Φ230/175/120mm)2300/1500/700W #2 Cooking Zone 3. (Φ200mm)1800W #3 Cooking Zone 4.(Φ165mm)1200W #4 Cooking Zone 5. Control Panel CONTROL PANEL 1. Extended zone control button 2. Cooking Zone selection button 3. Timer button 4. Child Lock control button 5.
- Page 12 Model: WRT9350AUS 1. (Φ230/175/120mm)2300/1500/700W #1 Cooking Zone 2.(Φ165mm)1200W #2 Cooking Zone 3. (Φ200mm)1800W #3 Cooking Zone 4.(Φ165mm)1200W #4 Cooking Zone 5. (270*165mm)2000/1100W #5 Cooking Zone 6. Control Panel CONTROL PANEL 1. Cooking Zone selection button 2. Child Lock control button 3.
- Page 13 BEFORE USING YOUR NEW COOKTOP ● Read this guide, taking special note of the ‘Safety Warnings’ section. ● Remove any protective film that may still be on your new electric cooktop. USING THE TOUCH CONTROLS ● The controls respond to touch, so you don’t need to apply any pressure. ●...
- Page 14 Make sure the bottom of the pan and the surface of the cooking zone are clean and dry. 4. Set the heating level of cooking zone. *WRK6140AUS Dedicated knob control mapped for each cooking zone. Set heat setting by turning the knob control in either direction of the corresponding cooking zone.
-
Page 15: Large Heating Area
Notes 1. After connecting to electricity, the buzzer of the cooktop will beep once to indicate the power is on while all indicators will light up for 1 second then go off. 2. When the cooktop is in Standby mode, the electric cooktop will automatically turn off if there is no practice within 1 minute, followed by the buzzer beeping once. -
Page 16: Stop & Go
Stop & Go button. Note: The cooktop will automatically turn off if the Stop & Go function lasts for more than 10 minutes. WRK6140AUS does not have the Stop & Go function. USING THE TIMER You can use the timer in two different ways: •... -
Page 17: Timer
Timer overview Minute display shows the number of minutes Timer control USING THE TIMER AS A MINUTE MINDER If you have not selected any cooking zones 1.Touch the timer button , the number in the timer indicator starts to flash. 2. - Page 18 *For Touch control models: WRT6140AUS, WRT6340AUS • Press the “+“ or “−“ button to set the desired time • The value will adjust down or up rapidly in a loop when you press and hold either of the two buttons. Note: When the timer indicator flashes, press the timer button to confirm the setting.
-
Page 19: Residual Heat Warning
All control buttons became invalid except ON/OFF and Child Lock button, unless you wipe the area of the control panel dry. Note: WRK6140AUS does not have the overflow protection feature. COOKING GUIDELINES Take care when frying as the oil and fat heat up quickly. -
Page 20: Cooking Table
Searing steak To cook juicy flavorsome steaks: 1. Stand the meat at room temperature for about 20 minutes before cooking. 2. Heat up a heavy-based frying pan. 3. Brush both sides of the steak with oil. Drizzle a small amount of oil into the hot pan and then lower the meat onto the hot pan. -
Page 21: Cleaning And Maintenance
CLEANING AND MAINTENANCE Important: Before any maintenance or cleaning work is carried out, DISCONNECT the appliance from ELECTRICITY supply and ensure the appliance is completely cool. CLEANING THE COOKTOP SURFACE Clean spillages from the cooktop surface as soon as possible after use. Always ensure the surface is cool enough before cleaning. - Page 22 HINTS AND TIPS What? How? Important! Everyday soiling on glass 1. Switch off the power • When turn off the power (fingerprints, marks, stains supply. supply of cooktop, there will left by food or non-sugary 2. Apply a vitro-ceramic glass be no ‘hot surface’...
-
Page 23: Troubleshooting
MAINTENANCE OF THE COOKTOP Troubleshooting 1. There is no power to the appliance: - Check whether there is a power cut of your department; - Check whether the appliance be connected to electricity properly; - Has the timer setting elapsed; - Whether it reaches the longest cooking time setting and auto shut off;... -
Page 24: Technical Specifications
Technical Specifications Model No. WRK6140AUS WRT6140AUS WRT6340AUS Rated Voltage & Frequency 220-240V~ or 380-415V 3N~, 50-60Hz Rated Power 6000W 6000W 6500W Product Size 590×520×51mm 590×520×51mm 590×520×51mm Carton Size 635×568×118mm 635×568×113mm 635×568×113mm Net Weight 8.00 kg 7.84 kg 8.24 kg 9.2 kg Gross Weight 8.75 kg... -
Page 25: After-Sales Service
AFTER-SALES SERVICE To receive complete assistance, please register your product in your local market. BEFORE CALLING THE AFTER-SALE SERVICE: 1. See if you can solve the problem by yourself with the help of the TROUBLESHOOTING suggestions. 2. Switch the appliance off and on again to see if the fault persists. IF AFTER THE ABOVE CHECKS THE FAULT STILL OCCURS, GET IN TOUCH WITH THE NEAREST AFTER-SALES SERVICE. - Page 26 This QR Code is only applicable to New Zealand. You can download the user manual by You can download the user manual by Visiting our website www.whirlpool.com.au Visiting our website www.whirlpool.co.nz Contracting our Customer Service Center at 1300 363 344 Contracting our Customer Service Center at 0800 442 584 -http://www.whirlpool.com.au...
Need help?
Do you have a question about the WRK6140AUS and is the answer not in the manual?
Questions and answers