Table of Contents
Advertisement
Available languages
Available languages
Quick Links
Advertisement
Table of Contents

Related Manuals for KitchenAid KOG21 7KC0128ZBM


Summary of Contents for KitchenAid KOG21 7KC0128ZBM
- Page 1 Countertop Oven Forno de bancada KOG21 7KCO128ZBM...
-
Page 2: Parts And Features
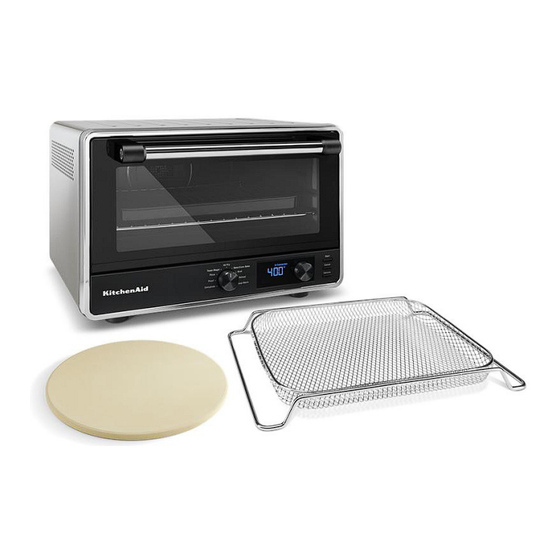
PARTS AND FEATURES Toughened Glass Window Mode Knob: Cooking Mode Selector Removable Crumb Tray Preheating Icon Cool Down Surface for Removable Toast Icon Oven Rack Bagel Icon Chrome-Plated Steel Broiling Rack Shade Icon Enamel-Coated Pan Fresh Icon Chrome-Plated Steel Oven Rack Frozen Icon Door Handle Minutes Icon... -
Page 3: Product Safety
Authorized Service Facility for examination, repair, or electrical or mechanical adjustment. 6. The use of accessories/attachments not recommended or sold by KitchenAid may cause fire, electrical shock, or injury to persons. 7. Do not let cord hang over edge of table or counter, or touch hot surfaces. - Page 4 15. Extreme caution should be exercised when using containers constructed of materials other than metal or glass. 16. Do not store any materials, other than KitchenAid recommended accessories, in this Countertop Oven when not in use. 17. Do not place any of the following materials in the Countertop Oven: paper, cardboard, plastic, or anything similar.
-
Page 5: Getting Started
PRODUCT SAFETY ELECTRICAL REQUIREMENTS Voltage: 127 V~ Frequency: 60 Hz Power: 1800 W If the plug does not fit in the outlet, NOTE: contact a qualified electrician. Do not modify the plug in any way. Do not use an adapter. Do not use an extension cord. If the power supply cord is too short, have a qualified electrician or service technician to install an outlet near the appliance. -
Page 6: Cooking Functions
GETTING STARTED Plug into a grounded 3 prong outlet. Your Countertop Oven is now ready to use. NOTE: Upon first use, the Air Fryer may produce light smoke. This is normal. TIME RECOMMENDATION - AIR FRY FUNCTION TEMPERATURE FOOD PORTION TIME °F (°C) Chicken Nuggets... - Page 7 COOKING FUNCTIONS NOTE: Automatic Preheat is not programmed for Dehydrate, Keep Warm, Reheat, Toast, and Bagel functions. CONVECTION The convection fan is controlled by the Options button. Pushing the Options button will toggle the fan ON or OFF for Bake. A “Convection” label and fan icon will appear on the display when the convection fan is on.
-
Page 8: Using The Dehydrate Function
COUNTERTOP OVEN RACK POSITION Bottom rack position for Air Fry, Bake, Dehydrate, Keep Warm, Pizza, Proof, Reheat Top rack position for Broil, Dehydrate USING THE DEHYDRATE FUNCTION Dehydrate option is to remove moisture content from veggies or fruits to dry and preserve them. - Page 9 USING THE DEHYDRATE FUNCTION IMPORTANT: Always use oven mitts when removing pans or racks. When the time has elapsed, the end signal will sound and the Air Fryer will shut off automatically. USING THE PROOF FUNCTION The Proof function maintains a warm environment useful for rising yeast.
- Page 10 USING THE PIZZA (FROZEN/FRESH) FUNCTION The Pizza Function distributes power to the top and bottom heating elements to maintain the desired Oven temperature to cook homemade or Frozen Pizza. The preset temperatures are 400°F (204°C) for Frozen and Set the Mode knob to Pizza. 450°F (232°C) for Fresh pizza.
- Page 11 USING THE TOAST OR BAGEL FUNCTION In Toast mode, your oven distributes power to the top and bottom heating elements to maintain the desired oven temperature. In Bagel mode, the oven distributes power between the top and bottom heating elements to nicely brown the top of cut bagels while gently warming the outside.
- Page 12 USING THE AIR FRY FUNCTION Open the door and place the food on the When the time has elapsed, the end signal will sound and the Countertop Oven will shut center of the rack. Close the door. Press Start to start the cycle. off automatically.
- Page 13 USING THE BROIL FUNCTION Only the top cooking elements heat when the Broil function is selected. Use the included broil pan directly on the oven rack for even browning and easy cleanup. The broil pan may also be used for the Bake and Warm settings.
-
Page 14: Using The Reheat Function
USING THE REHEAT FUNCTION Open the door and place the food on the When the time has elapsed, the end signal center of the rack. Close the door. will sound and the Countertop Oven will shut off automatically. Press Start to start the cycle. USING THE KEEP WARM FUNCTION WARNING Food Poisoning Hazard... -
Page 15: Care And Cleaning
USING THE KEEP WARM FUNCTION Open the door and place the food on the When the time has elapsed, the end signal center of the rack. Close the door. will sound and the Countertop Oven will Press Start to start the cycle. shut off automatically. -
Page 16: Troubleshooting
TROUBLESHOOTING WARNING Electrical Shock Hazard Plug into a grounded 3 prong outlet. Do not remove ground prong. Do not use an adapter. Do not use an extension cord. Failure to follow these instructions can result in death, fire, or electrical shock. PROBLEM SOLUTION Check to see if the oven is plugged into a grounded 3 prong... -
Page 17: Peças E Funcionalidades
PEÇAS E FUNCIONALIDADES Janela de vidro temperado Botão de modo: Seletor de modo de cozimento Bandeja de migalhas removível Ícone de pré-aquecimento Superfície de resfriamento para grelha do forno removível Ícone de torrada Grelha em aço cromado Ícone de bagel Bandeja esmaltada Ícone de tonalidade Grelha de forno em aço cromado... -
Page 18: Recomendações Importantes
Devolva o aparelho para a unidade de serviço autorizado para que seja examinado, consertado ou para receber ajustes mecânicos ou elétricos. 6. O uso de acessórios/anexos não recomendados ou vendidos pela KitchenAid pode causar incêndios, choques elétricos ou lesões às pessoas. - Page 19 16. Não armazene nenhum material, exceto os acessórios recomendados pela KitchenAid, neste forno de bancada quando não estiver em uso. 17. Não coloque nenhum dos seguintes materiais no forno de bancada: papel, papelão, plástico ou algo semelhante.
-
Page 20: Primeiros Passos
SEGURANÇA DE PRODUTOS REQUISITOS ELÉTRICOS Tensão: 127 V~ Frequência: 60 Hz ADVERTÊNCIA Potência: 1.800 W OBSERVAÇÃO: Se o plugue não encaixar na tomada, entre em contato com um eletricista qualificado. Não altere o plugue de forma alguma. Não utilize um adaptador. Não utilize um cabo de extensão. Perigo de choque elétrico Se o fio elétrico for muito curto, chame um eletricista qualificado ou... - Page 21 PRIMEIROS PASSOS ADVERTÊNCIA Perigo de choque elétrico Conecte em uma tomada aterrada de 3 pontos. Conecte a uma tomada aterrada. Seu forno de bancada está pronto para uso. Não remova o pino de aterramento. Não utilize adaptadores. OBSERVAÇÃO: Na primeira utilização, a fritadeira a ar pode produzir uma leve Não utilize extensões.
- Page 22 FUNÇÕES DE COZIMENTO OBSERVAÇÃO: O pré-aquecimento automático não está programado para as funções Dehydrate (Desidratar), Keep Warm (Manter quente), Reheat (Reaquecer), Toast (Torrada) e Bagel. CONVECÇÃO O ventilador de convecção é controlado pelo botão Options (Opções). Pressionar o botão Options (Opções) ativará (ON) ou desativará (OFF) o ventilador para Bake (Assar). Uma legenda “Convection”...
- Page 23 POSIÇÃO DA GRELHA DO FORNO DE BANCADA Posição inferior para Air Fry (Fritar a ar), Bake (Assar), Dehydrate (Desidratar), Keep Warm (Manter quente), Pizza, Proof (Crescimento), Reheat (Reaquecer) Posição superior da grelha para Broil (Grelhar), Dehydrate (Desidratar) USO DA FUNÇÃO DEHYDRATE (DESIDRATAR) A opção Dehydrate (Desidratar) é...
- Page 24 USO DA FUNÇÃO DEHYDRATE (DESIDRATAR) IMPORTANTE: Sempre use luvas de forno ao remover bandejas ou racks. Quando o tempo terminar, o sinal de fim soará e a fritadeira a ar desligará automaticamente. USO DA FUNÇÃO PROOF (CRESCIMENTO) A função Proof (Crescimento) mantém um ambiente quente, útil para a fermentação.
- Page 25 USO DA FUNÇÃO PIZZA (FROZEN/FRESH) (CONGELADA/FRESCA) A Função Pizza distribui energia para os elementos de aquecimento superior e inferior para manter a temperatura desejada do Forno para cozinhar pizza caseira ou congelada. As temperaturas predefinidas são 204 °C (400 °F) para pizza congelada e 232 °C Defina o botão Mode (Modo) para Pizza.
- Page 26 USO DA FUNÇÃO TOAST (TORRADA) OU BAGEL No modo Toast (Torrada), o forno distribui energia para os elementos de aquecimento superior e inferior para manter a temperatura desejada do forno. No modo Bagel, o forno distribui a energia entre os elementos de aquecimento superior e inferior para dourar bem a parte superior dos bagels cortados enquanto aquece suavemente a parte externa.
- Page 27 USO DA FUNÇÃO AIR FRY (FRITAR A AR) Abra a porta e coloque os alimentos no Quando o tempo terminar, o sinal de fim centro da grelha. Feche a porta. soará e o forno de bancada desligará Pressione Start (Iniciar) para começar o ciclo. automaticamente.
- Page 28 USO DA FUNÇÃO BROIL (GRELHAR) Apenas os elementos de cozimento superiores aquecem quando a função Broil (Grelhar) é selecionada. Use a assadeira incluída diretamente na grelha do forno para dourar uniformemente e facilitar a limpeza. A assadeira também pode ser usada para as configurações Bake (Assar) e Warm (Aquecer).
- Page 29 USO DA FUNÇÃO REHEAT (REAQUECER) Abra a porta e coloque os alimentos no Quando o tempo terminar, o sinal de fim soará e o forno de bancada desligará centro da grelha. Feche a porta. Pressione Start (Iniciar) para começar o ciclo. automaticamente.
-
Page 30: Cuidados E Limpeza
USO DA FUNÇÃO KEEP WARM (MANTER QUENTE) Abra a porta e coloque os alimentos no Quando o tempo terminar, o sinal de fim centro da grelha. Feche a porta. soará e o forno de bancada desligará Pressione Start (Iniciar) para começar o ciclo. automaticamente. -
Page 31: Solução De Problemas
WARNING SOLUÇÃO DE PROBLEMAS ADVERTÊNCIA Perigo de choque elétrico Conecte a uma tomada aterrada. Não remova o pino de aterramento. Não utilize adaptadores. Não utilize extensões. O não cumprimento dessas instruções pode resultar em morte, fogo ou choque elétrico. PROBLEMA SOLUÇÃO Verifique se o forno está... -
Page 32: Termo De Garantia
TERMO DE GARANTIA O seu produto KitchenAid é garantido contra defeitos de fabricação, pelo prazo de 12 meses, contado a partir da data da emissão da Nota Fiscal ou da entrega do produto, ao primeiro adquirente, sendo: • Os 03 (três) primeiros meses, - garantia legal;... - Page 33 TERMO DE GARANTIA • Problemas de oxidação/ferrugem causados pelos seguintes fatores: 1. Instalação em ambientes de alta concentração salina tais como regiões litorâneas; 2. Instalações em ambientes onde o produto esteja exposto a outros produtos químicos ácidos ou alcalinos que possam agredir a pintura do mesmo; 3.
- Page 34 ©2024 All rights reserved. ©2024 Todos os direitos reservados. 01/24 W11542841A...
Need help?
Do you have a question about the KOG21 7KC0128ZBM and is the answer not in the manual?
Questions and answers