
Related Manuals for Moosoo TD1 Series


Summary of Contents for Moosoo TD1 Series
- Page 1 User Manual TD1 Series TD1 Cordless Vacuum... support@flysums.com Mon. - Fri. 9am - 6pm (CST) Contact us We are here to help! support@flysums.com...
- Page 2 SAFETY WARNING WHAT'S IN THE BOX OVERVIEW ASSEMBLY CATALOGUE SPECIFICATION OPERATING INSTRUCTIONS CLEANING AND MAINTENANCE CLEANING A CLOG TROUBLESHOOTING WARRANTY...
-
Page 3: Safety Warning
SAFETY WARNING IMPORTANT SAFETY INSTRUCTIONS 11. Do not use the vacuum without the dust cup lid in place. When using an basic precautions should always be followed, including the following: 12. Do not put any objects into openings of the vacuum. Do not use when any READ ALL INSTRUCTIONS BEFORE USING (THIS APPLIANCE) openings are blocked. -
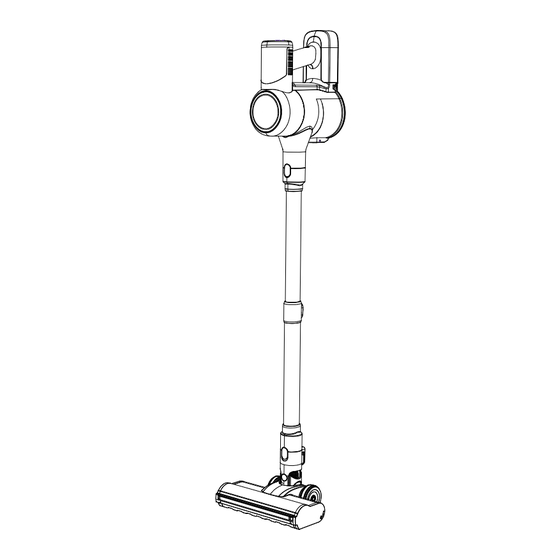
Page 4: What's In The Box
WHAT'S IN THE BOX OVERVIEW CAUTION: Power Switch Assemble the vacuum according to the "Assembly" section. Light Switch Suction Mode Switch Battery Pack Release Button Air Outlet Battery Pack Dust Cup Removal Button 2-in-1 Crevice Tool Vacuum Main Body Electric Floor Brush Dust Cup Wall Hanger One-key Empty... -
Page 5: Specification
Release Button SPECIFICATION Vacuum Cleaner Name Extension Rod Model TD1 Series Adapter Input Voltage 100-240V 50/60Hz Extend Button Adapter Output Voltage Environmental Protection Instructions: The chemical substances contained in the built-in lithium-ion battery of this product will pollute the environment. Before discarding the product, the battery must be removed and handed over to a professional waste battery recycling station for disposal. -
Page 6: Charging Instruction
OPERATING INSTRUCTIONS Charging Instruction Charging with Battery Pack CAUTION: (1) Press and hold the release button on the top of the battery pack while holding It is important to fully charge your machine before using it for the first time and after every use. the battery pack and take it out. -
Page 7: Button Description
OPERATING INSTRUCTIONS When the power indicator stops flashing, it means it is fully charged.When working, the 4 On-Screen Indicator Description squares of the power display will disappear in turn. When the bottom square is flashing, it means that the battery is low, and the vacuum cleaner needs to be charged as soon as possible. - Page 8 OPERATING INSTRUCTIONS Accessories Usage Guide Wall Hanger Instruction Insert wall anchors into the preinstalled holes of the wall, use two fixing Floor Brush: suitable for carpets, floors, and other flat, horizontal surfaces. screws to respectively pass through the two installation holes of the wall hanger.Align wall anchors, insert the fixing screw into wall anchors, and tighten the screw clockwise.
-
Page 9: Cleaning And Maintenance
OPERATING INSTRUCTIONS CLEANING AND MAINTENANCE Charging Base Instruction CAUTION: Always switch the vacuum OFF before attempting to empty the dust cup. Accessories can be inserted under the charging wall for storage. Clean the Dust Cup When the dust in the dust cup exceeds the MAX mark, please empty the dust cup in time, otherwise the suction may be weakened. - Page 10 CLEANING AND MAINTENANCE CAUTION: CAUTION: When “Brushroll Jam Indicator” flashes until the screen goes off and floor brush stops If you find that the suction is weak or the “ Suction Blockage Indicator" on the LED screen rotating, it means that the floor brush is blocked. Check the floor brush and clear the blockage. flashes, then please wash the filter.
-
Page 11: Troubleshooting
CLEANING A CLOG TROUBLESHOOTING CAUTION: PROBLEM POSSIBLE REASONS SOLUTIONS Low suction or vacuum failure caused by overheating may be due to a clog in the vacuum. The used adapter is not the Charge the vacuum with the original adapter. Please check and clear clogs in the dust cup, mesh shell, pre-motor filter, post-motor filter, The vacuum original one metal tube, and floor brush. -
Page 12: Customer Care
WARRANTY CUSTOMER CARE WARRANTY SERVICE The 1-year Limited Warranty is valid for Products. 1. If you have a query about your flysums appliance, please contact customer service at: support@flysums.com If your machine is used correctly according to the instruction manual and 2.
Need help?
Do you have a question about the TD1 Series and is the answer not in the manual?
Questions and answers
Where is the atmosphere light (blue light) when charging on the Moosoo TD1?
The atmosphere light is located on the vacuum cleaner and lights up blue when charging.
This answer is automatically generated