Table of Contents
Advertisement
Available languages
Available languages
Jump Starter/Power Pack
OWNER'S MANUAL
PLEASE SAVE THIS OWNERS MANUAL AND READ BEFORE EACH
USE. This manual will explain how to use the unit safely and effectively.
Please read and follow these instructions and precautions carefully.
1. IMPORTANT SAFETY INSTRUCTIONS
WARNING – RISK OF EXPLOSIVE GASES.
WORKING IN THE VICINITY OF A LEAD-ACID BATTERY IS
DANGEROUS. BATTERIES GENERATE EXPLOSIVE GASES
DURING NORMAL OPERATION. IT IS IMPORTANT THAT YOU
FOLLOW THESE INSTRUCTIONS EACH TIME YOU USE THE UNIT.
To reduce the risk of battery explosion, follow these instructions and
those published by the battery manufacturer and the manufacturer
of any equipment you intend to use in the vicinity of a battery.
Review cautionary markings on these products and on the engine.
WARNING! RISK OF ELECTRIC SHOCK OR FIRE.
1.1 Read the entire manual before using this product. Failure to do so
could result in serious injury or death.
1.2 Keep out of reach of children.
1.3 Do not put fingers or hands into any of the unit's outlets.
1.4 Do not expose the unit to rain or snow.
1.5 Use only recommended attachments (SA938 jump cable). Use of an
attachment not recommended or sold by the jump starter manufacturer
for this unit may result in a risk of fire, electric shock or injury to persons
or damage to property.
1.6 To reduce the risk of damage to the electric plug or cord, pull by the
adaptor rather than the cord when disconnecting the unit.
1.7 Do not operate the unit with damaged cables or clamps.
1.8 Do not operate the unit if it has received a sharp blow, been dropped or
otherwise damaged in any way; take it to a qualified service person.
1.9 Do not disassemble the unit; take it to a qualified service person when
service or repair is required. Incorrect reassembly may result in a risk of
fire or electric shock.
1.10 Changes or modifications not expressly approved by the party
responsible for compliance could void the user's authority to operate
this device.
WARNING! RISK OF EXPLOSIVE GASES.
1.11 To reduce the risk of a battery explosion, follow these instructions and
those published by the battery manufacturer and the manufacturer of
any equipment you intend to use in the vicinity of the battery. Review
the cautionary markings on these products and on the engine.
1.12 Do not set the unit on flammable materials, such as carpeting,
upholstery, paper, cardboard, etc.
SAVE THESE INSTRUCTIONS.
MODEL
SL1639
E115376
5-1
0099002405-00
Advertisement
Table of Contents

Related Manuals for Schumacher SL1639


Summary of Contents for Schumacher SL1639
- Page 1 Jump Starter/Power Pack MODEL SL1639 OWNER’S MANUAL E115376 PLEASE SAVE THIS OWNERS MANUAL AND READ BEFORE EACH USE. This manual will explain how to use the unit safely and effectively. Please read and follow these instructions and precautions carefully. 1. IMPORTANT SAFETY INSTRUCTIONS SAVE THESE INSTRUCTIONS.
-
Page 2: Personal Precautions
1.13 Never place the unit directly above battery being jumped. 1.14 Do not use the unit to jump start a vehicle while charging the internal battery. 1.15 Do not use a battery pack or appliance that is damaged or modified. Damaged or modified batteries may exhibit unpredictable behavior resulting in fire, explosion, or risk of injury. - Page 3 2.9 If battery acid contacts your skin or clothing, immediately wash the area with soap and water. If acid enters your eye, immediately flood the eye with cold running water and get medical attention right away. 2.10 If battery acid is accidentally swallowed, drink milk, the whites of eggs or water.
-
Page 4: Follow These Steps When Connecting To A Battery
3. FOLLOW THESE STEPS WHEN CONNECTING TO A BATTERY WARNING! A SPARK NEAR THE BATTERY MAY CAUSE A BATTERY EXPLOSION. TO REDUCE THE RISK OF A SPARK NEAR THE BATTERY: 3.1 Plug the clamps into the unit, and then attach the output cables to the battery and chassis as indicated below. -
Page 5: Charging The Jump Starter
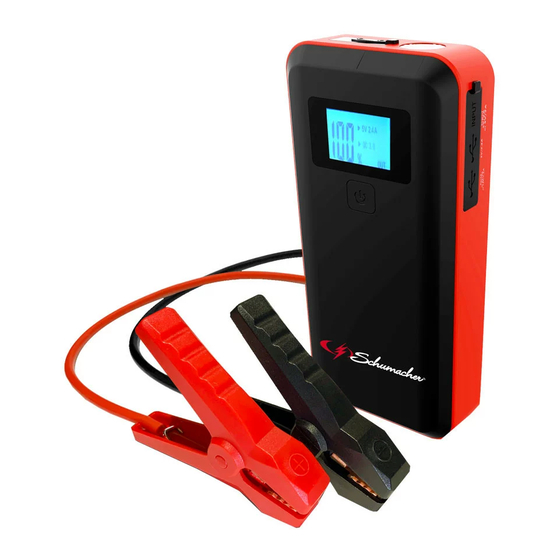
4. FEATURES 1. Display button 6. 2.4A USB output port 2. LCD display 7. 3A USB output port 3. Jump start output socket 8. Battery clamps/smart cable 4. LED light Not shown: 5. 2A USB input port 9. USB charging cable for recharging 10. - Page 6 2. Plug your charger into a live AC or DC power outlet. 3. The LCD display will light, the digit begins to flash and show “IN”, indicating that charging has begun. 4. The jump starter will fully charge in 2.5-4 hours. When the unit is fully charged, the display will show “100%”.
- Page 7 NOTE: Cold weather may affect the performance of the jump starter’s lithium battery. If you hear only a click and the engine does not turn over, try the following: With the jump starter connected to the car battery and the green LED illuminated on the smart cable, turn on all lights and electrical accessories for one minute.
-
Page 8: Maintenance Instructions
7. MAINTENANCE INSTRUCTIONS 1. After use and before performing maintenance, unplug and disconnect the unit. 2. Use a dry cloth to wipe all battery corrosion and other dirt or oil from the battery clamps, cords, and the outer case. 3. Do not open the unit, as there are no user-serviceable parts. 8. -
Page 9: Specifications
For information on our one year limited warranty, please visit schumacherelectric.com or call 1-800-621-5485 to request a copy. Go to schumacherelectric.com to register your product online. The Schumacher logo is a registered trademark of Schumacher Electric Corporation. • 9 •... -
Page 10: Manual Del Propietario
Arrancador/Power Pack MODELO SL1639 MANUAL DEL PROPIETARIO E115376 GUARDE ESTE MANUAL DEL PROPIETARIO Y LÉALO ANTES DE CADA USO. Este manual muestra cómo usar la unidad de manera segura y eficaz. Lea y siga atentamente estas instrucciones y precauciones. 1. INSTRUCCIONES DE SEGURIDAD IMPORTANTES GUARDE ESTAS INSTRUCCIONES ADVERTENCIA –... -
Page 11: Precauciones Personales
1.11 Para reducir el riesgo de explosión de la batería, siga estas instrucciones y las publicadas por el fabricante de la batería y el fabricante de cualquier equipo que pretenda usar en áreas contiguas a ella. Revise las marcas de precaución en estos productos o en el motor. - Page 12 2.3 Tenga especial cuidado para reducir el riesgo de caída de herramientas metálicas sobre la batería. Podrían generarse chispas o cortocircuitos en la batería o en otro componente eléctrico, con riesgo de explosión. 2.4 No permita que se congele la batería interna de la unidad. No cargue nunca una batería congelada.
- Page 13 • Conecte el equipo a una toma de corriente en un circuito distinto al cual está conectado el receptor. • Consulte al representante o a un técnico experimentado en radio y televisión.ARING TO USE THE UNIT ¡ADVERTENCIA! RIESGO DE CONTACTO CON EL ÁCIDO DE LA BATERÍA.
- Page 14 3.7 Para vehículos con conexión a tierra positiva, conecte la pinza NEGATIVA (NEGRA) del arrancador al borne NEGATIVO (NEG, N, -) de la batería no conectado a tierra. Conecte la pinza POSITIVA (ROJA) al chasis del vehículo o al bloque del motor alejado de la batería. No conecte la pinza al carburador, las líneas de combustible o las piezas de chapa de la carrocería.
-
Page 15: Instrucciones De Uso
5.1 COMPROBACIÓN DEL NIVEL DE LA BATERÍA INTERNA 1. Presione el botón de la pantalla. La pantalla LCD mostrará el porcentaje de carga de la batería. Una batería interna completamente cargada indicará 100 %. Cargue la batería interna si la pantalla indica que es inferior al 85 %. - Page 16 5. Para vehículos con conexión a tierra positiva, conecte la pinza NEGATIVA (NEGRA) del arrancador al borne NEGATIVO (NEG, N, -) de la batería no conectado a tierra. Conecte la pinza POSITIVA (ROJA) al chasis del vehículo o al bloque del motor alejado de la batería. No conecte la pinza al carburador, las líneas de combustible o las piezas de chapa de la carrocería.
-
Page 17: Instrucciones De Mantenimiento
2. La carga debería comenzar automáticamente. La pantalla mostrará qué puerto está en uso. 3. El tiempo de carga variará en función del tamaño de la batería del dispositivo móvil y del puerto de carga utilizado. NOTA: La mayoría de los dispositivos se cargan con cualquiera de los puertos USB, pero pueden cargar a una velocidad más lenta. -
Page 18: Solución De Problemas
9. SOLUCIÓN DE PROBLEMAS Arrancador de baterías PROBLEMA SOLUCIÓN No enciende la pantalla del Asegúrese de que la unidad esté arrancador. cargada Conéctelo a una toma de corriente, para reiniciar. La unidad está demasiado caliente o fría. El símbolo del termómetro está... -
Page 19: Especificaciones
Para obtener información sobre nuestra garantía limitada de un año, visite schumacherelectric.com o llame al 1-800-621-5485 para solicitar una copia. Visite schumacherelectric.com para registrar su producto en línea. El logotipo de Schumacher es una marca registrada de Schumacher Electric Corporation. • 19 •... -
Page 20: Manuel D'utilisation
Aide de Démarrage / MODÈLE SL1639 Bloc d’alimentation E115376 MANUEL D’UTILISATION ESSAYER DE GARDER LE MANUEL D’INSTRUCTIONS ET LE LIRE AVANT CHAQUE UTILISATION. Ce manuel explique comment utiliser l’unité d’une façon sûre et efficace. S’il vous plaît lisez et suivez ces instructions et précautions. -
Page 21: Mesures De Sécurité Personnelle
1.12 Ne mettez pas l’unité sur des matériaux inflammables, tels que les tapis, tissus d’ameublement, papier, carton, etc. 1.13 Ne placez jamais l’unité directement au-dessus de la batterie qui va être utilisé. 1.14 Ne pas utiliser l’unité pour démarrer un véhicule pendant le chargement de la batterie interne. - Page 22 2.5 Pour éviter les étincelles, NE JAMAIS laisser pinces se toucher ensemble ou contacter la même pièce de métal. 2.6 Considérez d’être assez proche d’une personne quand vous travaillez près d’un accumulateur au plomb pour qu’elle puisse venir à votre aide en cas d’urgence.
-
Page 23: Suivez Ces Étapes Lorsque Connexion À Une Batterie
2.14 Assurez-vous que la zone autour de la batterie est bien ventilée lorsque l’appareil est en cours d’utilisation. 2.15 Nettoyer les bornes de la batterie avant d’utilisée l’unité. Lors du nettoyage, ne laissez pas les particules de corrosion entrer en contact avec vos yeux, votre nez et votre bouche. -
Page 24: Caractéristiques
4. CARACTÉRISTIQUES 1. Bouton de l’afficheur 6. Port USB de sortie de 2,4 A 2. Afficheur ACL 7. Port USB de sortie de 3 A 3. JPrise pour démarrage 8. Câble intelligent et pinces d’appoint d’accumulateur 4. Éclairage à DEL Non montré... -
Page 25: Consignes D'utilisation
5.2 RECHARGE DES PILES INTERNES Pour recharger rapidement le démarreur d’appoint, utilisez un chargeur USB de 2 A (non compris). 1. Branchez l’extrémité à connecteur USB du câble de recharge dans le port USB du chargeur. Ensuite, branchez l’extrémité à connecteur USB du câble de recharge dans le port USB d’un chargeur. - Page 26 câble d’appoint se réinitialisera automatiquement lorsque la condition sera corrigée. 7. Après avoir fait les raccordements appropriés, lancez le démarrage de la voiture. Si le moteur ne démarre pas en dedans de 5-8 secondes, arrêtez le démarreur et attendez au moins 1 minute avant de faire un autre essai. REMARQUE: Si lors du second essai le démarreur ne tourne pas, vérifiez le câble d’appoint intelligent pour vous assurer que la DEL verte est allumée.
-
Page 27: Consignes D'entretien
REMARQUE : La plupart des appareils se rechargeront sur n’importe lequel des ports USB, mais pourraient se recharger à un taux moins rapide. REMARQUE : Le port USB de recharge rapide requiert un câble de recharge spécial (non compris). 4. Après l’utilisation du port USB terminée, débranchez le câble de l’appareil portable et de l’unité. - Page 28 PROBLÈME SOLUTION L’unité est trop chaude ou trop froide. L’icône du thermomètre L’icône s’éteindra lorsque la température clignote. reviendra à la normale. Le démarreur d’appoint ne se S’assurer que la source d’alimentation est recharge pas. sous tension. Le démarreur d’appoint Vérifier les connexions.
-
Page 29: Spécifications
Pour plus d’informations sur notre garantie limitée d’un an, veuillez visiter schumacherelectric.com ou appeler le 1-800-621- 5485 pour demander une copie. Aller sur schumacherelectric.com pour enregistrer votre produit en ligne. Le logo Schumacher est une marque de commerce déposée de Schumacher Electric Corporation. • 29 •...
Need help?
Do you have a question about the SL1639 and is the answer not in the manual?
Questions and answers
Where can you purchase a unit to charge the SL-1396 and SL 1673 systems? It's surprising that you do not supply a charging unit with the system.