Table of Contents
Advertisement
Quick Links
Advertisement
Table of Contents

Subscribe to Our Youtube Channel
Related Manuals for GROM Audio VLine GM1


Summary of Contents for GROM Audio VLine GM1
- Page 1 INSTALLATION MANUAL GM1/GM1S www.gromaudio.com www.gromaudio.com/support.html...
-
Page 2: Table Of Contents
CONTENTS Package contents......................3 CHAPTER 1 — INSTALLATION.................3 1.1 Before Installation 1.2 Tools 1.3 Vehicle Installation 1.4 Safety Guidelines & Appropriate Use Connect supplied Video Cable to factory display........5 Connect VLine Interface cable and USB cable to factory stereo..5 Connecting to VLine..................6 Routing the GPS Antenna. -
Page 3: Package Contents
GROM-VLINE VL2 SYSTEM PACKAGE CONTENTS MCFGML Power GVMF Video GMMINIUSB USB VLine module Cable Interface Cable cable GPS Antenna Microphone USB Extension cable CHAPTER 1 — INSTALLATION 1.1 Before the installation Before starting work with any wiring, please wait 90 seconds after turning the ignition to the OFF position and disconnecting the battery’s negative (-) terminal. -
Page 4: Safety Guidelines & Appropriate Use
wiring installation requires special technical skills and experience. If you do not feel comfortable doing the installation please consult with your local car audio shop or installation professional for instructions or assistance if necessary. Carefully remove the factory Stereo and Display out of the dash cavity with proper tools. -
Page 5: Connect Supplied Video Cable To Factory Display
Connect video cable GVMF to the factory display Locate the BLUE display port on the back of the car stereo display. If the port is empty, plug the supplied video cable (GVMF) into the port and leave the cable’s female connector with nothing attached. If a factory cable (typically blue) is plugged in, disconnect it. -
Page 6: Connecting To Vline
Connect GVMF video cable, MCFGML Interface cable, and GMMINIUSB cable to the VLine Route the unused ends of GVMF video cable, MCFGML interface cable, and GMMINIUSB cable to the VLine module and connect them to the corres- ponding ports. Important! Correct placement of VLine in your vehicle It is important to make sure you position VLine unit avoiding any excessive bends in the video cables and movement of the unit. -
Page 7: Routing The Gps Antenna
Routing the GPS antenna It can be mounted to the top of dashboard or to outside of vehicle whichever you prefer. Route to desired location. We recommend mounting inside of the vehicle on the passenger side of the dashboard as shown below. Plug GPS antenna into Camera AV port of VLine unit. -
Page 8: Installation Troubleshooting
Testing VLine operation Test VLine Operation before mounting the dashboard back. WARNING: Make sure to reconnect all unplugged connectors back to the vehicle before cycling the ignition. Cycle the ignition and press SOURCE button until in USB mode to enter VLine mode. -
Page 9: Mounting The Vline Module
3. The VLine is not visible under the stereo USB source, or the stereo USB source is not accessible. Check the GMMINIUSB cable and ensure it is properly connected to the USB pigtail cable of the VLine and the VLine’s USB pigtail cable is securely attached inside the VLine main module. -
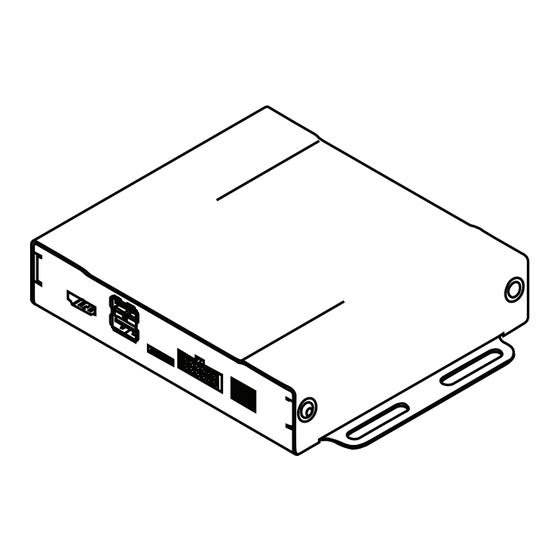
Page 10: Understanding Vline Ports
Understanding VLine ports HDMA WiFi / Bluetooth Output Antenna USB1 iPhone GPS / AV / Camera Input USB 1 HDMI IN HDMI OUT USB 2 CAMERA AV1 HDMI Input MicroSD Card Microphone (Pin side up*) USB2 OTG/USB storage USB1 iPhone connection Any other USB device (Keyboard / Mouse) USB2 USB flash drive... -
Page 11: Chapter 2 - Getting Started
CHAPTER 2 — GETTING STARTED 2.1 Initializing After connecting the VLine module to the stereo, and reconnecting all unplugged connectors back to the vehicle, an ignition cycle will have to be performed for the stereo to discover VLine and allow VLine to self config- ure. - Page 12 2.4 Adjusting Audio Bass, Treble, Balance/Fade for VLINE Use the Factory UI icon to get to the factory UI and adjust the sound settings. While in the VLine VL2 main screen, press on empty PLUS sign and go to Shortcuts --> Factory UI. Press on the Factory UI to get the shortcut icon to the main VLine screen.
- Page 13 Q. The VLine mode or OEM stereo mode is flickering/blinking. A. Ensure there are no any hard bends or cuts/pinches of the GVMF video cable. See p.5 of this manual. Q. VLine is misbehaving. A. Check for firmware update and apply the latest firmware, if available. Con- nect VLine to Wifi (see User Manual).
-
Page 14: Support
Unless otherwise prescribed by law, GROM Audio shall not be liable for any personal injury, property damage and or any incidental or consequential damages of any kind (including water damage) resulting from malfunctions, defects, misuse, improper installation or alteration of this product. -
Page 15: Grant Of License
IN CONNECTION WITH ANY BUSINESS, LOSS OF ANY GOODWILL, OR DAM- AGES. THE TERM ‘INCIDENTAL DAMAGES’ REFERS TO THE EXPENSES OF TRANSPORTING THE PRODUCTS TO THE GROM AUDIO SERVICE CENTER, LOSS OF THE END-USERS [ORIGINAL PURCHASER’S] TIME, LOSS OF THE USE... - Page 16 THE CARE AND CUSTODY OF THE PRODUCT. THE TERM ‘CONSEQUENTIAL DAMAGES’ REFERS TO THE COST OF REPAIRING OR REPLACING OTHER PROPERTY, WHICH IS DAMAGED WHEN THIS PRODUCT DOES NOT WORK PROPERLY, RESULTING FROM THE USE OR INABILITY TO USE THE PRODUCTS, INCLUDING ANY DAMAGES INCURRED DUE TO THE NEGLIGENT OPERATION OF A MOTOR VEHICLE, IN CONJUNCTION WITH THE USE OF SAID PRODUCTS.
- Page 17 You agree not to use the GROM Product: - for any illegal, non-personal or unauthorized purpose, - in a manner that could damage or cause risk to GROM Audio business, reputation, employees, customers, facilities, or to any third party, - in a manner that would distract the driver or that may otherwise cause...
- Page 18 GROM Audio is not in any way responsible for any such use by you. In all cases, GROM Audio may limit or revoke your use for any reason and at any time. Use of some GROM Product features while a vehicle is in motion may be against the laws of the jurisdiction in which you use the GROM Product.
- Page 19 You further agree to use maps, location, navigation and traffic applications when it is safe to the driver, vehicle occupants and bypassers. GROM Audio is not responsible for any mobile data charges resulted from using GROM Product.
- Page 20 GROM AUDIO. Quantities are subject to availability. E. ENTIRE AGREEMENT. These terms and conditions constitute the entire and...
Need help?
Do you have a question about the VLine GM1 and is the answer not in the manual?
Questions and answers