Table of Contents
Advertisement
Advertisement
Table of Contents

Related Manuals for Baofeng UV-5G PRO


Summary of Contents for Baofeng UV-5G PRO
- Page 1 UV-5G PRO GMRS Radio OWNER’S MANUAL...
- Page 2 PREFACE Thank you for purchasing UV-5G PRO Two Way Radio, It is a multitask GMRS transceiver. Combining the latest technology in radio communication along with a sturdy mechanical frame, UV-5G PRO is the ideal and effective solution for the professionals who need to stay in touch with the working team (in construction sites, buildings, shows, trade fairs or hotels) or for leisure users that just want to keep up with friends and family.
-
Page 3: Table Of Contents
Table of Contents Chapter1. Getting Started 5.3 Making a call 1.1 Regulations and Safety Warnings 5.4 Channel selection 1.2 Content of the packaging 5.5 Frequency (VFO) mode 1.3 Main features 5.6 Channel (MR) mode Chapter2. Charging the Battery Chapter6. Advanced Features 2.1 Charging the Battery Pack 6.1 Frequency scanning 2.2 Charger Supplied... -
Page 4: Chapter1. Getting Started
Chapter1. Getting Started Chapter1. Getting Started 1.1 Regulations and Safety Warnings This device complies with Part 15 of the FCC Rules. Operation is subject to the following two conditions: (1) This device may not cause harmful interference. (2) This device must accept any interference received, including interference that may cause undesired operation. Important: Any changes or modifications not expressly approved by the party responsible for compliance could void the user's authority to operate this device. - Page 5 RF Exposure Information WARNING! Read this information before using the radio. In August 1996 the Federal Communications Commission (FCC) of the United States with its action in Report and Order FCC 96-326 adopted an updated safety standard for human exposure to radio frequency electromagnetic energy emitted by FCC regulated transmitters.
- Page 6 GMRS Communication This GMRS (General Mobile Radio Service) feature is a land-mobile service available for short-distance, two-way communications in the USA. You must have a valid FCC license to communicate on these channels. The GMRS/FRS frequencies that radio this radio uses are set aside for communicating with others while hiking, biking, and working; keeping track of family and friends at a crowded public event;...
- Page 7 ■ Precautions for Portable Terminals Operating Prohibitions To protect you against any property loss, bodily injury or even death, be sure to observe the following safety instructions: 1. Do not operate the product in a location containing fuels, chemicals, explosive atmospheres and other flammable or explosive materials.
- Page 8 flammable or explosive materials. 2. Do not charge your battery that is wet. Please dry it with a soft and clean cloth prior to charge. 3. Do not charge your battery suffering deformation, leakage and overheat. 4. Do not charge your battery with an unauthorized charger. 5.
-
Page 9: Content Of The Packaging
1.2 Content of the packaging • 1 Radio • 1 Li-Ion battery pack • 1 Fast desktop charger • 1 Wall adaptor • 1 Antenna • 1 Belt clip If any item is missing, please verify with your dealer. 1.3 Main features •... -
Page 10: Charging The Battery Pack
If this is the case, replace the battery pack. 2.2 Charger Supplied Please use the specified charger provided by BAOFENG. Other models may cause explosion and personal injury. After installing the battery pack, and if the radio displays low battery with a voice prompt, please charge the battery. -
Page 11: How To Charge
2.4 How to Charge a. Plug the AC adaptor into the AC outlet, and then plug the cable of the AC adaptor into the DC jack located on the back of the charger. The indicator light blinks orange and is then ready to charge a battery. b. -
Page 12: Chapter3. Installation Of Accessories
Chapter3. Installation of Accessories Before the radio is ready for use we need to attach the antenna and battery pack, as well as charge the battery. 3.1 Installing/ Removing the Antenna a. Installing the Antenna: Screw the antenna into the connector on the top of the transceiver by holding the antenna at its base and turning it clockwise until secure. -
Page 13: Additional Speaker/Microphone (Optional)
Remove the battery pack To remove the battery, press the battery release above the battery pack, as you slide the battery downward. 3.4 Installing the Additional Speaker/Microphone (Optional) Pry open the rubber MIC-Headset jack cover and then insert the Speaker / Microphone plug into the double jack. -10-... -
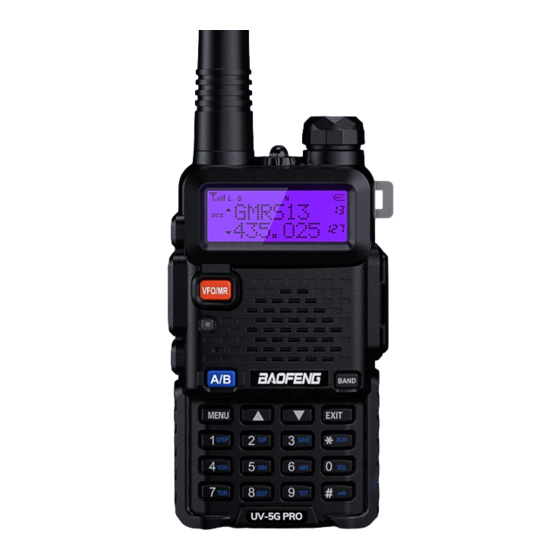
Page 14: Chapter4. Radio Overview
Chapter4. Radio Overview 4.1 Buttons and controls of the radio Antenna 7. PTT - Push to talk 13. BAND key LED flashlight VFO/MR mode key Keypad Power / Volume knob Status LED Speaker and microphone Two-line LCD Lanyard loop Battery pack Call key Accessory jack Battery contacts... - Page 15 4.2 Main controls and parts of the radio LCD Display Icon Description Icon Description Memory channel Reverse function enabled Least significant modifiers. Narrowband enabled CTCSS enabled Battery level indicator DCS enabled Keypad lock enabled Frequency shift direction if enabled in VFO Transmit power level indicator According to Power (High, Low) Dual watch enabled...
-
Page 16: Status Indications
indicating that you need to change your battery or put your radio in the charger. 4.3 Status Indications The status LED has a very simple and traditional design. When you receive a signal it turns green, when you transmit it turns red, and it's off in standby. -
Page 17: Chapter5. Basic Operations
To enable the scanner, press and hold the [*SCAN] key for about two seconds. • Zero 0 Key The BAOFENG UV-5G PRO features a battery voltage meter that the current voltage of the battery on the display. To see the voltage displayed, press and hold the [0SQL] key for about two seconds. -
Page 18: Making A Call
5.3 Making a call NOTE: Press the [A/B] key to switch the main channel to the other channel if there is 2 channels shown on the display. Press the [VFO/MR] key to switch between VFO and channel display. • Channel mode call: After selecting a channel, hold down the [PTT] key to initiate a call to the current channel. Speak into the microphone with normal tone. -
Page 19: Channel (Mr) Mode
c. Enter [4][6][2][6][1][2][5] on the numeric keypad. WARNING! Just because you can program in a channel does not mean you're automatically authorized to use that frequency. You may be tempted to use PMR446, FRS, GMRS and MURS (in USA) frequencies. Do note however that there are restrictions on these bands that make this transceiver illegal for use. -
Page 20: Tone Scanning
c. Press any key to stop scanning. Note: for Scan mode, see Menu No.18. 6.3 Tone Scanning Scanning for CTCSS and DCS Tones/Codes Scanning for a CTCSS tone or DCS code can be done while Frequency Mode (VFO) or Channel Mode (MR) is selected. Only when VFO mode is selected, can the detected tone/code be saved to menu 11/10. -
Page 21: Dual Watch
5. Press the [EXIT] key to exit the menu. Due to the way the BAOFENG UV-5G PRO is constructed, whenever one of the A or B Frequencies (VFO/MR) goes active, it will default to transmit on that channel. This behavior can be inconvenient, especially if when monitoring a frequency, you should not transmit on. -
Page 22: High/Low Power Fast Selection
Directly press [A/B] key to move the cursor up and down. Then, you can modify or confirm the parameters indicated by the cursor. Important1: UV-5G PRO has a dual-frequency display function. In frequency mode, you will see on the display two different receiving and transmitting frequencies; while in channel mode the two different channels will be displayed. -
Page 23: 1000Hz, 1450Hz, 1750Hz Tone-Burst
When the signal disappears the radio will automatically switch again to FM radio mode. 6.9 Flashlight This function is very useful for night illumination. To turn it on press MON; push it again, the flash light will be strobe; push it again: it will turn off. 6.10 1000Hz, 1450Hz, 1750Hz Tone-burst To send out a tone-burst;... -
Page 24: One Touch Frequency Search
The BAOFENG UV-5G PRO EU has a full implementation of DTMF, including the A, B, C and D codes. The numerical keys, as well as the [*SCAN], and [# ] , keys correspond to the matching DTMF codes as you would expect. The A, B, C and D codes are located in the [MENU], [▲],[▼]and [EXIT] keys respectively (†). -
Page 25: Using Short-Cuts
e. When you've selected the parameter you want to set for a given menu item; a). To confirm your selection, press [MENU] and it will save your setting and bring you back to the main menu. b). To cancel your changes, press [EXIT] and it will reset that menu item and bring you out of the menu entirely. f. - Page 26 Appendix A. – Trouble shooting guide Phenomena Analysis Solution The battery may be installed improperly. Remove and reattach the battery. The battery power may run out. Recharge or replace the battery. You cannot turn on the radio. The battery may suffer from poor contact caused by dirty or damaged Clean the battery contacts or replace the battery.
-
Page 27: Appendix A. - Technical Specifications
Appendix B. - Technical Specifications Scanning Receive Frequency FM65-108MHz; AM108-136MHz(Rx); 136-174MHz (Rx); 220-260MHz (Rx); 350-390MHz(Rx); 400-520MHz(Rx) Transmission Frequency GMRS Memory channels Power supply batteria Li-Ion da 7.4V/1800 mAh (BL-5) Operating temperature -10°C to + 45°C Working mode monoband/dualband Modulation F3E(FM) Max. -
Page 28: Appendix C. - Shortcut Menu Operations
Appendix C. - Shortcut Menu operations Name Enter item Select able U No. (Full Name) 0-9 Levels SQL - Squelch Level MENU+0 0:Lowest 9:Highest STEP –Step 2.5K/5.0K/6.25K/10.0K MENU+1 Frequency 12.5K/20.0K/25.0K/50.0K HIGH:5W(VHF) 4W(UHF)* TXP – Transmit Power MENU+2 Low:2W OFF: SAVE - Battery MENU+3 Saving OFF, 1-9... - Page 29 15,30…600S *This feature provides a safety switch that limits transmission time to a programmed value. This will promote battery conservation by not allowing TOT- Time-Out-Timer MENU+9 you to make excessively long transmissions, and in the event of a stuck PTT switch it can prevent interference to other users as well as battery depletion D023N…D754N...
- Page 30 67.0HZ…254.1HZ T-CTCS - Transmitter MENU+13 *Transmits a specific and continuous sub audible CTCSS signal to unlock the squelch of a distant receiver (usually a repeater). VOICE - Voice MENU+14 Reminding *Allows audible voice confirmation of a key press. ANI-ID -ANI-ID MENU+15 It can be programmed by software OFF: No DTMF Side Tones are heard...
- Page 31 0,1,2…,50ms PTT-LT – PTT ID delay MENU+20 *PTT-ID Delay (milliseconds) FREQ: Displays programmed Frequency MDF-A - Channel A CH: Displays the channel number MENU+21 Display Mode NAME: Displays the channel name *Note: Names must be entered using software. FREQ: Displays programmed Frequency MDF-B - Channel B CH: Displays the channel number MENU+22...
- Page 32 *When enabled, priority is returned to selected Watch mode display once the signal in the other display disappears. STE - Squelch Tail MENU+35 *This function is used eliminate squelch tail noise Elimination between BAOFENG handhelds that are communicating directly (no repeater). Reception -29-...
- Page 33 of a 55 Hz or 134.4 Hz tone burst mutes the audio long enough to prevent hearing any squelch tail noise. OFF/ 1,2,3…10 RP-STE-Squelch Tail MENU+36 *This function is used eliminate squelch tail noise Elimination when communicating through a repeater. OFF/ 1,2,3…10 RPT-RL - Delay the MENU+37...
- Page 34 Appendix D. - GMRS Frequency Chart (MHz) Type of Power Type of Power CH.No CH.Freq. CH.No CH.Freq. Radio Output Radio Output 462.5625 GMRS High 462.5750 GMRS High 462.5875 GMRS High 462.6000 GMRS High 462.6125 GMRS High 462.6250 GMRS High 462.6375 GMRS High 462.6500...
-
Page 35: Appendix E. - Dcs Table
Appendix E. - DCS Table DCS CODE LIST Number Code Number Code Number Code Number Code Number Code D023N D025N D026N D031N D032N D036N D043N D047N D051N D053N D054N D065N D071N D072N D073N D074N D114N D115N D116N D122N D125N D131N D132N D134N D143N... - Page 36 D731N D732N D734N D743N D754N D023I D025I D026I D031I D032I D036I D043I D047I D051I D053I D054I D065I D071I D072I D073I D074I D114I D115I D116I D122I D125I D131I D132I D134I D143I D145I D152I D155I D156I D162I D165I D172I D174I D205I D212I D223I D225I D226I...
-
Page 37: Appendix F. - Ctcss Table
Appendix F. - CTCSS Table CTCSS CHART (Hz) Number Frequency Number Frequency Number Frequency Number Frequency Number Frequency 67.0 69.3 71.9 74.4 77.0 79.7 82.5 85.4 88.5 91.5 94.8 97.4 103.5 107.2 110.9 114.8 118.8 123.0 127.3 131.8 136.5 141.3 146.2 151.4 156.7... - Page 38 Disclaimer Disclaimer The Company endeavors to achieve the accuracy and completeness of this manual, but no warranty of accuracy or The accuracy and completeness of the contents are sought in the process of compilation, but we do not bear any reliability is given.
Need help?
Do you have a question about the UV-5G PRO and is the answer not in the manual?
Questions and answers