Table of Contents
Advertisement
Advertisement
Table of Contents

Related Manuals for Baofeng UV-25 Series


Summary of Contents for Baofeng UV-25 Series
- Page 1 UV-25 SERIES Amateur Radio OWNER’S MANUAL...
- Page 2 PREFACE Thank you for purchasing this product. Which is a dual band/dual display/dual watch. This easy-to-use radio will deliver you secure, instant and reliable communications at peak efficiency. Please read this manual carefully before use. The information presented herein will help you to derive maximum performance from your radio. WARNING!...
-
Page 3: Table Of Contents
Table of Contents Chapter1. Ge�ng Started 5.2 Adjus�ng the volume 1.1 Regula�ons and Safety Warnings 5.3 Making a call 1.2 Main features 5.4 Channel selec�on 1.3 Content of the packaging 5.5 Frequency (VFO) mode Chapter2. Charging the Ba�ery 5.6 Channel (MR) mode 2.1 Charging the Ba�ery Pack Chapter6. -
Page 4: Chapter1. Ge�Ng Started
Chapter1. Getting Started 1.1 Regulations and Safety Warnings EU Regulatory Conformance As certified by the qualified laboratory, the product is in compliance with the essential requirements and other relevant provisions of the Directive 2014/53/EU. All applicable EU regulations are regarded (2006/66/EC, 2011/65/EU, (EU)2015/863, 2012/19/EU). NOTE: It can be operating under 2000m. - Page 5 • User awareness instructions should accompany device when transferred to other users. • Do not use this device if the operational requirements described herein are not met. Operating Instructions: • Transmit no more than the rated duty factor of 50% of the time. To transmit (talk), press the Push-to-Talk (PTT) key. To receive calls, release the [PTT] key.
- Page 6 3. Do not keep the product receiving at high volume for a long time. 4. For vehicles with an air bag, do not place the product in the area over the air bag or in the air bag deployment area. 5.
-
Page 7: Main Features
7. Do not squeeze and penetrate the battery, nor remove its housing. Transportation Instructions 1. Damaged batteries must not be transported. 2. To avoid short circuit, separate the battery from metal pars or from each other if two or more batteries are transported in one packaging. -
Page 8: Content Of The Packaging
1.3 Content of the packaging • 1 Radio • 1 Li-Ion battery pack • 1 Fast desktop charger •1 Antenna If any item is missing, please verify with your dealer. Chapter2. Charging the Battery 2.1 Charging the Battery Pack The Li-ion battery pack is not charged at the factory; please charge it before use. Charging the battery pack for the first time after purchase or extended storage (more than 2 months) may not bring the battery pack to its normal maximum operating capacity. -
Page 9: How To Charge
When the indicator light on the back of the battery lights up green, it indicates that charging is complete. Remove the cable from the Type-C port of the battery. Baofeng recommends your radio is turned off while being charged. 2.5 LED Indicator... -
Page 10: Chapter3. Installa�On Of Accessories
Removing the Antenna: Turn the antenna counter-clockwise to remove it. 3.2 Accessory jack The accessory jack on the Baofeng UV25 is a Kenwood compatible two (2)-pin design. Typical 2 pin Kenwood headset configuration. -
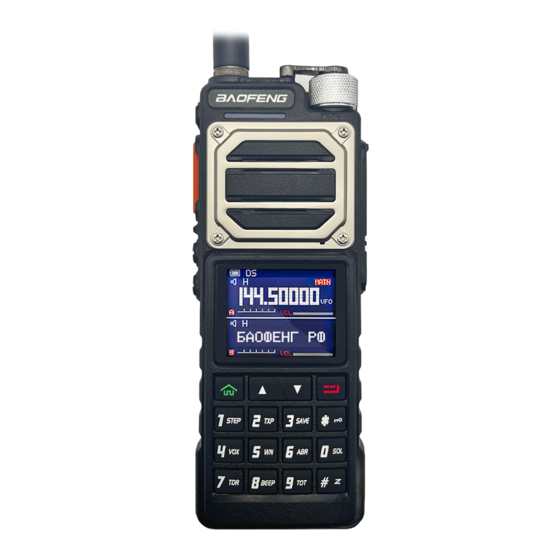
Page 11: Chapter4. Radio Overview
Chapter4. Radio Overview 4.1 Buttons and controls of the radio 1. Antenna 2. Status LED 3. SK1- Weather and search frequency key 4. PTT key 5. SK2- Broadcast FM/Monitor key 6. SK3- Flashlight and Alarm key 7. or navigation keys Key (Menu and VFO/MR mode key) 9. -
Page 12: Lcd Display
4.2 LCD Display Icon Description RSSI Squelch Open/ Close Indicator H/M/L Transmit power level indicator, According to Power (High/Middle/Low) Make sure you can hear the DTMF side tone from the radio speaker, set to DT-ST, ANI-ST, DT+ANI. DCS enabled CTCSS enabled Enables access of repeaters in VFO/Frequency Mode. -
Page 13: Status Indica�Ons
4.3 Status Indications The status LED has a very simple and traditional design. LED Indicator Radio Status Constant Red Transmitting. Constant Green Receiving. 4.4 Main keypad controls • Side key 1 (One touch search frequency Alarm) Press and hold the [SK1] key to activate the frequency search function and enter the search display interface •... -
Page 14: Chapter5. Basic Opera�Ons
• key Keep it pressed it for more than 2 seconds, the channel and frequency will move downwards rapidly; in SCAN mode, press this control to move the scanning downwards. • press to exit the Menu and functions. A/B (appears on the display): press to select the desired frequency (VHF or UHF) in the main or secondary display. -
Page 15: Adjus�Ng The Volume
5.2 Adjusting the volume To turn up the volume, turn the volume/power knob clock-wise. To turn the volume down, turn the Volume/Power knob counter-clock-wise. Be careful not to turn it too far, as you may inadvertently turn your radio off. By using the monitor function, enabled from the [FM broadcast/Monitor] key below the PTT, you can more easily adjust your volume by adjusting it to the un-squelched static. -
Page 16: Making A Call
rules and regulations apply to your area. 5.6 Channel (MR) mode and Channel selection There are two modes of operation: Frequency (VFO) mode, and Channel or Memory (MR) mode. For everyday use, Channel (MR) mode is going to be a whole lot more practical than Frequency (VFO) mode. However, Frequency (VFO) mode is very handy for experimentation out in the field. - Page 17 5.8 Emergency Alert The Emergency Alert feature can be used to signal members in your group for help. To activate the emergency alert function, press and hold the [SK3] key for 3 seconds. The radio will send out a loud siren sound and the flashlight will flash.
-
Page 18: Chapter6. Advanced Features
5.12 Frequency reversal A short momentary press of the key enables the reverse function If you for some reason want to listen to the repeater's input frequency instead, press key momentarily and you'll reverse your transmit and receive frequencies. » After activating the frequency reversal function, the first line of the screen displays "R" 5.13 TX Repeaters tone Press [PTT] + [SK3] key to send 1750Hz repeaters tone. - Page 19 6.1.1 Basic use Using the menu with arrow keys a. Press the key to enter the menu. b. Use the / keys to navigate between menu items. c. Once you find the desired menu item, press again to select that menu item. d.
- Page 20 g. All further examples and procedures in this manual will use the numerical menu shortcuts. 6.2 Scanning The Radios features a built in scanner for the VHF and UHF bands. When in Frequency (VFO) mode it will scan in steps according to your set frequency step.
-
Page 21: Frequency Scanning
To resume scanning you must press and hold the key again. 6.2.2 Frequency scanning This function can scan the frequency. a. In frequency mode, press key for more than 2 seconds. The radio will start scanning the frequency according to the set frequency step. - Page 22 receiving band will detect a signal. 6.3 Manual Programming (Channels Memory) Memory channels are an easy way to store commonly used frequencies so that they can easily be retrieved at a later date. The radios features 999 memory channels that each can hold: Receive and transmit frequencies, transmit power, group signaling information, bandwidth, ANI/ PTT-ID settings and a six character alphanumeric identifier or channel name Frequency Mode vs.
-
Page 23: Repeaters Programming
-->> TX has been added i. Press and hold the key to return to the MR mode and the channel number will reappear. Ex 2. Programming a Simplex Channel with CTCSS tone EXAMPLE New memory in Channel 10: RX = 432.6625 MHz TX CTCSS tone 123.0 a. -
Page 24: Vox
h. Enter [2][8] on the numeric keypad to get to offset direction. i. Use the / keys to select + (positive) or - (negative) offset. j. Press key to confirm and save. k. Optional: a). Save to memory, see the section called “Manual programming” for details. b). -
Page 25: Dual Watch
6.6 Dual Watch In certain situations, the ability to monitor two channels at once can be a valuable asset. This can be achieved in one of two ways. You can either have one receiver in your radio and flip-flop between two frequencies at a fixed interval (known as Dual Watch), or you can equip a radio with two receivers (known as Dual Receive or Dual VFO). -
Page 26: Dtmf
In standby mode, Press [MENU] + 45. The screen displays “SCRAMBLE”. Press [MENU] to enter the function. Press the keys to select the scramble mode (between MODE1 and MODE3) to / activate the scramble function. “SCR” icon will appear on the display. 6.9 DTMF DTMF is an in-band signaling method using dual sinusoidal signals for any given code. - Page 27 6.10.1 Display backlight (ABR) - MENU 7 In standby mode, press + 7. The screen will display “ABR ”. Press key to enter the function. Press the / keys to select the always on/required delay time (ON/5sec/5sec/10sec/15sec/20sec) the backlight of the display, then press key to confirm.
- Page 28 Press key again to confirm your selection. 6.10.6 Roger Beep, end Transmission Tone (ROGER) - MENU 36 Roger Beep can be enabled/disabled: • OFF: Roger Beep disabled • ON: Roger Beep tone at the end of transmission In standby mode, press + 36;...
-
Page 29: Reset - Menu
Enable the power on password function. Each time the radio is turned on, it will display "Input Password" to prompt for the correct password. 6.11 Reset - MENU 42 This transceiver has two Reset modes available: VFO and ALL. • Reset VFO: all the settings except channels will return to the default settings. •... -
Page 30: Appendix A. - Trouble Shoo�Ng Guide
Appendix A. – Trouble shooting guide Phenomena Analysis Solution The battery may be installed improperly. Remove and reattach the battery. The battery power may run out. Recharge or replace the battery. You cannot turn on the radio. The battery may suffer from poor contact caused by dirty Clean the battery contacts or replace the battery. -
Page 31: Appendix B. - Shortcut Menu Opera�Ons
Appendix B. - Shortcut Menu operations Name Description MENU Settings (Full Name) Squelch silences the receiver when there is no [0 - 9] signal. Setting the squelch to 0 will open up the - Sensitivity can be varied from .1 to .3 mV on - Squelch Level squelch entirely. - Page 32 BEEP - Keypad Beep OFF [0] | ON [1] Allows audible confirmation of a key press *This feature provides a safety switch that limits transmission time to a programmed value. This will promote battery conservation by not TOT- Transmission OFF [0] 15[1] - 180[12] in 15 second steps allowing you to make excessively long Time-out-Timer (TIMEOUT-15)/15=[n]...
- Page 33 VOICE OFF [0] | ON [1] Allows audible voice confirmation of a key press - Voice Prompt Set the language type of menu and prompt voice. LANGUAGE ENGLISH: Display as an English menu with • ENGLISH [0] | 中文 [1] - Language selection English prompts for operation.
- Page 34 MDF-A CH [0]: Displays the channel number • [A] MR/Channel Mode Display Format - Channel Mode A NAME [1]: Displays the channel name. • Note: Names must be entered using software. Display FREQ [2]: Displays programmed Frequency • MDF-B CH [0]: Displays the channel number •...
- Page 35 • followed by the ANI code over-the-air followed by the ANI code over-the-air This function is used eliminate squelch tail noise between BaoFeng handhelds that are communicating directly (no repeater). - Squelch Tail OFF [0] | ON [1] Reception of a 55 Hz or 134.4 Hz tone burst...
-
Page 36: Appendix C. - Technical Specifica�Ons
Activate the radio power-on password. You POWER ON PWD OFF [0] | ON [1] must enter the correct password to turn on the -Power on password radio Activate the stopwatch function. Press the STOP WATCH key to start timing. Scramble is a voice inversion function that enables private communication by scramble SCRAMBLE OFF [0] | ON [1]... - Page 37 Declaración de conformidad Baofeng y Pofung declaran por la presente que el tipo de equipo de radio que figura en las Especificaciones técnicas cumple con la Directiva 2014/53 / EU. El texto completo de la Declaración de conformidad de la UE está disponible en el siguiente enlace: http://www.pofung.cn/download.asp?EnBigClassName=EU%20DOC.
- Page 38 Dichiarazione di conformità Baofeng e Pofung dichiarano con la presente che il tipo di apparecchiatura radio elencato nelle Specifiche Tecniche è conforme alla Direttiva 2014/53/EU. Il testo completo della Dichiarazione di Conformità UE è disponibile al seguente link: http://www.pofung.cn/download.asp?EnBigClassName=EU%20DOC. Tramite il tuo helpdesk Baofeng locale, il tuo rivenditore da cui hai acquistato questa radio o invia un'e-mail a wangjianhui@baofengradio.com.
- Page 39 konsultieren. Sie müssen insbesondere im Besitz einer ihnen von ihrer jeweils zuständigen Behörde zugeteilten Konzession oder Frequenz sein. ATTENTION: conditions d’utilisation! La bande de fréquences sur laquelle cet appareil fonctionne est gérée par des limitations et/ou des autorisations pour leur utilisation.
- Page 40 riconsegnarla al rivenditore al momento dell’acquisto di una nuova apparecchiatura di tipo equivalente, in ragione di uno a uno. L’adeguata raccolta differenziata per l’avvio successivo dell’apparecchiatura dismessa al riciclaggio, al trattamento e allo smaltimento ambientalmente compatibile contribuisce ad evitare possibili effetti negativi sull’ambiente e sulla salute e favorisce il riciclo dei materiali di cui è...
- Page 41 -38-...
- Page 42 -39-...
- Page 43 -40-...
- Page 44 Disclaimer The accuracy and completeness of the contents are sought in the process of compilation, but we do not bear any responsibility for the possible errors or omissions. With the continuous development of technology, we reserve the right to change the design and specification of the product without notice. No copy, modification, translation and dissemination of this handbook may be made in any form without the prior written authorization of our department.
Need help?
Do you have a question about the UV-25 Series and is the answer not in the manual?
Questions and answers