Table of Contents
Advertisement
Quick Links
EN
INCREASE
EFFICIENCY
Operation Manual
BIND CONTROL
Measuring device for quality control
of perfect bindings and wire stitchings
PITSID Polygraphische innovative Technik Leipzig GmbH
Mommsenstrasse 2 | 04329 Leipzig | Germany
Tel +49 341 25942-0 | Fax +49 341 25942-99
EN
info@pitsidleipzig.com | www.pitsidleipzig.com
Advertisement
Table of Contents

Related Manuals for PITSID BIND CONTROL


Summary of Contents for PITSID BIND CONTROL
- Page 1 Operation Manual BIND CONTROL Measuring device for quality control of perfect bindings and wire stitchings PITSID Polygraphische innovative Technik Leipzig GmbH Mommsenstrasse 2 | 04329 Leipzig | Germany Tel +49 341 25942-0 | Fax +49 341 25942-99 info@pitsidleipzig.com | www.pitsidleipzig.com...
-
Page 2: Table Of Contents
6.2 Device Placement 6.3 Technical Design of the Device 6.3.1 Front View BIND CONTROL 6.3.2 Rear View BIND CONTROL Connection Ports of the BIND CONTROL 7.1 Electrical Connection 7.2 Data Connection 7.3 Calibration Opening 8 Working With the BIND CONTROL 8.1 Handling Instructions... - Page 3 10 Verifying the Calibration These operating instructions support you during the initial start-up, operation and 11 Cleaning maintenance of the Perfect Binding Tester BIND CONTROL. 12 Storage, Transportation It contains important information, the observance of which ensures safe use. Familiar-...
-
Page 4: Intended Use And Restrictions On Use
2.1 Features and Possible Applications Attention The BIND CONTROL is a special testing device that was developed for the qualitative testing of perfect bound products that are cut to a sample size of 10 cm spine length Improperly opening individual system components can lead to prop- and 11 to 13 cm page width. -
Page 5: Technical Data
Measuring System Sample dimensions Spine length: 10 cm / Page width: 11 to 13 cm Display 4 lines 6.1 Scope of Delivery • Desktop device BIND CONTROL Display size 60 x 38 mm • Power cord Resolution 0.1 N/cm •... -
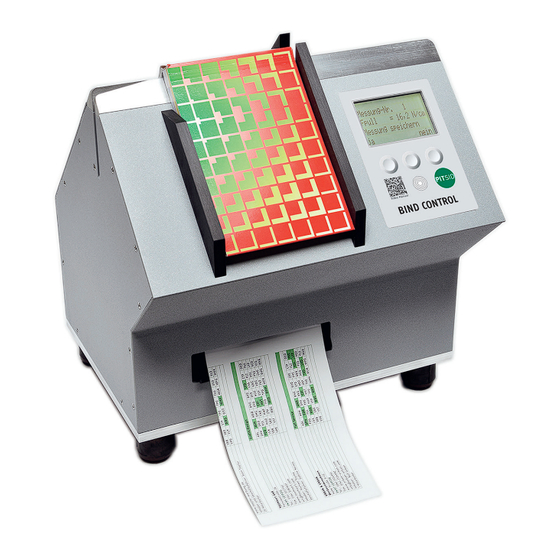
Page 6: Technical Design Of The Device
Connection Ports of the BIND CONTROL 6.3.1 Front View BIND CONTROL Electrical Connection The BIND CONTROL operates with AC current. To power the device, please use the sup- Operating plied and tested power cable and plug. Plug the BIND CONTROL into a grounded pow- panel er outlet. -
Page 7: Working With The Bind Control
Keep the BIND CONTROL and the PC connected with the USB cable. ▬ Turning the BIND CONTROL on and off is done with the main power switch located on Open the Device Manager (Control Panel > Category ‚Hardware and Sound‘... -
Page 8: Using The Software Program
PC. The data will be written directly into a Microsoft Excel spreadsheet. Instructions for Use: ▬ Turn on the BIND CONTROL and connect it with your PC using the supplied USB cable. ▬ Start the program BindControlDataAccess. The programme will start a new Mi- crosoft Excel fi le and will try to establish a connection to the BIND CONTROL. -
Page 9: Measurement
After the measurement, the pulled-out page will be ejected via the ejection slot. If the interface is not established after an extended period of time, please check the USB connection and the installa- Measurement No.: 1 tion of the driver. Fpull =9.3 N/cm Store Measurement... -
Page 10: The Guided Measurement
If you confi rm with ‘Yes’, the collected values will be transmitted to the PC via the Choice of Glue interface. There, they will be fi lled into a protocol for quality control. Within this menu, the glue which is used to bind the books is set. The available choices are "Hot melt", "PUR"... -
Page 11: Settings
Poor 0= 0% ed values for binding strength are given. These values are already set as evaluation ▶▶▶ criteria in the BIND CONTROL. Pressing ‘End’ returns to measurement mode to continue the measurement series. Assessment of the EVA hot melt... -
Page 12: Verifying The Calibration
Cleaning description of the error after contacting us to: PITSID Polygraphische innovative Technik Leipzig GmbH If necessary, the device can be cleaned with a dry or damp cloth, or a cleaning agent can be used if it is very dirty. -
Page 13: Disposal
▬ parties are not agreed upon with PITSID – Polygraphische Innovative Technik Leipzig EMC Directive 2014/30/EU of the European Parliament and of the Council of Feb- GmbH which go beyond the activities described in this product. This also applies to ruary 26, 2014 on the harmonization of the laws of the member states relating repair measures carried out independently or carried out by third parties. -
Page 14: Malfuncions
Malfunctions Error Messages If no measured values can be determined, error messages provide information on operation. Troubleshooting If the measuring device malfunctions, observe the information on operation (action). Error messages are visible via the operating panel Section 6.3 Technical Design of the Device). Error Cause Action... - Page 15 DOC_BIND CONTROL_EN_20231117...
Need help?
Do you have a question about the BIND CONTROL and is the answer not in the manual?
Questions and answers