Hikmicro HABROK 4K Series User Manual
Multi-spectrum binocular
Hide thumbs
Also See for HABROK 4K Series:
- Quick start manual (144 pages) ,
- Quick start manual (150 pages)
Table of Contents
Advertisement
Quick Links
Advertisement
Table of Contents

Related Manuals for Hikmicro HABROK 4K Series


Summary of Contents for Hikmicro HABROK 4K Series
- Page 1 User Manual Multi-Spectrum Binocular HABROK 4K SERIES V5.5.92 202404 Contact Us...
-
Page 2: Table Of Contents
Multi-Spectrum Binocular User Manual CONTENTS Overview ..........................1 Main Function ............................1 Appearance ............................. 1 Preparation........................5 Install Battery ............................5 2.1.1 Battery Instruction ..........................5 2.1.2 Battery Installation ..........................5 Cable Connection ........................... 6 Mount Neck Strap ........................... 7 Mount Tripod Adapter ..........................8 Power On/Off ............................ - Page 3 Record Video ............................ 29 5.4.4 View Local Files ..........................30 Hot Tracking ............................31 Export Files ............................32 5.6.1 Export Files via HIKMICRO Sight ..................... 32 5.6.2 Export Files via PC ........................... 33 Direction Display ........................... 33 5.7.1 Switch on Compass ......................... 33 5.7.2...
-
Page 4: Overview
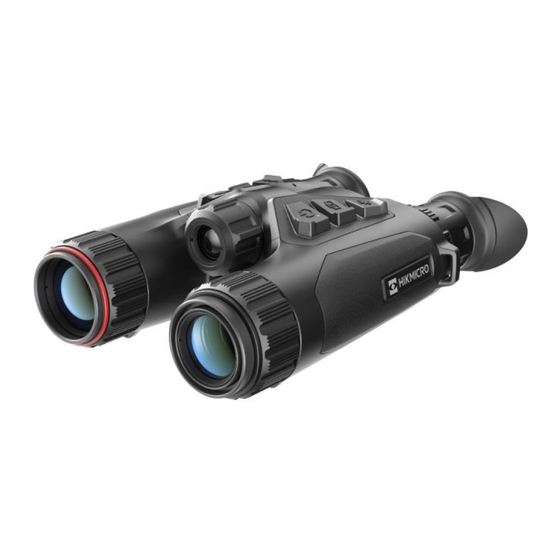
Multi-Spectrum Binocular User Manual Overview HIKMICRO HABROK 4K series is a powerful and innovative digital and thermal binocular designed especially for daytime use. This all-in-one binocular can be mainly applied in forest & field hunting, birding, animal searching, adventuring, and rescuing in various weather conditions. - Page 5 Multi-Spectrum Binocular User Manual Pictures in this manual are for illustration purpose only. Please take the actual product for reference. Figure 1-1 Appearance Table 1-1 Description of Buttons and Components Component Description The piece placed closest to the eye to view the target.
- Page 6 Multi-Spectrum Binocular User Manual 4 & 9 Focus Ring Adjusts focus to obtain clear targets. Thermal Lens For thermal imaging. Helps to view target clearly in the dark Infrared Light environment. Laser Measures the distance to the target with Rangefinder laser.
- Page 7 Multi-Spectrum Binocular User Manual Hold: Save and exit menu. Non-Menu Mode: Press: Switch digital zoom. Zoom Hold: Turn on/off PIP (Picture-in-Picture). Menu Mode: Press to move down. Note The power indicator stays solid red when the device is on. ...
-
Page 8: Preparation
Multi-Spectrum Binocular User Manual Preparation Install Battery Battery Instruction 2.1.1 Remove the battery if the device is not used for a long time. The external rechargeable battery type is 18650, and the battery size should be 19 mm × 70 mm. The rated voltage is 3.6 VDC, and the battery capacity is 3200 mAh. -
Page 9: Cable Connection
Multi-Spectrum Binocular User Manual Figure 2-2 Install the Battery 3. Close the battery compartment cover and slide to lock it. Figure 2-3 Close the Cover Cable Connection Connect the device and power adapter with a type-C cable to charge the device. -
Page 10: Mount Neck Strap
Multi-Spectrum Binocular User Manual Figure 2-4 Cable Connection Note Please charge the device after the battery is installed in the battery compartment of the device. Make sure the battery temperature is between 0°C to 45°C (32°F to 113°F) when charging. ... -
Page 11: Mount Tripod Adapter
Multi-Spectrum Binocular User Manual Figure 2-6 Thread Neck Strap through Strap Buckle 3. Thread the neck strap through the strap keeper. Figure 2-7 Thread Neck Strap through Strap Keeper 4. Repeat above steps to finish mounting. 5. Adjust the length of neck strap as needed. Mount Tripod Adapter Steps 1. -
Page 12: Power On/Off
Multi-Spectrum Binocular User Manual Figure 2-8 Insert the Column 2. Rotate the tripod adapter screw clockwise to fix the tripod adapter. Figure 2-9 Rotate the Screw Power On/Off Power On When the device is connected to cable or the battery is enough, hold power on the device. -
Page 13: Auto Screen Off
When the low power note shows, charge the battery. The auto power off takes effect only when you don’t operate the device and the device isn’t connected with HIKMICRO Sight app at the same time. The auto power off countdown will start again when the device reenters standby mode, or the device is restarted. -
Page 14: Menu Description
Multi-Spectrum Binocular User Manual You can do one of the following methods to enter the standby mode when the display is turned on: Tilt the device downwards from 70° to 90°. Rotate the device horizontally from 75° to 90°. ... -
Page 15: App Connection
Multi-Spectrum Binocular User Manual App Connection Connect the device to the HIKMICRO Sight app via hotspot, then you can capture picture, record video, or configure parameters on your phone. Steps 1. Search the HIKMICRO Sight on App Store (iOS System) or Google Play™... -
Page 16: Upgrade Device
Multi-Spectrum Binocular User Manual 1. Open the HIKMICRO Sight and connect your device to the app. 2. Check if there is an upgrade prompt on the device management interface. If there is no upgrade prompt, the firmware is the latest version. - Page 17 Multi-Spectrum Binocular User Manual Caution During the upgrade package transmission, make sure the device is connected to your PC. Otherwise, it may cause unnecessary upgrade failure, firmware damage, etc.
-
Page 18: Image Settings
Multi-Spectrum Binocular User Manual Image Settings You can set palettes, brightness, scenes, FFC (flat field correction), and DPC (defective pixel correction) to display the better image effect. Adjust Device Figure 3-1 Adjust Device Adjust Infrared Light: Slightly rotate to adjust the beam angle of the infrared light. -
Page 19: Adjust Brightness
Multi-Spectrum Binocular User Manual Note When adjusting diopter, DO NOT touch the surface of lens to avoid smearing the lens. Adjust Brightness You can adjust the brightness in the menu. Steps 1. Press to show the menu. 2. Press to select and press to confirm. -
Page 20: Adjust Sharpness
Multi-Spectrum Binocular User Manual Figure 3-2 Adjust Tone Adjust Sharpness Steps 1. Press to show the menu. 2. Go to Advanced Settings, and press to select 3. Press to confirm, and press to adjust sharpness. 4. Hold to save and exit. -
Page 21: Select Scene
Multi-Spectrum Binocular User Manual Figure 3-3 Sharpness Adjustment Comparison Select Scene You can select proper scene according to actual using scene to improve the display effect. Steps 1. Press to show the menu. 2. Go to Advanced Settings, and press to select 3. - Page 22 Multi-Spectrum Binocular User Manual Note At least one palette should be enabled. 5. Hold to save the settings and exit. 6. Press in live view interface to switch the selected palettes. Optical The image of optical channel is displayed in this mode. White Hot The hot part is light-colored in view.
- Page 23 Multi-Spectrum Binocular User Manual Red Hot The hot part is red-colored in view. The higher the temperature is, the redder the color is. Fusion From high temperature to low temperature, the image is colored in from white, yellow, red, pink to purple.
-
Page 24: Set Display Mode
Multi-Spectrum Binocular User Manual Set Display Mode You can select different display modes in different scenes. Hold live view interface to switch display modes in the optical channel. Day, night, and auto modes are selectable. : Day Mode: You can use this mode at daytime and in bright ... -
Page 25: Adjust Digital Zoom
Multi-Spectrum Binocular User Manual Figure 3-5 Set PIP Mode Note If the PIP function is enabled, only the PIP view zooms when adjusting the digital zoom ratio. If the PIP function is enabled in thermal mode, the PIP view only switches between current palette and optical mode;... -
Page 26: Correct Defective Pixel
Multi-Spectrum Binocular User Manual 1. Press to show the menu. 2. Go to Advanced Settings, and select Function Settings. 3. Press to select , and press to enter the configuration interface. 4. Press to switch FFC mode. Manual FFC: Hold in the live view to correct the non- uniformity of display. -
Page 27: Set Infrared Light
Multi-Spectrum Binocular User Manual Figure 3-6 Correct Defective Pixel Note The selected defective pixel can be magnified and displayed on the bottom right of the interface. If the screen OSD blocks the defective pixel, move the cursor to reach the defective pixel, then the device performs mirror display automatically. -
Page 28: Zoom Pro
Multi-Spectrum Binocular User Manual Note Infrared light cannot be turned on if the battery is low. The infrared light is off in the thermal mode or standby mode. 3.14 Zoom Pro Zoom Pro refers to zoomed image detail enhancement. When you turn on this function, the details of zoomed live view image will be enhanced. -
Page 29: Measure Distance
Multi-Spectrum Binocular User Manual Measure Distance The device can detect the distance between the target and the observation position with laser. Before You Start When measuring the distance, keep the hand and the position steady. Otherwise, the accuracy may be affected. Steps 1. - Page 30 Multi-Spectrum Binocular User Manual Figure 4-1 Laser Ranging Result Caution The laser radiation emitted from the device can cause eye injuries, burning of skin or inflammable substances. Before enabling the laser ranging function, make sure no human or inflammable substances are in front of the laser rangefinder.
-
Page 31: General Settings
Multi-Spectrum Binocular User Manual General Settings Set OSD This function can display or hide the OSD information on the live view interface. Steps 1. Press to show the menu. 2. Go to Advanced Settings, and select Function Settings. 3. Press to select , and press to enter OSD setting... -
Page 32: Burning Prevention
Multi-Spectrum Binocular User Manual Burning Prevention Avoid direct sunlight and enable the burning prevention function to reduce the risk of sensor damage from the heat. Steps 1. Press to show the menu. 2. Go to Advanced Settings, and select Function Settings. 3. -
Page 33: View Local Files
Multi-Spectrum Binocular User Manual 1. In the live view interface, hold to start recording. Figure 5-1 Start Recording The left image displays the information of recording time. 2. Hold again to stop recording. View Local Files 5.4.4 Captured images and recorded videos are automatically stored in the device, and you can view the files in local albums. -
Page 34: Hot Tracking
Multi-Spectrum Binocular User Manual Note Files are arranged in chronological order, with the most recent at the top. If you fails to find the most recently taken snapshots or videos, please check the time and date settings of your device. When you are viewing files, you can switch to other files by pressing ... -
Page 35: Export Files
HIKMICRO Sight. Before You Start Install HIKMICRO Sight on your mobile phone. Steps 1. Open HIKMICRO Sight and connect your device to the app. See Connection 2. Tap Media to access device albums. Figure 5-3 Access Device Albums 3. Tap Local or Device to view the photos and videos. -
Page 36: Export Files Via Pc
Multi-Spectrum Binocular User Manual 5.6.2 Export Files via PC This function is used to export recorded videos and captured pictures. Before You Start Make sure the device is turned on when connecting the cable. Steps 1. Connect the device and PC with cable. Note Make sure the device is turned on when connecting the cable. -
Page 37: Calibrate Compass
Multi-Spectrum Binocular User Manual Calibrate 4. Follow the pop-up instructions to calibrate the compass. See Compass for more information. Result After successful calibration, you can see the azimuth (AZM) angle and elevation (EL) angle displayed on the screen. It is recommended to read the information when you lay the device horizontally. -
Page 38: Magnetic Declination Correction
Multi-Spectrum Binocular User Manual Calibration Level indicates the validity of calibration. Higher level means more accurate compass reading. Calibration succeeds when Level turns to 3. 3. Stop moving the device when calibration success message pops up. Result The direction information is displayed on the live view interface. Figure 5-7 Direction Display Magnetic Declination Correction 5.7.3... -
Page 39: Geographic Location Display
Multi-Spectrum Binocular User Manual Figure 5-8 Manual Correction 3. Hold to save and exit. Note It is recommended to check the local magnetic declination information on the authorized website before manually correcting the magnetic declination. The eastern magnetic declination is indicated with a positive mark (+), and the western declination is indicated with a negative mark (-). - Page 40 Multi-Spectrum Binocular User Manual If the location information displays the information “Weak Signal”, it indicates the signal is weak or no signal. Please move to the open outdoor space to try again. Figure 5-10 Weak Signal...
-
Page 41: System Settings
Multi-Spectrum Binocular User Manual System Settings Adjust Date Steps 1. Press to show the menu. 2. Go to Advanced Settings, and select General Settings. 3. Press to select 4. Press to enter the configuration interface. 5. Press to select the year, month, or day, and press change the number. -
Page 42: Set Unit
Multi-Spectrum Binocular User Manual 1. Press to show the menu. 2. Go to Advanced Settings, and select General Settings. 3. Press to select 4. Press to enter the language configuration interface. 5. Press to select the language as required, and press to confirm. -
Page 43: Restore Device
Multi-Spectrum Binocular User Manual 1. Press to show the menu. 2. Go to Advanced Settings, and select General Settings. 3. Press to select 4. Press to format the device storage according to the prompt. Note When selecting , the device automatically shows the remaining storage. -
Page 44: Frequently Asked Questions
Multi-Spectrum Binocular User Manual Frequently Asked Questions Why does the charge indicator flash improperly? Check the following items. Check whether the device is charged with standard power adapter and the charging temperature is above 0 °C (32 °F). Charge the device in power off status. Why is the power indicator off? Check whether the device is off-battery. - Page 45 The information contained in the Manual is subject to change, without notice, due to firmware updates or other reasons. Please find the latest version of this Manual at the HIKMICRO website (www.hikmicrotech.com/). Please use this Manual with the guidance and assistance of professionals trained in supporting the Product.
- Page 46 OTHER DAMAGES RESULTING FROM CYBER-ATTACK, HACKER ATTACK, VIRUS INFECTION, OR OTHER INTERNET SECURITY RISKS; HOWEVER, HIKMICRO WILL PROVIDE TIMELY TECHNICAL SUPPORT IF REQUIRED. YOU AGREE TO USE THIS PRODUCT IN COMPLIANCE WITH ALL APPLICABLE LAWS, AND YOU ARE SOLELY RESPONSIBLE FOR ENSURING THAT YOUR USE CONFORMS TO THE APPLICABLE LAW.
- Page 47 Multi-Spectrum Binocular User Manual Regulatory Information These clauses apply only to the products bearing the corresponding mark or information. EU Conformity Statement This product and - if applicable - the supplied accessories too are marked with "CE" and comply therefore with the applicable harmonized European standards listed under the Directive 2014/30/EU (EMCD), Directive 2014/35/EU (LVD), Directive 2011/65/EU (RoHS), Directive 2014/53/EU.
- Page 48 Multi-Spectrum Binocular User Manual Directive 2006/66/EC and its amendment 2013/56/EU (Battery Directive): This product contains a battery that cannot be disposed of as unsorted municipal waste in the European Union. See the product documentation for specific battery information. The battery is marked with this symbol, which may include lettering to indicate cadmium (Cd), lead (Pb), or mercury (Hg).
- Page 49 Multi-Spectrum Binocular User Manual gesamten Lager- und Versandflächen mindestens 800 m² betragen. Vertreiber haben die Rücknahme grundsätzlich durch geeignete Rückgabemöglichkeiten in zumutbarer Entfernung zum jeweiligen Endnutzer zu gewährleisten. Die Möglichkeit der unentgeltlichen Rückgabe eines Altgerätes besteht bei rücknahmepflichtigen Vertreibern unter anderem dann, wenn ein neues gleichartiges Gerät, das im Wesentlichen die gleichen Funktionen erfüllt, an einen Endnutzer abgegeben wird.
- Page 50 Multi-Spectrum Binocular User Manual Symbol Conventions The symbols that may be found in this document are defined as follows. Symbol Description Provides additional information to emphasize or Note supplement important points of the main text. Indicates a potentially hazardous situation, which if not Caution avoided, could result in equipment damage, data loss, performance degradation, or unexpected results.
- Page 51 Multi-Spectrum Binocular User Manual Safety Instruction These instructions are intended to ensure that user can use the product correctly to avoid danger or property loss. Please read all the safety information carefully before using. Transportation Keep the device in original or similar packaging while transporting it. ...
- Page 52 Multi-Spectrum Binocular User Manual Do not leave the battery in an extremely high temperature surrounding environment, which may result in an explosion or the leakage of flammable liquid or gas. Do not subject the battery to extremely low air pressure, which may result in an explosion or the leakage of flammable liquid or gas.
- Page 53 Multi-Spectrum Binocular User Manual Laser When any laser equipment is in use, make sure that the device lens is not exposed to the laser beam, or it may burn out. The laser radiation emitted from the device can cause eye injuries, burning of skin or inflammable substances. Before enabling the laser ranging function, make sure no human or inflammable substances are in front of the laser lens.
- Page 54 UD37357B...
Need help?
Do you have a question about the HABROK 4K Series and is the answer not in the manual?
Questions and answers