Advertisement
Quick Links
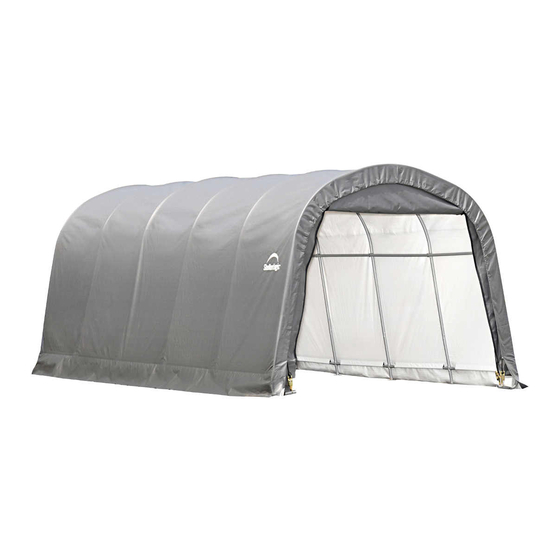
12' x 20' x 8' Garage-in-a-Box RoundTop
Garage-in-a-Box RoundTop
Garage-in-a-Box RoundTop
Please read instructions COMPLETELY before assembly. This shelter MUST be securely anchored.
THIS IS A TEMPORARY STRUCTURE AND NOT RECOMMENDED AS A PERMANENT STRUCTURE.
Before you start: 3+ individuals recommended for assembly, approximate time 2 hr.
150 Callender Road
Watertown, CT 06795
www.shelterlogic.com
7/28/11 1058
Assembly Instructions
DescRIpTIon
- Gray
®
- Brown
®
RecoMMenDeD Tools
1
®
MoDel #
62780
62783
1-800-524-9970
Canada:
1-800-559-6175
05_62780_62783_0B
Advertisement

Related Manuals for ShelterLogic Garage-in-a-Box RoundTop


Summary of Contents for ShelterLogic Garage-in-a-Box RoundTop
- Page 1 12' x 20' x 8' Garage-in-a-Box RoundTop ® Assembly Instructions DescRIpTIon MoDel # 62780 Garage-in-a-Box RoundTop - Gray ® 62783 Garage-in-a-Box RoundTop - Brown ® RecoMMenDeD Tools Please read instructions COMPLETELY before assembly. This shelter MUST be securely anchored. THIS IS A TEMPORARY STRUCTURE AND NOT RECOMMENDED AS A PERMANENT STRUCTURE.
-
Page 2: Service Hotline
SERVICE HOTLINE TEL.: +49 (0) 6571 / 95117-0 FAX: +49 (0) 6571 / 95117-98 E-MAIL: INFO@50NRTH.COM 50NRTH GmbH STRASSBURGSTR. 14-16 54516 WITTLICH / GERMANY www.50NRTH.com 05_62780_62783_0B... - Page 3 05_62780_62783_0B...
- Page 4 12' x 20' x 8' Garage-in-a-Box RoundTop Parts List - Model 62780 or 62783 ® ™ Quantity Part # Description of Parts: Rib Peak 50 in. 126,8 cm 800919 Rafter Bend 50 in. 126,8 cm 800920 Leg Pipe 41 in. 104,1 cm 800921 800923...
- Page 5 1. AsseMBle enD RIBs Secure connections using Bolts as shown with #01010 Nuts. 800919 ShelterLock Connection ® 800920 01010 800920 800920 800939 #10115 Bolts (1 ") 800939 800939 03032 800921 #03032 Bolts (1 ") 800921 800921 noTe: The bolt heads at the end ribs must be facing outward to avoid damaging your cover.
- Page 6 3. ATTAcH cRoss RAIls AnD coVeR RAIls To FRonT enD RIB A. Place a Cover Rail (#802695) at each leg and secure it with a Cover Clamp as shown. Only HAND-TIGHTEN these bolts! B. Slide the Cover Rails so they are 8 inches up from the ground. ShelterLock ®...
- Page 7 5. connecT ReMAInInG MIDDle RIBs ShelterLock ® connections use #03032 (1 ") Bolts. Cover Rail Clamp connections use #10115 (1 ") Bolts. Cross Rails face to the inside of the garage. ShelterLock Middle Rib Connection ® Middle Rib Cover Rail Clamps 800920 800923 03032...
- Page 8 12 ft. 8. pRopeRlY AncHoR FRAMe Your unit comes with 4 temporary Shelter Auger Earth Anchors. For best results, ShelterLogic ™ recommends additional anchors, one for each foot of your frame. A. Anchors must be placed inside shelter at the corners of the shelter. Insert a ¾-inch pipe or steel rod, through the eyelet of the auger and screw the anchor into the ground until the eyelet is sticking out of the ground by 1 to 2 inches so it can be anchored to the legs.
- Page 9 9. DooR pAnel AnD BAcK pAnel InsTAllATIon A. (1) Hold end panel at the top center with white inner surface facing inside of the shelter. (2) Wrap the edges of the fabric panel around the end rib and line up the cross rails with the pre made slits in the fabric. B.
- Page 10 9. enD pAnel InsTAllATIon - continued D. At the bottom, where the webbing exits the pocket on each side of end panel, pull webbing as you would a drawstring to remove the slack. Be careful not to pull the webbing strap out of the webbing pocket. END PANEL vIEW FROM INSIDE SHELTER...
Need help?
Do you have a question about the Garage-in-a-Box RoundTop and is the answer not in the manual?
Questions and answers