Advertisement
Quick Links
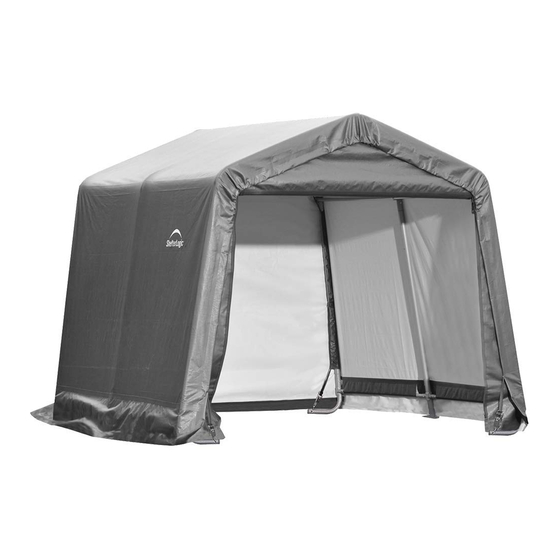
shed-in-a-Box
®
Assembly Manual
Description
MoDel #
30333
10' x 10' x 8' Shed-in-a-Box
- Gray
®
recoMMenDeD tools
7/16"
or
Please read instructions COMPLETELY before assembly. This shelter MUST be securely anchored.
THIS IS A TEMPORARY STRUCTURE AND NOT RECOMMENDED AS A PERMANENT STRUCTURE.
Before you start: 2 or more individuals recommended for assembly, approximate time 2 hours.
VieW An online instrUctionAl
ViDeo oF A GArAGe BeinG BUilt!
www.shelterlogic.com
1-800-524-9970
Canada:
1-800-559-6175
3/26/12
Page 1
05_30333_0F
Advertisement

Related Manuals for ShelterLogic Shed-in-a-Box 30333


Summary of Contents for ShelterLogic Shed-in-a-Box 30333
- Page 1 THIS IS A TEMPORARY STRUCTURE AND NOT RECOMMENDED AS A PERMANENT STRUCTURE. Before you start: 2 or more individuals recommended for assembly, approximate time 2 hours. VieW An online instrUctionAl ViDeo oF A GArAGe BeinG BUilt! www.shelterlogic.com 1-800-524-9970 Canada: 1-800-559-6175...
-
Page 2: Warranty
Attention: This shelter product is manufactured with quality materials. It is designed to fit the ShelterLogic Corp. custom fabric cover included. ® ShelterLogic Corp. Shelters offer storage and protection from damage caused by sun, light rain, tree sap, animal - bird excrement ®... - Page 3 pArts list 10016 10015 802637 10014 801272 801277 802099 801204 13202 13201 802605 10114 03032 10115 10066 802604 10240 800938 12270 01011 01010 Page 3 05_30333_0F...
- Page 4 1. AsseMBle 2 enD riBs Secure connections using Bolts as shown with #01010 Nuts. 801272 801204 01010 802632 802632 800938 801204 801204 #03032 10114 800938 800938 802633 #10114 802633 802633 802634 802634 #10115 802637 802637 2. AsseMBle 1 MiDDle riB Secure connections using Bolts as shown with #01010 Nuts.
- Page 5 3. connect Front enD riB to MiDDle riB A. Assemble 2 Side Cross Rails using parts as shown. B. Assemble 1 Top Cross Rail using parts as shown. C. Connect the 2 Side Cross Rails at each ShelterLock ® 3X (800938). D.
- Page 6 4. connect reAr riB A. Assemble 2 Side Cross Rails using parts as shown. B. Assemble 1 Top Cross Rail using parts as shown. C. Connect the 2 Side Cross Rails at each ShelterLock ® 3X (800938). D. Connect the Top Cross Rail as shown. 10115 10115 800599...
- Page 7 C. Wrap cable provided through the eyelet of the anchor and around the frame as shown below. Secure the cable with the clamps provided. NOTE: 15" Augers are for temporary use only! For best results ShelterLogic recommends using our Easy Hooks (#10036 4-pack, #10035 6-pack, or #10038 8-pack) or 30" Augers (#10075 4-pack, #10078 6-pack, or #10079 8-pack) for a stronger, more secure installation.
- Page 8 7. Door pAnel AnD BAcK pAnel instAllAtion A. (1) Hold end panel at the top center with white inner surface facing inside of the shelter. (2) Wrap the edges of the fabric panel around the end rib and line up the cross rails with the pre made slits in the fabric. B.
- Page 9 7. enD pAnel instAllAtion - continued D. At the bottom, where the webbing exits the pocket on each side of end panel, pull webbing as you would a drawstring to remove the slack. Be careful not to pull the webbing strap out of the webbing pocket. END PANEL vIEw FROM INSIDE wEBBING...
- Page 10 8. instAllinG coVer AnD coVer rAils A. Lay the cover on the ground next to the frame with inside of the cover (the side with the pipe pockets) facing down and the webbing on the front and rear of the corner of the building. B.
Need help?
Do you have a question about the Shed-in-a-Box 30333 and is the answer not in the manual?
Questions and answers