Table of Contents
Advertisement
Available languages
Available languages
Quick Links
IMPORTANT
Read Before Using
GCB18V-5
Pour obtenir des informations et les adresses de nos centres de service après-vente, appelez ce numéro gratuit
Llame gratis para obtener información para el consumidor y ubicaciones de servicio
1-877-BOSCH99 (1-877-267-2499) www.boschtools.com
For English Version
See page 2
160992A8P6 GCB18V-5 202309.indd 1
IMPORTANT
Lire avant usage
Operating / Safety Instructions
Consignes d'utilisation / de sécurité
Instrucciones de funcionamiento y seguridad
Call Toll Free for Consumer Information & Service Locations
Version française
Voir page 15
IMPORTANTE
Leer antes de usar
Versión en español
Ver la página 28
9/8/23 8:59 AM
Advertisement
Table of Contents

Related Manuals for Bosch GCB18V-5


Summary of Contents for Bosch GCB18V-5
- Page 1 Llame gratis para obtener información para el consumidor y ubicaciones de servicio 1-877-BOSCH99 (1-877-267-2499) www.boschtools.com For English Version Version française Versión en español See page 2 Voir page 15 Ver la página 28 160992A8P6 GCB18V-5 202309.indd 1 9/8/23 8:59 AM...
-
Page 2: Safety Symbols
There is an increased hol or medication. A moment of inattention risk of electric shock if your body is earthed while operating power tools may result in se- or grounded. rious personal injury. SAVE THESE INSTRUCTIONS 160992A8P6 GCB18V-5 202309.indd 2 9/8/23 8:59 AM... - Page 3 Under abusive conditions, liquid may be any adjustments, changing accessories, or ejected from the battery; avoid contact. SAVE THESE INSTRUCTIONS 160992A8P6 GCB18V-5 202309.indd 3 9/8/23 8:59 AM...
- Page 4 Figures in this manual illustrate typical n. Do not operate saw without cover plate hand support of the saw. secured on the saw. Contact with moving parts may result in serious personal injury. SAVE THESE INSTRUCTIONS 160992A8P6 GCB18V-5 202309.indd 4 9/8/23 8:59 AM...
-
Page 5: Additional Safety Warnings
5 x 5” (127 x 127 mm) Battery Packs / Chargers: Please refer to the battery/charger list, included with your tool. NOTE: For tool specifications refer to the nameplate on your tool. SAVE THESE INSTRUCTIONS 160992A8P6 GCB18V-5 202309.indd 5 9/8/23 8:59 AM... - Page 6 Arrow (action in the direction of arrow) Type or a characteristic of current This symbol designates that this tool is listed by the Canadian Standards Association, to United States and Canadian Standards. Designates Li-ion battery recycling program. 160992A8P6 GCB18V-5 202309.indd 6 9/8/23 8:59 AM...
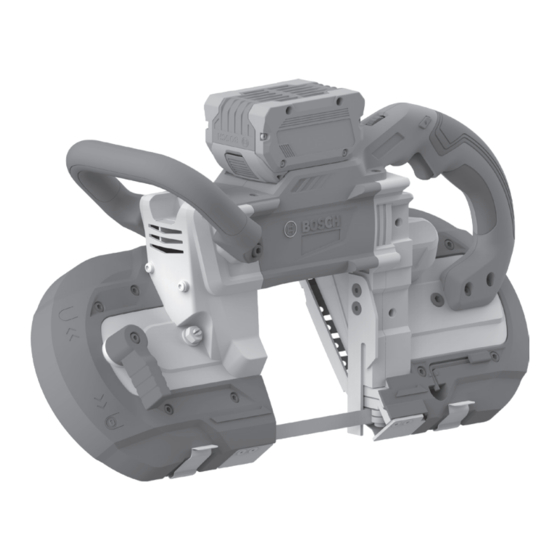
- Page 7 Getting to Know Your Product Bosch Cordless Band Saw GCB18V-5 Fig. 1 10 18 11 12 11 Material Guide Wrench Lock-Off Button 12 Wrench Holder Variable Speed Trigger Switch 13 Battery Pack Release Button* Main Handle (insulated gripping surface) 14 Battery Pack*...
-
Page 8: Removing The Blade
(Fig. 4). SEATED ON THE PULLEYS BEFORE START- 2. Turn Blade Tension Lock Lever 5 180° coun- ING THE CUT. ter-clockwise to tighten the Blade 9 on the Pulleys 20 (Fig. 2). Fig. 3 160992A8P6 GCB18V-5 202309.indd 8 9/8/23 9:00 AM... - Page 9 “Typical Application”.) • Ensure that the tool is hung out of the way of walkways and working areas with bystanders. The tool could be bumped causing the tool to unexpectedly fall. 160992A8P6 GCB18V-5 202309.indd 9 9/8/23 9:00 AM...
- Page 10 (Fig. 5). Inserting and Removing Fig. 6 Battery Pack Use only Bosch or AMPShare batteries recommended in the battery/charger list, included with your tool. Use of any other types of batteries may re- sult in personal injury or property damage.
-
Page 11: Blade Tracking Adjustment
Fig. 7 Fig. 8 >1/8” (3mm) above the >1/8” (3mm) below the rim of the pulley, tracking rim of the pulley, tracking needs to be adjusted needs to be adjusted Fig. 9 Fig. 10 160992A8P6 GCB18V-5 202309.indd 11 9/8/23 9:00 AM... -
Page 12: Led Work Light
The LockOff Button is designed to prevent ac- cidental starts. To operate switch, press the LockOff Button 1 with your thumb to the unlock symbol . To lock the switch, press the LockOff Button 1 to the lock symbol . 160992A8P6 GCB18V-5 202309.indd 12 9/8/23 9:00 AM... -
Page 13: Overload Protection
3. Place the material guide against the work- piece and lower the moving saw blade into 5. When completing a cut, hold the tool firmly so it will not fall against the workpiece. the cut. 160992A8P6 GCB18V-5 202309.indd 13 9/8/23 9:00 AM... -
Page 14: Maintenance
We recom mend that all tool service parts. Some of these are: gasoline, carbon tetra- be performed by a Bosch Factory Service Center chloride, chlorinated cleaning solvents, ammo- or Authorized Bosch Service Station. nia and household detergents that contain am- monia. - Page 15 Le risque de choc électrique augmente si votre de drogues, d’alcool ou de médicaments. Quand on corps est relié à la terre. utilise des outils électroportatifs, il suffit d’un moment d’inattention pour causer des blessures corporelles graves. CONSERVER CES INSTRUCTIONS 160992A8P6 GCB18V-5 202309.indd 15 9/8/23 9:00 AM...
- Page 16 être connexion entre une borne et une autre. Court-circuiter réparé. les bornes des piles peut causer des brûlures ou un incendie. CONSERVER CES INSTRUCTIONS 160992A8P6 GCB18V-5 202309.indd 16 9/8/23 9:00 AM...
-
Page 17: Entretien
« arrêt » (OFF). Les mises en peau et utilisez des gants protecteurs appropriés en marche accidentelles peuvent causer des blessures. saisissant la lame ou l’accessoire. Les accessoires peu- vent être chauds après un usage prolongé. CONSERVER CES INSTRUCTIONS 160992A8P6 GCB18V-5 202309.indd 17 9/8/23 9:00 AM... -
Page 18: Utilisation Prévue
4.5 x 4.5” (114 x 114 mm) Bloc-piles/chargeurs Veuillez vous référer à la liste des piles/chargeurs accompagnant votre outil. REMARQUE : Pour spécifications de l’outil, reportez-vous à la plaque signalétique de votre outil. CONSERVER CES INSTRUCTIONS 160992A8P6 GCB18V-5 202309.indd 18 9/8/23 9:00 AM... - Page 19 Courant continu (type ou caractéristique du courant) Ce symbole signifie que cet outil est approuvé par l’Association canadienne de normalisation selon les normes des États-Unis et du Canada. Désigne le programme de recyclage des piles Li-ion. 160992A8P6 GCB18V-5 202309.indd 19 9/8/23 9:00 AM...
-
Page 20: Description Fonctionnelle Et Spécifications
Description fonctionnelle et spécifications page heading Scie à ruban sans fil Bosch GCB18V-5 Fig. 1 10 18 11 12 10 Guide de l’ouvrage Bouton de verrouillage en position d’arrêt 11 Clé de réglage du guide de l’ouvrage Interrupteur à gâchette de réglage de la vitesse 12 Porte-clé... -
Page 21: Installation De La Lame
ASSUREZ-VOUS QUE LA LAME REPOSE CORRECTE- orientées vers le haut et pointent dans la même direction MENT SUR LES POULIES AVANT DE COMMENCER LA que la flèche de sens de rotation. (Fig. 4). COUPE. Fig. 3 160992A8P6 GCB18V-5 202309.indd 21 9/8/23 9:00 AM... - Page 22 Un passant pour- rait se cogner sur l’outil ou s’empêtrer dans le cordon d’alimentation électrique et causer ainsi sa chute acciden- telle. 160992A8P6 GCB18V-5 202309.indd 22 9/8/23 9:00 AM...
-
Page 23: Insertion Et Retrait Du Bloc-Piles
2. Appuyez une fois de plus sur le bouton de déclenchement du bloc-piles 13 et faites glisser le bloc-piles jusqu’à ce qu’il sorte complètement du bâti de l’outil. 160992A8P6 GCB18V-5 202309.indd 23 9/8/23 9:00 AM... -
Page 24: Réglage De L'alignement De La Lame
> 1/8” (3 mm) au-dessus > 1/8” (3 mm) sous le bord du bord de la poulie, le suivi de la poulie, le suivi doit doit être ajusté être ajusté Fig. 9 Fig. 10 160992A8P6 GCB18V-5 202309.indd 24 9/8/23 9:00 AM... -
Page 25: Consignes De Fonctionnement
1 avec votre pouce jusqu’au symbole de déver- rouillage . Pour verrouiller l’interrupteur, appuyez sur le bouton de verrouillage en postion d’arrêt 1 jusqu’au symbole de verrouillage . 160992A8P6 GCB18V-5 202309.indd 25 9/8/23 9:00 AM... -
Page 26: Application Type
5. Après avoir effectué une coupe, tenez fermement l’outil pour qu’il ne tombe pas contre l’ouvrage. l’ouvrage à l’endroit où vous voulez commencer à couper. 160992A8P6 GCB18V-5 202309.indd 26 9/8/23 9:00 AM... - Page 27 Graissage de l’outil une surface horizontale. Vaporisez périodiquement de l’huile dégrippante sur le porte- Votre outil Bosch a été graissé de manière appropriée et il est lame de scie. prêt à l’usage. Vérifiez périodiquement le rouleau du système de guidage.
- Page 28 Manténgase alerta, fíjese en lo que está haciendo y diadores, estufas y refrigeradores. Hay un aumento del use el sentido común cuando esté utilizando una her- GUARDA ESTAS INSTRUCCIONES 160992A8P6 GCB18V-5 202309.indd 28 9/8/23 9:00 AM...
- Page 29 Desconecte el enchufe de la fuente de alimentación y/o entra en contacto con los ojos, obtenga además ayuda retire el paquete de batería de la herramienta eléctrica médica. El líquido que salga eyectado de la batería puede GUARDA ESTAS INSTRUCCIONES 160992A8P6 GCB18V-5 202309.indd 29 9/8/23 9:00 AM...
- Page 30 Antes de introducir el paquete de baterías, asegúrese entes después del uso prolongado. de que el cierre del gatillo esté en la posición de apagado. Un arranque accidental podría causar lesiones. GUARDA ESTAS INSTRUCCIONES 160992A8P6 GCB18V-5 202309.indd 30 9/8/23 9:00 AM...
-
Page 31: Advertencias De Seguridad Adicionales
Paquetes de batería/Cargadores de baterías: Sírvase consultar la lista de baterías/cargadores incluidas con su herramienta. NOTA: Para obtener las especificaciones de la herramienta, consulte la placa del fabricante colocada en la herramienta. GUARDA ESTAS INSTRUCCIONES 160992A8P6 GCB18V-5 202309.indd 31 9/8/23 9:00 AM... - Page 32 Corriente continua (tipo o una característica de corriente) Este símbolo indica que la Canadian Standards Association ha catalogado esta herramienta indi- cando que cumple con las normas estadounidenses y canadienses. Designa el programa de reciclaje de baterías de Li-ion. 160992A8P6 GCB18V-5 202309.indd 32 9/8/23 9:00 AM...
- Page 33 Descripción funcional y especificaciones page heading Sierra de cinta inalámbrica Bosch GCB18V-5 Fig. 1 10 18 11 12 10 Guía para el material Botón de fijación en apagado 11 Llave de la guía para el material Interruptor gatillo de velocidad variable...
-
Page 34: Instalación De La Hoja
2. Gire la palanca de fijación de la tensión de la hoja 180° en RECTAMENTE SOBRE LAS POLEAS ANTES DE CO- sentido contrario al de las agujas del reloj para apretar la MENZAR EL CORTE. hoja sobre las poleas (Fig. 2). Fig. 3 160992A8P6 GCB18V-5 202309.indd 34 9/8/23 9:00 AM... - Page 35 áreas de trabajo en las que haya otras personas presentes. La herramienta podría ser golpeada o alguien que se encuentre presente podría engancharse en el cable de la fuente de alimentación y hacer que la her- ramienta se caiga inesperadamente. 160992A8P6 GCB18V-5 202309.indd 35 9/8/23 9:00 AM...
-
Page 36: Instrucciones De Funcionamiento
160992A8P6 GCB18V-5 202309.indd 36 9/8/23 9:00 AM... -
Page 37: Ajuste De La Trayectoria De La Hoja
>1/8” (3 mm) por encima del >1/8” (3 mm) por debajo del borde de la polea, es necesario borde de la polea, es necesario ajustar el seguimiento ajustar el seguimiento Fig. 9 Fig. 10 160992A8P6 GCB18V-5 202309.indd 37 9/8/23 9:00 AM... - Page 38 1 con el pulgar hasta el símbolo de desbloqueo . Para bloquear el interruptor, presione el botón de fijación en apagado 1 hasta el símbolo de bloqueo . 160992A8P6 GCB18V-5 202309.indd 38 9/8/23 9:00 AM...
- Page 39 5. Cuando esté completando un corte, agarre firmemente interior del corte. la herramienta para que no se caiga contra la pieza de trabajo. 160992A8P6 GCB18V-5 202309.indd 39 9/8/23 9:00 AM...
-
Page 40: Accesorios Y Aditamentos
éste sea examinado cada Servicio seis me ses. Sólo se debe usar un motor de repuesto Bosch genuino diseñado especialmente para la herramienta. NO HAy PIEZAS EN EL IN-... - Page 41 Notes / Remarques / Notas page heading This page was intentionally left blank Cette page a été laissée vierge intentionnellement. Esta página se dejó intencionalmente en blanco 160992A8P6 GCB18V-5 202309.indd 41 9/8/23 9:00 AM...
- Page 42 Notes / Remarques / Notas page heading This page was intentionally left blank Cette page a été laissée vierge intentionnellement. Esta página se dejó intencionalmente en blanco 160992A8P6 GCB18V-5 202309.indd 42 9/8/23 9:00 AM...
- Page 43 Notes / Remarques / Notas This page was intentionally left blank Cette page a été laissée vierge intentionnellement. Esta página se dejó intencionalmente en blanco 160992A8P6 GCB18V-5 202309.indd 43 9/8/23 9:00 AM...
- Page 44 1-877-BOSCH99 GARANTÍA LIMITADA Para obtener detalles sobre los términos de la garantía limitada de este producto, visite https://rb-pt.io/PowerToolWarranty o llame al 1-877-BOSCH99 © Robert Bosch Tool Corporation !160992A8p6! 1800 W. Central Road Mt. Prospect, IL 60056-2230 160992A8P6 09/2023 160992A8P6 GCB18V-5 202309.indd 44...
Need help?
Do you have a question about the GCB18V-5 and is the answer not in the manual?
Questions and answers