Table of Contents
Advertisement
Quick Links
Advertisement
Table of Contents

Summary of Contents for iSolution IL-0824
- Page 1 IL-0824 User Guide Please read these instructions carefully before use...
-
Page 2: Table Of Contents
CONTENTS 1. Features…………………………………………………………………………………..…2 2. General Instructions…………………………………………………………………..……3 3. Overview……………………………………………………………………………….….…4 3.1 Front View……………………………………………………………………………….…4 3.2 Rear View………………………………………………………………………………….6 4. Operation Guide…………………………………………………………………………….7 4.1.1 Program Mode…………………………………………………………………………..7 4.1.2 Blackout Mode…………………………………………………………………………..7 4.1.3 Stand Alone Mode………………………………………………………………………7 4.2 Remote Setting of DMX address………………………………………………………...8 4.3.1 Selecting which fixtures to control…………………………………………………….9 4.3.2 Setting Position………………………………………………………………………….9 4.3.3 Setting MOVEMENT………………………………………………………………….…9 4.3.4 Setting SHUTTER……………………………………………………………………...10 4.3.5 Setting GOBO…………………………………………………………………………..10... -
Page 3: Features
1. Features Ø Standard 19-inch rack mount Ø Controls up to 192 DMX channels Ø Controls 24 scanners with up to 8 DMX channels per fixture Ø 12 preset movements for instant show editing Ø Set lights’ ( iRock, iShow, and iMove ) DMX address remotely by the controller Ø... -
Page 4: General Instructions
2. General Instructions Please read the user manual carefully as it includes important information regarding details of operation, maintenance, and technical data. Keep this manual with the unit for future consultation. WARNING! ♦ Avoid any flammable liquids, water or metal objects entering into the unit. ♦... -
Page 5: Overview
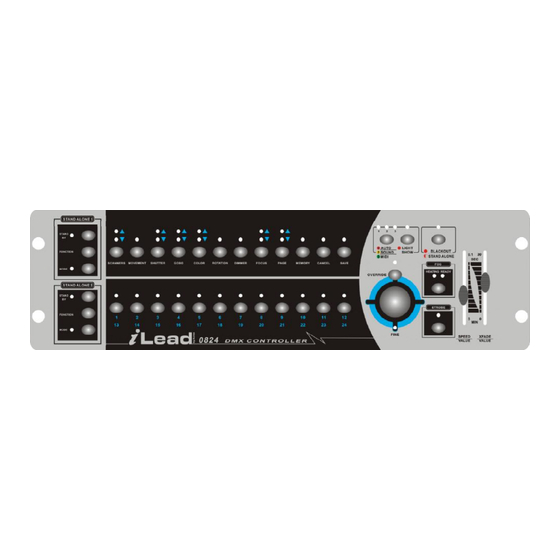
3. Overview 3.1 Front View To select one or more fixtures. 1. Scanners 2. Movement To select/set the pan & tilt movement. 3. Shutter To set the strobe speed, shaking effect and open. To select gobo. 4. Gobo To select color. 5. - Page 6 2. To set the tilt position of the Scanners when programming or to set the tilt movement range for Movement function or to set DMX value 0~255 for channels of Shutter/Gobo/ Color/Rotation/Dimmer/Focus. 19. Speed ( Wait time ) Controls with two different functions: 1.
-
Page 7: Rear View
3.2 Rear View Turns On/Off the power. 1. POWER DC 9 ~12V, 300mA min. 2. DC INPUT 3. FOG MACHINE 5 pin din socket for connecting DC Fog Machine. Trigger non-DMX strobe. Signal +12V DC. 4. STROBE By build-in microphone or line in. 5. -
Page 8: Operation Guide
Hold on the BLACKOUT/STAND ALONE for 3 seconds, the LED above this button will blink indicating Stand-Alone mode in active. The Stand Alone 1 and Stand Alone 2 are designed for iSolution lighting fixtures in Stand Alone ( Master/ Slave ) mode. -
Page 9: Remote Setting Of Dmx Address
4.2 Remotely Set DMX Address 1. Hold on the BLACKOUT/STAND ALONE button for 3 seconds to enter Stand-Alone mode. 2. Hold down the SCANNERS button and then press BLACKOUT/ STAND ALONE button. You will see the pan & tilt of all the fixtures in the chain stopping at the central position. -
Page 10: Selecting Which Fixtures To Control
4.3.1 Select the fixtures you want to control Ø Press SCANNERS button Ø You can choose one or more than one fixtures by pressing the 1~12 buttons Ø When the buttons’ LED ( 1 ~ 12 ) are lit, you can control the fixtures. Ø... -
Page 11: Setting Shutter
4.3.4 Setting SHUTTER Ø Select the fixtures you want to control Ø Press SHUTTER button Ø Select a shutter value with the 1~12 buttons, or use the X-Fade/Value slider Ø To select strobing speed 13~24, press SHUTTER again to next page the lower LED will be on. -
Page 12: Setting Color
4.3.6 Setting COLOR Ø Select the fixtures you want to control Ø Press COLOR button Ø Select a color value with the 1~12 buttons, or move the X-Fade/Value slider. Ø To select colors 13~24, press COLOR again to next page, the lower LED will be on. -
Page 13: Setting Rotation
4.3.7 Setting GOBO ROTATION Ø Select the fixtures you want to control Ø Press ROTATION button Ø Select a rotation speed value with 1~12 buttons, or move the X-Fade/Value slider Below is the Gobo Rotation settings: ( CCW- Counterclockwise; CW- Clockwise ) Fast CCW. -
Page 14: Create A Scene
4.4.1 Create a Scene 1. Enter Program mode. 2. a.)Press Scanners button to choose the fixtures you want to control b.)Use Joystick or sliders to locate the positions of pan/tilt to create a scene. 3. Press SAVE. The 1~12 buttons will light up if they have memory already saved into them. -
Page 15: Running Scenes
4.4.3 Running Scenes 1. Enter Program mode. 2. Press MEMORY button. 3. Press a button 1~12 or press PAGE select button 13~24 for manually running a scene. 4. Press the same button again. The second scene will be run after the first scene. -
Page 16: Overwrite A Scene
4.4.5 Overwrite a Scene 1. Enter Program mode. 2. Press the MEMORY button. 3. Press the button ( 1 ~ 24 ) where the memory ( chase ) is saved and select the scene that you wish to overwrite. Press the same button ( e.g. 6 ) repeatedly, you can view the scene one by one. -
Page 17: Delete A Chase
4.5.2 Delete a Chase 1. Enter Program mode. 2. Press MEMORY button. 3. Hold down MEMORY button and then press a 1~12 button or press PAGE to select a 13-24 button to delete a chase. 4.6 Clear Memory 1. Press the BLACKOUT/STAND ALONE for 3 seconds, into Stand-Alone mode. -
Page 18: Override Control
When in Auto mode, you can set the light speed and fade time by using the sliders. These settings will be kept when next time you run the same light show. When in Sound mode activation, the Light show will be triggered by music, however, you can still set the fade time of the light show. - Page 19 MIDI note Note name Function Chase 1 Chase 2 Chase 3 Chase 4 Chase 5 Chase 6 Chase 7 Chase 8 Chase 9 Chase 10 Chase 11 Chase 12 Chase 13 Chase 14 Chase 15 Chase 16 Chase 17 Chase 18 Chase 19 Chase 20 Chase 21...
- Page 20 EC Declaration of Conformity We declare that our products (lighting equipments) comply with the following specification and bears CE mark in accordance with the provision of the Electromagnetic Compatibility (EMC) Directive 89/336/EEC. EN55014-2: 1997 A1:2001, EN61000-4-2: 1995; EN61000-4-3:2002; EN61000-4-4: 1995; EN61000-4-5: 1995, EN61000-4-6:1996, EN61000-4-11: 1994.
- Page 21 Note on - 20D -...
- Page 22 Technical Specification Power Input ....…………………………..…..DC 9-12V 300 mA min DMX Input ..........……………………3 pin male XLR DMX Output .........………………..3 pin female XLR Stand Alone…………………………………………………….5 pin male XLR MIDI Signal ........……….….……..5 pin standard interface Audio Input .....………………..By built-in microphone or line in Dimensions ........……….…..…..
Need help?
Do you have a question about the IL-0824 and is the answer not in the manual?
Questions and answers