Table of Contents
Advertisement
Quick Links
Advertisement
Table of Contents

Related Manuals for thomann swissonic Professional Router 2 MKII


Summary of Contents for thomann swissonic Professional Router 2 MKII
- Page 1 Professional Router 2 MKII Router...
- Page 2 Thomann GmbH Hans-Thomann-Straße 1 96138 Burgebrach Germany Telephone: +49 (0) 9546 9223-0 Internet: www.thomann.de 21.03.2024, ID: 544731 (V2)
-
Page 3: Table Of Contents
Table of contents Table of contents General information..........................5 1.1 Symbols and signal words....................... 5 Safety instructions............................. 7 Features............................... 10 Installation and starting up........................ 11 4.1 Setup on the PC (operating system: Windows® 10)............. 13 4.2 Setup on a smartphone (Android®)................... 18 4.3 Set up an EasyMesh network....................... - Page 4 Professional Router 2 MKII Router...
-
Page 5: General Information
Our products and documentation are subject to a process of continuous development. They are therefore subject to change. Please refer to the latest version of the documentation, which is ready for download under www.thomann.de. 1.1 Symbols and signal words In this section you will find an overview of the meaning of symbols and signal words that are used in this document. - Page 6 General information Warning signs Type of danger Warning – high-voltage. Warning – danger zone. Professional Router 2 MKII Router...
-
Page 7: Safety Instructions
Safety instructions Safety instructions Intended use This device is used to wirelessly connect Wi-Fi-enabled devices to each other to form a wireless local area network or to connect to the Internet. Use the device only as described in this user manual. - Page 8 Safety instructions NOTICE! Risk of fire due to covered vents and neighbouring heat sources! If the vents of the device are covered or the device is operated in the immediate vicinity of other heat sources, the device can over‐ heat and burst into flames. Never cover the device or the vents. Do not install the device in the immediate vicinity of other heat sources.
- Page 9 Safety instructions NOTICE! Risk of explosion due to electromagnetic fields! The unit emits electromagnetic radio signals. Under unfavourable conditions, radio waves near explosive spots can cause fire or explosions. Do not use the device in the immediate vicinity of locations subject to explosion hazards. NOTICE! Possible staining due to plasticiser in rubber feet! The plasticiser contained in the rubber feet of this product may react with the coating of the floor and cause permanent dark stains...
-
Page 10: Features
Features Features Wireless Dual Band Router (2.4 and 5 GHz) Easy Mesh Network Data transfer rate Wi-Fi up to 574 Mbps (2.4 GHz) or up to 1201 Mbps (5 GHz) 4 operation modes: Router, Repeater (Extender), Access Point, wireless ISP 1 WAN port (1000 Mbps) 4 LAN ports (1000 Mbps) Diversity... -
Page 11: Installation And Starting Up
This equipment uses a frequency range that is free of charge and registration within the European Union. For more information, please visit: http://www.thomann.de. Make sure that no metal objects are located between transmitter and receiver. Avoid interference by other radio and in-ear systems. - Page 12 Installation and starting up Connect the router Wall Socket ö Telephone Cable Network Network Cable Cable If you want to use the device with an existing DSL connection, connect the WAN socket of the router to the port provided at the DSL point of interconnection. Configure the router as follows: Connect the LAN connector of the device to your PC via an Ethernet network cable.
-
Page 13: Setup On The Pc (Operating System: Windows® 10)
Installation and starting up 4.1 Setup on the PC (operating system: Windows® 10) Activate the WLAN on your PC. Set up WLAN on the router Start the browser of your PC. Enter http://192.168.1.1 in the address line of the browser. Confirm with [ENTER]. Enter the password and click ‘Login’... - Page 14 Installation and starting up Go to ‘Operation Mode’ and select the ‘Gateway Mode’ operating mode for the router. Professional Router 2 MKII Router...
- Page 15 Installation and starting up Go to ‘Quick Setup’ and select the network access type. With ‘Dynamic IP’ , the router is automatically assigned an available dynamic IP address by the DHCP server (Dynamic Host Configuration Protocol) of the internet provider. Select ‘Static IP’...
- Page 16 Installation and starting up Under ‘IPTV’ you can activate IPTV (Internet Protocol Television) for transmission of tele‐ vision programmes and movies. Confirm with ‘Next’ . Under ‘Wireless’ , you can change the default SSID and encryption parameters as needed for ‘Wireless 2.4GHz’ or ‘Wireless 5GHz’ . Confirm with ‘Next’...
- Page 17 Installation and starting up Establish a WLAN connection Click the button for networks in the task bar. ð The available networks are displayed. SWISSONIC Professional Router Select the network to which you want to connect. Check the box for ‘Automatically connect’...
-
Page 18: Setup On A Smartphone (Android®)
Installation and starting up 4.2 Setup on a smartphone (Android®) WLAN setup Activate your smartphone. Activate WLAN and select ‘Swissonic Router 2 MKII 5G’ . ð The WLAN connection to the smartphone is established. Professional Router 2 MKII Router... - Page 19 Installation and starting up Set up WLAN on the router Start the browser on your smartphone. Enter http://192.168.1.1 in the address line of the browser. ð The login mask appears on the display. Enter the password and press ‘Login’ . The default password is ‘admin’ . ð...
- Page 20 Installation and starting up Go to ‘Operation Mode’ and select the ‘Gateway Mode’ operating mode for the router. Professional Router 2 MKII Router...
- Page 21 Installation and starting up Go to ‘Internet’ and select the network access type. With ‘Dynamic IP’ , the router is automatically assigned an available dynamic IP address by the DHCP server (Dynamic Host Configuration Protocol) of the internet provider. Select ‘Static IP’ if your internet provider has provided a fixed IP address. Your internet provider will send you the values for ‘IP Address’...
- Page 22 Installation and starting up Under ‘Wireless’ , you can change the default SSID and encryption parameters as needed for ‘2.4G Network’ or ‘5G Network’ . Confirm with ‘Next’ . Under ‘IPTV’ you can activate IPTV (Internet Protocol Television) for transmission of tele‐ vision programmes and movies.
-
Page 23: Set Up An Easymesh Network
Installation and starting up The settings are now displayed under ‘Summary’ . Complete the setup with ‘Done’ . 4.3 Set up an EasyMesh network EasyMesh network function The router has an EasyMesh network function. This function allows WLAN operation of mul‐ tiple routers in a network. - Page 24 Installation and starting up Make sure that the LAN socket of the router is connected to your PC via an Ethernet net‐ work cable. Make sure that you have made the preliminary settings for the router. Enter http://192.168.1.1 in the address line of your web browser and log in to the web interface with the default password ‘admin’...
- Page 25 Installation and starting up Confirm with ‘Apply’ . ð The router is set up as the master router. The ‘Basic Service Setup’ area is displayed. If necessary, change the default parameters for the 2.4 GHz and 5 GHz network as well as the SSID and the encryption.
- Page 26 Installation and starting up Confirm with ‘Apply’ . ð The router is set up as a slave router. The ‘Basic Service Setup’ area is displayed. From the drop-down lists for the 2.4 GHz and 5 GHz networks, select the preferred fre‐ quency band for coordination among the routers.
- Page 27 Installation and starting up Briefly and simultaneously press the [RST / WPS] buttons on the master router and one slave router. Do not press the buttons for more than 3 seconds, otherwise the routers will be reset to their default settings. ð...
-
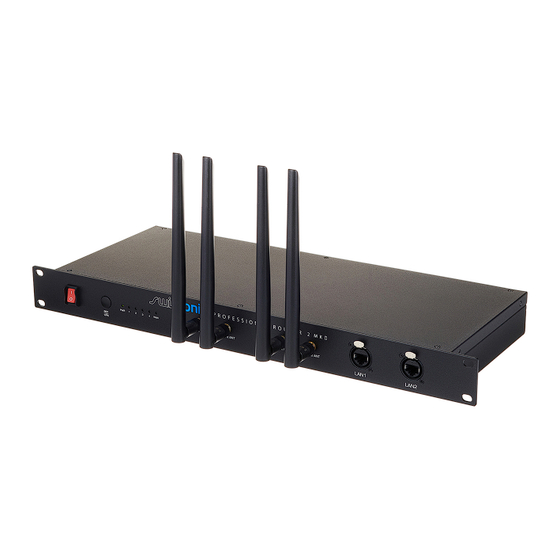
Page 28: Connections And Controls
Connections and controls Connections and controls Front PUSH PUSH ö & & 1 Main switch. Turns the device on and off. 2 [RST / WPS] | Press the button to add a new device to the wireless network. Pressed and hold the button for more than 5 seconds to restore the device to its default settings. - Page 29 Connections and controls 5 [2.4GHz ANT] | Connection for the 2.4 GHz omnidirectional antenna 6 [LAN1], [LAN2] | Lockable Neutrik RJ45 plugs for connection to local network devices Back 7 [RST / WPS] | Flashes when data are transferred via the port Lights up while the device is reset to its default settings 8 [LAN3], [LAN4] | LAN ports for connecting to local network devices 9 [WAN] | WAN port for connecting to the internet 10 Connection socket for the mains cable...
-
Page 30: Technical Specifications
Technical specifications Technical specifications Input connections Voltage supply IEC chassis plug C14 Data interface 1 × WAN port for internet connection Output connections Network interfaces 2 × LAN port for connection to local network devices 2 × lockable Neutrik RJ45 plugs for connection to local network devices Frequency range 2.4 GHz and 5 GHz... - Page 31 Technical specifications Standard user name admin Standard password admin Further information Component type Router Wi-Fi standards IEEE 802.11a, b, ac, ax, g, n Data transfer rate Wi-Fi up to 574 Mbps (2.4 GHz), up to 1201 Mbps (5 GHz) PoE Class Professional Router 2 MKII Router...
-
Page 32: Troubleshooting
Router is not connecting to the Check if there is a DSL connection. local network or the Internet. If the procedures recommended above do not succeed, please contact our Service Center. You can find the contact information at www.thomann.de. Professional Router 2 MKII Router... -
Page 33: Cleaning
Cleaning Cleaning Clean the unit with a dry, soft, lint-free cloth. Stubborn dirt can be removed with a slightly dampened cloth. Never use cleaners containing alcohol or thinner. Professional Router 2 MKII Router... -
Page 34: Protecting The Environment
Protecting the environment Protecting the environment Disposal of the packing material Environmentally friendly materials have been chosen for the packaging. These materials can be sent for normal recycling. Ensure that plastic bags, packaging, etc. are disposed of in the proper manner. Do not dispose of these materials with your normal household waste, but make sure that they are collected for recycling. - Page 35 When disposing of the device, comply with the rules and regulations that apply in your country. You can also return your old device to Thomann GmbH at no charge. Check the current conditions on www.thomann.de.
- Page 36 Notes Professional Router 2 MKII Router...
- Page 37 Notes Professional Router 2 MKII Router...
- Page 38 Notes Professional Router 2 MKII Router...
- Page 40 Musikhaus Thomann · Hans-Thomann-Straße 1 · 96138 Burgebrach · Germany · www.thomann.de...
Need help?
Do you have a question about the swissonic Professional Router 2 MKII and is the answer not in the manual?
Questions and answers
Hi I need to buy 4 antennas for Swissonic Professional Router 2 MKII