thomann Swissonic Basic Router User Manual
Hide thumbs
Also See for Swissonic Basic Router:
- User manual (32 pages) ,
- Quick start manual (2 pages)
Table of Contents
Advertisement
Advertisement
Table of Contents

Subscribe to Our Youtube Channel
Related Manuals for thomann Swissonic Basic Router


Summary of Contents for thomann Swissonic Basic Router
- Page 1 Basic Router router user manual...
- Page 2 Musikhaus Thomann Thomann GmbH Hans-Thomann-Straße 1 96138 Burgebrach Germany Telephone: +49 (0) 9546 9223-0 E-mail: info@thomann.de Internet: www.thomann.de 12.02.2019, ID: 427045 (V2)
-
Page 3: Table Of Contents
Table of contents Table of contents General information..........................4 1.1 Further information........................... 5 1.2 Notational conventions........................6 1.3 Symbols and signal words....................... 7 Safety instructions............................. 9 Features............................... 14 Installation and starting up........................ 15 Connections and controls........................27 Cleaning............................... 31 Troubleshooting............................32 Technical specifications........................ -
Page 4: General Information
Our products and user manuals are subject to a process of continuous development. We there‐ fore reserve the right to make changes without notice. Please refer to the latest version of the user manual which is ready for download under www.thomann.de. router... -
Page 5: Further Information
General information 1.1 Further information On our website (www.thomann.de) you will find lots of further information and details on the following points: Download This manual is also available as PDF file for you to download. Use the search function in the electronic version to find the topics of Keyword search interest for you quickly. -
Page 6: Notational Conventions
General information 1.2 Notational conventions This manual uses the following notational conventions: Letterings The letterings for connectors and controls are marked by square brackets and italics. Examples: [VOLUME] control, [Mono] button. Displays Texts and values displayed on the device are marked by quotation marks and italics. Examples: ‘24ch’... -
Page 7: Symbols And Signal Words
General information Instructions The individual steps of an instruction are numbered consecutively. The result of a step is indented and highlighted by an arrow. Example: Switch on the device. Press [Auto]. ð Automatic operation is started. Switch off the device. 1.3 Symbols and signal words In this section you will find an overview of the meaning of symbols and signal words that are used in this manual. - Page 8 General information Signal word Meaning DANGER! This combination of symbol and signal word indicates an immediate dangerous situation that will result in death or serious injury if it is not avoided. NOTICE! This combination of symbol and signal word indicates a pos‐ sible dangerous situation that can result in material and environmental damage if it is not avoided.
-
Page 9: Safety Instructions
Safety instructions Safety instructions Intended use This device is used to wirelessly connect Wi-Fi-enabled devices to each other to form a wireless local area network or to connect to the Internet. Use the device only as described in this user manual. - Page 10 Safety instructions DANGER! Danger for children Ensure that plastic bags, packaging, etc. are disposed of properly and are not within reach of babies and young children. Choking hazard! Ensure that children do not detach any small parts (e.g. knobs or the like) from the unit.
- Page 11 Safety instructions NOTICE! Risk of fire Do not block areas of ventilation. Do not install the device near any direct heat source. Keep the device away from naked flames. NOTICE! External power supply The device is powered by an external power supply. Before connecting the external power supply, ensure that the input voltage (AC outlet) matches the voltage rating of the device and that the AC outlet is protected by a residual cur‐...
- Page 12 Safety instructions NOTICE! Operating conditions This device has been designed for indoor use only. To prevent damage, never expose the device to any liquid or moisture. Avoid direct sunlight, heavy dirt, and strong vibrations. NOTICE! Possible staining The plasticiser contained in the rubber feet of this product may possibly react with the coating of your parquet, linoleum, laminate or PVC floor and after some time cause permanent dark stains.
- Page 13 Safety instructions NOTICE! Radio interference This device emits electromagnetic signals. This can cause interference due to overlapping radio waves. Do not use the device in locations where the use of wireless devices is prohibited. NOTICE! Locations subject to explosion hazards This device emits electromagnetic signals.
-
Page 14: Features
Features Features Wireless Dual Band Router (2.4 and 5 GHz) 4 operation modes: Router, Repeater (Extender), Access Point, wireless ISP 1 WAN port 4 LAN ports Suitable power adapter and network cable included router... -
Page 15: Installation And Starting Up
Installation and starting up Installation and starting up Unpack and check carefully there is no transportation damage before using the unit. Keep the equipment packaging. To fully protect the product against vibration, dust and moisture during transportation or storage use the original packaging or your own packaging material suitable for transport or storage, respectively. - Page 16 Installation and starting up Connect the router If you want to use the device with an existing DSL connection, connect the WAN con‐ nector of the router to the provided port at the DSL point of interconnection. Configure the router as follows: Connect the LAN connector of the device via an Ethernet network cable to your PC.
- Page 17 Installation and starting up Connect the device to the power supply with the power adapter. ð The device is now operational. Basic Router...
- Page 18 Installation and starting up Set up WLAN at the PC (oper‐ ating system Windows 10) Start your PC. Click the Windows start button and select ‘All Apps’ . Click ‘Windows System è Control Panel è Network and Internet è Network and Sharing Center’ and select ‘Change adapter settings’ . Right-click on the displayed internet connection and select ‘Settings’...
- Page 19 Installation and starting up Double-click the ‘Internet protocol version 4 (TCP IPv4)’ . Basic Router...
- Page 20 Installation and starting up Select the options ‘Obtain IP address automatically’ and ‘Obtain DNS server address automatically’ Confirm the selection with ‘OK’ . ð The WLAN connection is now set up at the PC. router...
- Page 21 Installation and starting up Set up WLAN at the router Start the browser of your PC. Enter http://192.168.1.1 into the address box of the browser. Confirm with [ENTER]. Enter the user name and the password and click ‘Login’ . The preset user name and the preset password is ‘admin’...
- Page 22 Installation and starting up Select the access type to the network with ‘WAN Access Type’ . Select ‘Static IP’ when your internet provider has provided a fixed IP address. Your internet provider will send you the values for ‘IP Address’ , ‘Subnet Mask’ and ‘DNS’ . DHCP (Dynamic Host Configuration Protocol) is a local network protocol.
- Page 23 Installation and starting up With ‘5G Wireless Setting’ or ‘2.4G Wireless Setting’ you can change the preset parameter for SSID and the encryption if needed. Basic Router...
- Page 24 Installation and starting up Click ‘Apply Changes’ to save the settings. Click ‘Reset’ to discard the changes and to return to the presets. router...
- Page 25 Installation and starting up Establish WLAN connection Click the button for networks in the task bar. ð The available networks are displayed. Basic Router...
- Page 26 Installation and starting up Select the network to which you want to connect. Enter the user name and the password and click ‘Login’ . The preset user name and the preset password is ‘admin’ . ð The WLAN connection is establishing. router...
-
Page 27: Connections And Controls
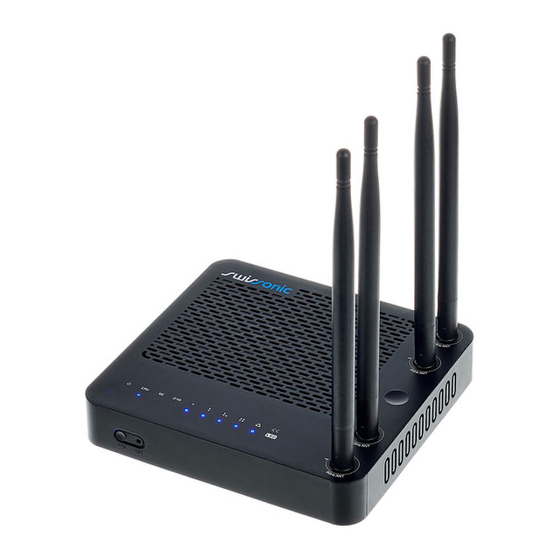
Connections and controls Connections and controls Front panel Basic Router... - Page 28 Connections and controls 1 LED indicator lights illuminates as soon as the router is connected to the mains and ready for use. flashes as soon as the router is connected to the mains and ready for use. flashes when there is a 5G Wi-Fi connection. 2.4G flashes when there is a 2.4G Wi-Fi connection.
- Page 29 Connections and controls Rear panel Basic Router...
- Page 30 Connections and controls 4 [WPS] Press [WPS] to add a new device to the wireless local area network. [RST] Press [RST] for more than 5 seconds to reset the device to factory settings. The reset button [RST] is located in a small recess and is accessible via a pointed object, e.g.
-
Page 31: Cleaning
Cleaning Cleaning Clean the unit with a dry, soft, lint-free cloth. Stubborn dirt can be removed with a slightly dampened cloth. Never use solvents or alcohol for cleaning. Basic Router... -
Page 32: Troubleshooting
Router is not connecting to the Check if there is a DSL connection. local network or the Internet. If the procedures recommended above do not succeed, please contact our Service Center. You can find the contact information at www.thomann.de. router... -
Page 33: Technical Specifications
Technical specifications Technical specifications Power supply Power adapter (9 V / 0,8 A , positive centre) Dimensions (W × H × D) 135 mm × 23 mm × 127 mm Weight 200 g (incl. antennas) Ambient conditions Temperature range 0 °C…40 °C Relative humidity 50 %, non condensing IP address... - Page 34 Technical specifications Data throughput WLan Up to 300 Mbps (2.4 GHz), up to 867 Mbps (5 GHz) Chipset Realtek 8197DL + 8192ER + 8812AR router...
-
Page 35: Protecting The Environment
Protecting the environment Protecting the environment Disposal of the packaging mate‐ rial For the transport and protective packaging, environmentally friendly materials have been chosen that can be supplied to normal recycling. Ensure that plastic bags, packaging, etc. are properly disposed of. Do not just dispose of these materials with your normal household waste, but make sure that they are collected for recycling. - Page 36 Notes router...
- Page 37 Notes Basic Router...
- Page 38 Notes router...
- Page 40 Musikhaus Thomann · Hans-Thomann-Straße 1 · 96138 Burgebrach · Germany · www.thomann.de...
Need help?
Do you have a question about the Swissonic Basic Router and is the answer not in the manual?
Questions and answers