Advertisement
In The Box

Actual product may vary from images.
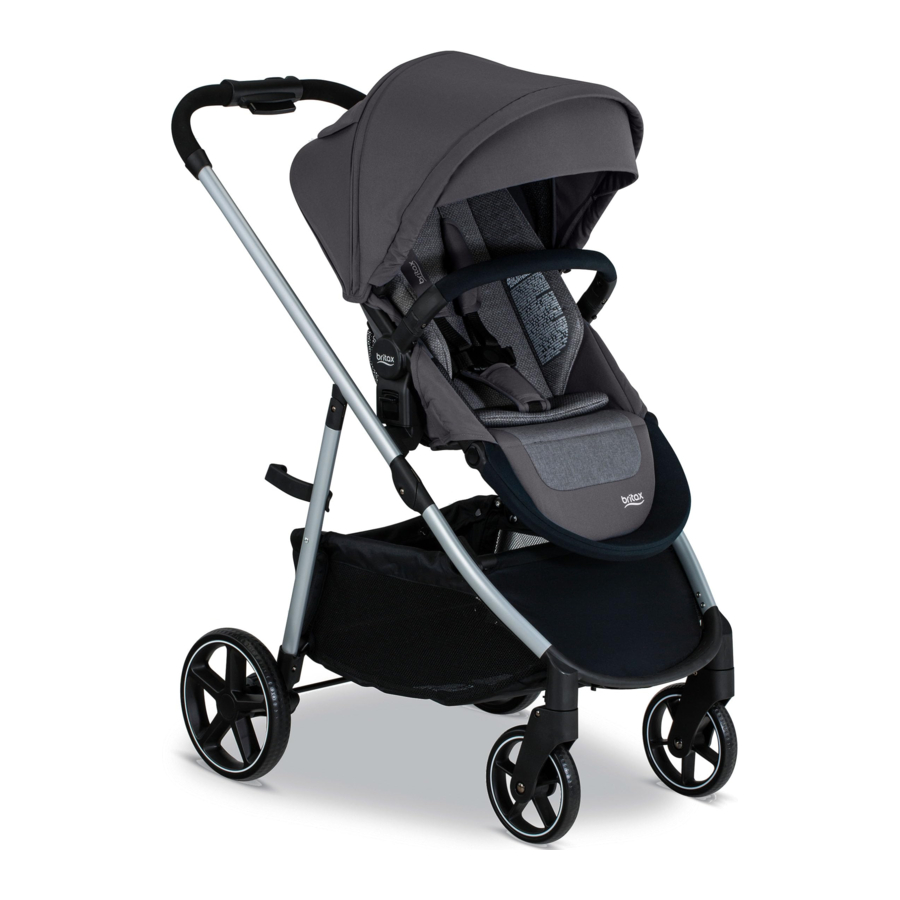
Stroller Overview

- Canopy
- Canopy Window
- Seat Recline Handle
- Extended Canopy
- Toddler Seat Storage pockets (2)
- Stroller Fold Button
- Handle
- Stroller Fold Lever
- Seat Receiver and Stroller Adapter (2)
- Frame Lock (on right side of frame)
- Foot Rest Adjustment Buttons (2)
- Basket Storage Pockets [2 (Inside)]
- Brake Pedals(2)
- Rear Wheels
- Rear Wheel Release Button (2)
- Cargo Basket
- Front Wheel Release Button
- Swivel lock
- Front Wheels
- Foot Rest
- Child Storage Pockect
- Child Buckle
- Child Accessory Mounts (2)
- Harness
- Sun Visor
Actual product may vary from images.
Accessories Overview
Bumper Bar

- Bumper Bar
- Pins (2)
CozyFit Insert TM

- Liner
- Head Pad *
- Wedge *
Until the child is ready to transition into the CozyFit TM insert the infant car seat must be used as instructed with the stroller.
* The wedge and the head pad is for infants weighing 10 lbs (4.5 kg) or more ONLY and MUST be used until the infant has sufficient head and neck control.
Britax Stroller Modes

- Do not exceed maximum weight limits defined in the infant car seat or accessory user guide.
Toddler Seat Modes

Infant Car Seat Modes

- Compatible Britax infant car seat can be installed parent facing/rear-facing or forwardfacing.
- Other compatible car seats MUST be installed parent facing/ rear-facing.
Stroller Assembly
Unfolding the Stroller Frame
- Lift the frame lock and open the frame.

- Lift handle until frame locks into upright position.
NOTE: After stroller is upright, push down on handle to make sure frame is locked in open position.
![]()


Installing the Front Wheels
- Slide front wheel mounting pin into the housing on the frame until they lock into place. Repeat on the other side.

- Pull wheel to ensure that it is secure.

Installing the Rear Wheels
- Place the stroller upside down.
- Align the rear wheel assembly to the stroller frame.

- Make sure the pin holes are aligned with the pins on the stroller frame.
- Slide the rear wheel assembly to the bottom of the stroller frame.
- Pull on the wheel assembly to ensure that it is secure.


Attaching the Toddler Seat
- Press both brake pedals down to lock the parking brake.

- Align seat receivers with stroller adapters and push onto frame until a click is heard on each side.
NOTE: Seat attaches forward or parent facing/ rear-facing.


- Pull up on both sides of the seat to ensure that it is locked into place correctly.


Installing the Canopy
- Position the seat upright.
- Slide the canopy stays into the canopy brackets until they lock into place.

- Extend the canopy forward and lift the rear of the canopy and tuck around the seat recline handle and the back of the stroller.

- Wrap the hook and loops around the toddler seat frame on each side.


Stroller Disassembly
Removing the Canopy
- Unwrap the hook and loops on each side of the canopy.

- Push the canopy forward and untuck the rear part of the canopy from the back of the seat.
![]()
- Push the tab on the outside of the canopy stay with a screwdriver and pull away from stroller. Repeat on the other side.


Removing the Toddler Seat
- Press both brake pedals down to lock the parking brake.

- Lift both release levers on the receivers at the same time.

- Lift the seat up and away from the stroller frame.


Removing the Rear Wheels
- Place the stroller upside down.
- Remove the rear wheels.
- Press the release button on the rear wheel assembly housing and lift. Repeat on the other side.

- Pull away from the wheel housing.

- Press the release button on the rear wheel assembly housing and lift. Repeat on the other side.


Removing the Front Wheels
- Push the button at the back of front wheel housing.

- Pull the wheel from the stroller. Repeat on the other side.


Stroller Operation
Using the Stroller

Before and during use, always make sure the child's hands and feet are away from wheels.
Folding the Stroller
Always apply brake and remove children before folding the stroller.
- Press the stroller fold button and then stroller fold lever located on the handle, and step back while pushing handle downward.

- Continue folding until the frame lock engages.
NOTE: You may need to compress the frame to engage the frame lock.


Unfolding the Stroller
- Lift the frame lock and open.

- Lift the handle until frame locks into upright position.
NOTE: After stroller is upright, push down on handle to make sure frame is locked in open position.


Using the Parking Brake
- To completely engage the parking brake, step on both brake pedals.
![]()
Pressing one brake pedal will only lock one back wheel.
NOTE: After setting the brake, check that the brake is set properly by attempting to roll the stroller forward and backward. If the stroller will not roll, the brake is set properly.

- To disengage, lift each brake.

Using the Front Wheel Swivel Locks
- Move the swivel wheel lock on the back of the front wheel housing up or down on both sides. Down will lock wheels inline with stroller and up will allow wheels to swivel.
NOTE: You may need to swivel the wheels to the proper position to engage the swivel lock.


Adjusting the Stroller
Reclining the Seat
- Lift and hold the seat recline handle on the back of the seat for raising or lowering to the desired position.


Adjusting the Foot Rest
- Press and hold both buttons on either side of the foot rest hinge while raising or lowering the foot rest to the desired position.


Using the Harness
Shoulder and hip straps separate for care and maintenance, but should always be used together to secure your child.
- Align the tongues on the hip straps with the retainers of the shoulder straps and slide through until they lock into place.

- Insert the tongues into the buckle assembly until a click is heard.

Adjusting the Harness
- To adjust the harness.

- Slide the shoulder adjuster up or down.
- Slide the hip adjuster left or right for a proper adjustment. NOTE: For a proper adjustment, harness straps at or above your child's shoulders.

Adjusting the Buckle
- Push down the belly pad to reveal buckle strap and adjuster.

- Slide the buckle adjuster up to lengthen or down to shorten.
NOTE: Buckle strap length should be adjusted to have a snug fit.


Grove Stroller Accessories
CozyFitTM Insert
Britax recommends you consult with your pediatrician regarding whether your child has sufficient head and neck control.
- Until the child is ready to transition into the CozyFitTM insert the infant car seat must be used as instructed with the stroller.
- The CozyFitTM insert is ONLY intended for use with the toddler seat. Do NOT use outside of the stroller seat.
- The liner, wedge and the head pad is for infants weighing 10 lbs (4.5 kg) or more ONLY and MUST be used until the infant has sufficient head and neck control.
- The wedge and the head pad MUST ONLY be used with the stroller harness straps to secure the child in the most reclined position of the toddler seat.
- The liner and the head pad may continue to be used with children after they have sufficient head and neck control.
- Do not allow the infant to lie face down on the insert or any padded material.
- Do not allow infant to sleep in stroller. The CozyFitTM insert is not intended for sleep.
Installing the CozyFitTM Insert
- Recline the seat.
![]()
- Lift and hold the recline handle on the back of the seat, and recline into the lowest position.
- Release the harness by pressing the button in the center of the buckle while pulling the two tongues away from the buckle assembly.

- Pinch the waist strap tongues while you separate them from the shoulder strap. Place them to the side.

- Place the wedge with the curved side facing upward.
Note: The wedge is for infants weighing 10 lbs (4.5 kg) or more ONLY and MUST be used until the infant has sufficient head and neck control.

- Attach the head pad hook and loop behind the liner.
Note: The head pad MUST be used for infants weighing 10 lbs (4.5 kg) or more until the infant has sufficient head and neck control.

- Place the liner on the toddler seat aligning its openings with the respective straps.

- Route the waist straps, shoulder straps, and the buckle through the liner slots.

- Align the waist strap tongues with the shoulder strap retainers and slide through until they click locking into place.

- Slide the head pad up or down for a proper adjustment.


Removing the CozyFitTM insert
- Release the harness by pressing the button in the center of the buckle while pulling the two tongues away from the buckle assembly.

- Pinch the waist strap tongues while you separate them from the shoulder strap.

- Pull out the waist straps, shoulder straps, and buckle from the liner slots.

- Remove the liner and the wedge seat insert from stroller.
- Reconnect the shoulder strap retainers with the waist strap tongues.


Bumper Bar
Installing the Bumper Bar
- Slide the pins onto the child accessory mounts on the seat until they lock into place.
NOTE: Keep hands and fingers away from the child accessory mounts when installing.


Rotating the Bumper bar
- Disengage either side of the bumper bar by pressing the button underneath the bumper bar.

- Rotate the bumper bar to the side of the stroller.


Removing the Bumper Bar
- Disengage either side of the bumper bar by pressing the button underneath the bumper bar

- Pull the bumper bar away from the stroller.


Securing Your Child
- Release the harness by pressing the button in the center of the buckle while pulling the two tongues away from the buckle assembly.

- Fasten the harness by inserting the tongues on the harness straps into the buckle assembly.
NOTE: Ensure the straps are not twisted.

- Adjust the buckle strap.

- Slide the buckle adjuster up to lengthen or down to shorten.
NOTE: Buckle strap length should be adjusted to have a snug fit.
- Slide the buckle adjuster up to lengthen or down to shorten.
- Adjust the harness strap.

- Slide the shoulder adjuster up or down and slide the hip adjuster left or right for a proper adjustment.
- Tighten the harness straps by pulling the harness straps.
NOTE: For a proper adjustment, harness straps at or above your child's shoulders.


Infant Car Seat Mode
Not all infant car seats are compatible with the Grove stroller. For infant car seat compatibility refer to us.britax.com/support/frequently-asked-questions.
Always secure child in car seat harness when infant car seat is in use with the stroller.
Use only with an infant car seat until child has sufficient head and neck control.
Using a Compatible Britax Infant Car Seat
Attaching the Infant Car Seat
- Press both brake pedals down to lock the parking brake. NOTE: After setting the brake, check that the brake is set properly by attempting to roll the stroller forward and backward. If the stroller will not roll, the brake is set properly.
- Remove the toddler seat.
- Align the car seat receivers with the stroller adapters and push onto the frame until a click is heard.
NOTE: Seat attaches forward or parent facing/rear-facing.

- Pull up on both sides of the infant car seat to ensure that it is secure.


Removing the Infant Car Seat
- Pull and hold the release lever on the back of the car seat and lift up to remove from stroller.


Care and Maintenance
Before each use, check this stroller and its components to make sure they are in good condition and good working order.
General Maintenance
- If the stroller gets wet, wipe with a clean cloth or towel to prevent corrosion.
- DO NOT fold the stroller when wet or damp. Always make sure that the stroller is dry before storing.
- Wipe the frame with a damp cloth and mild soap. Use clean, dry cloth or towel to wipe away excess water and soap.
- DO NOT use abrasives, solvents, strong detergents, or household cleaners. These products can scratch, discolor, and weaken plastic or cause corrosion on metal surfaces.
- To prevent damage to plastic parts, store away from extreme heat.
- DO NOT stack other items on top of the stroller. Parking Brake & Stroller Adapters
- Check that the parking brake works properly and locks both wheels securely.
- Clean out any dirt or debris that may prevent the brake or stroller adapters system from working.
Fabric & Harness
- For CozyFitTM insert, refer to product care label for wash instructions. If care label indicates machine washable, always refer to us.britax. com/faqs for important care information.
- DO NOT machine wash or dry.
- Spot clean with cold water and mild soap. Air dry to prevent shrinking.
- DO NOT iron.
Safety Information
THIS USER GUIDE CONTAINS A MANDATORY ARBITRATION CLAUSE AND CLASS ACTION WAIVER ("ARBITRATION AGREEMENT") THAT AFFECTS YOUR LEGAL RIGHTS, REQUIRES YOU TO ARBITRATE DISPUTES, AND LIMITS THE MANNER IN WHICH YOU CAN SEEK RELIEF.
Failure to follow all warnings and instructions could result in SERIOUS INJURY or DEATH
Read these instructions carefully before using this product. To ensure proper use, store this user guide in a convenient place so it can be consulted often.
- Never leave child unattended.
- Avoid serious injury from falling or sliding out. Always use harness to secure child.
- Avoid finger entrapment or injury. Always ensure any child occupants or bystanders are away from the stroller while folding or unfolding.
- Use only with an infant car seat until child has sufficient head and neck control.
- Do not use stroller with a child taller than 44 inches (111.8 cm).
- Do not use stroller with a child who weighs more than 50 lbs (22.6 kg). Exceeding this limit may cause stroller to become unstable.
- Until the child is ready to transition into the CozyFitTM insert the infant car seat must be used as instructed with the stroller.
- The CozyFitTM insert is ONLY intended for use with the toddler seat. Do NOT use outside of the stroller seat.
- The liner, wedge and the head pad is for infants weighing 10 lbs (4.5 kg) or more ONLY and MUST be used until the infant has sufficient head and neck control.
- The wedge and the head pad MUST ONLY be used with the stroller harness straps to secure the child in the most reclined position of the toddler seat.
- The liner and the head pad may continue to be used with children after they have sufficient head and neck control.
- Do not allow the infant to lie face down on the insert or any padded material.
- Do not allow infant to sleep in stroller. The CozyFitTM insert is not intended for sleep.
- Do not overload basket – Maximum weight in basket is 20 lbs (9 kg), this includes the basket storage pockets. Overloading the basket may cause the stroller to become unstable and tip over.
- Do not overload toddler seat storage pockets and child storage pocket. Maximum weight for toddler seat storage pockets and child storage pocket is 1 lbs (0.5 kg) each. Overloading may cause the stroller to become unstable and tip over.
- Do not attach parcels, bags, or other items to the handlebar or frame of stroller except those recommended by Britax, as stroller can become unstable and tip over.
- Always make certain that the stroller is fully open and locked before use.
- Assembly of this stroller must be performed only by an adult.
- Only use Britax approved car seats, accessories, and replacement parts with this stroller.
- Do not allow children to climb on or play with the stroller.
- Do not use the stroller on stairs, escalators, moving vehicles, or steep inclines. Stroller can tip over.
- Do not use stroller receivers as a carry handle.
- Stroller is intended for walking speed only. Do not use while jogging, skating, or any activity other than walking.
- Always set the parking brake when stroller is not moving. Never load or unload the stroller without the parking brake set.
- Do not park on inclines. The parking brake is intended to park the stroller on flat surfaces only. Parking on inclines may result in tip over or runaway stroller.
- Do not exceed the manufacturer's maximum weight limit when using an infant car seat with this product. See infant car seat user guide for maximum occupant weight and other instructions.
- Compatible Britax infant car seat can be installed parent facing/rear-facing or forward-facing.
- Other compatible car seats MUST be installed parent facing/rear-facing.
- Do not modify the stroller or any labels. Doing so voids the warranty and could lead to a dangerous condition.
- Failure to regularly inspect this product and its components to make sure they are in good condition and good working order can result in injury. Discontinue use of stroller if damaged or any parts are missing.
Documents / Resources
References
Download manual
Here you can download full pdf version of manual, it may contain additional safety instructions, warranty information, FCC rules, etc.
Advertisement


Need help?
Do you have a question about the Grove and is the answer not in the manual?
Questions and answers