Alesis MultiMix 10 Wireless - Mixer Manual
- User manual (25 pages)
Advertisement
Introduction
- Make sure all items listed on the front of this guide are included in the box.
- READ SAFETY INSTRUCTION BOOKLET BEFORE USING THE PRODUCT.
- Study the Connection Diagram.
- Place product in an appropriate position for operation.
- Make sure all input devices such as microphones, CD players, or MP3 players are turned off and volume settings are set at "zero."
- Connect all devices as shown.
- Switch everything on in the following order:
- audio input sources (i.e. microphones, instruments, CD/MP3 Players)
- MultiMix 10 Wireless
- When turning off, always reverse this operation:
- MultiMix 10 Wireless
- last, any input devices
Go to www.alesis.com for product registration.
BOX CONTENTS
- MultiMix 10 Wireless
- Power Cable (standard IEC)
- User Guide
- Safety Instructions & Warranty Information Booklet
Connection Diagram

*SOLD SEPARATELY
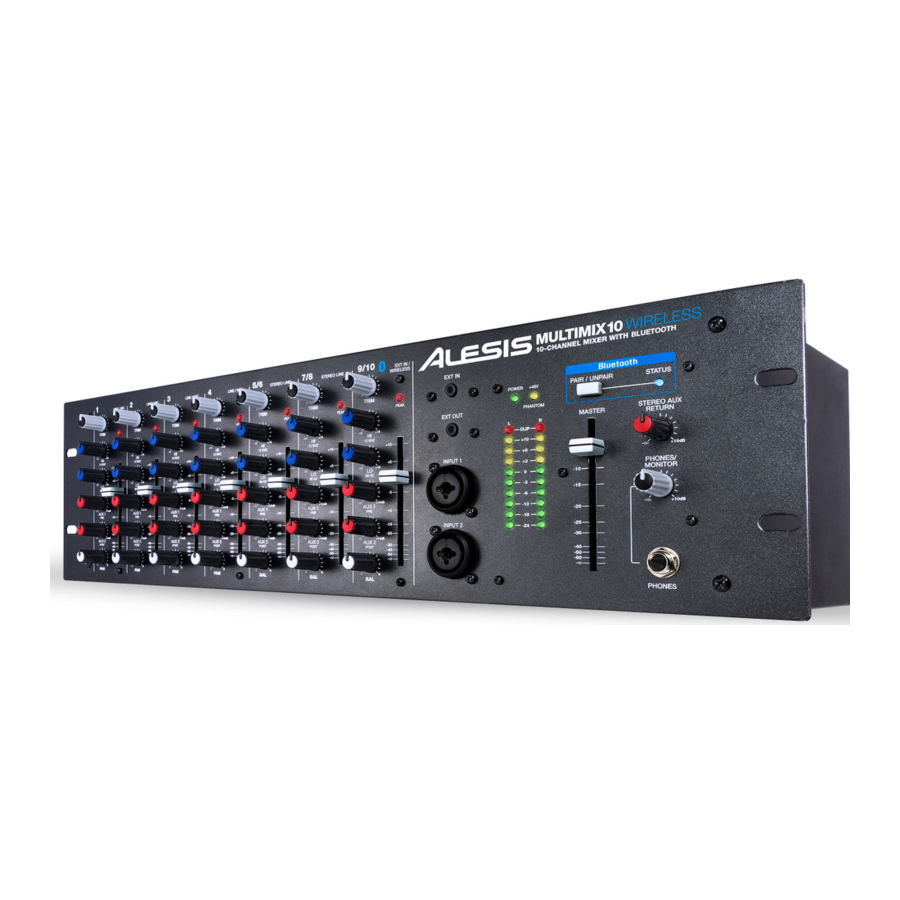
Front Panel


Note: To avoid interruptions during playback, we recommend putting your Bluetooth device in Airplane Mode and deactivating any alarms or alerts before activating Bluetooth.
- Trim – Sets the channel's input level. Adjust this so that the Peak LED lights on the loudest passages and then back it down so it no longer peaks.
- Peak LED – The LED will flash if the signal is clipping. If this happens, decrease the setting of the Gain knob or Channel fader.
Note: Avoid amplifier "clipping" at all costs. Clipping occurs when the power amplifier is distorting and working beyond its limits. Amplifier distortion is THE major cause of speaker failure. - Hi EQ – Provides up to 15dB of boost or cut to the 12 KHz frequency range.
- Lo EQ – Provides up to 15dB of boost or cut to the 80 Hz frequency range.
- Aux 1 – Sends the channel's signal to auxiliary processors, onstage monitors, or headphone amplifiers.
Aux 1 is pre-fader, meaning it takes the signal before the channel fader position. Aux 6 1 is ideal for sending a signal to monitors or headphone amplifiers. - Aux 2 – Sends the channel's signal to auxiliary processors, onstage monitors, or headphone amplifiers. Aux 2 is post-fader, meaning it takes the signal after the channel fader position. Aux 2 is ideal for sending a signal to outboard processors.
- Channel Fader – Controls the signal level of the Mic and Line inputs.
- Pan/Bal (Balance) – Directs the output signal to the left or right Main Out. Pan controls are found on mono channels, sending the mono source to either the left or the right speakers or anywhere in between. The Balance controls are found on stereo channels which take a stereo source and varies the relative level of the channels, so that the left channel will not come out of the right speaker when adjusting the Balance control fully right and vice-versa.
- Ext In – 1/8" stereo line level input for channels 9 and 10.
- Ext Out – 1/8" stereo output that mirrors the main outputs.
- Mic Input 1/2 – XLR-1/4" combo inputs for use with dynamic and condenser mics. The signal level is controlled with channel faders 1 and 2, respectively. When front panel Mic inputs 1 and 2 are in use, this will disable the rear panel Mic 1 and 2 inputs.
- Power LED – Indicates whether MultiMix 10 Wireless is powered on or off.
- Phantom Power LED – Indicates whether the phantom power is enabled for the Mic inputs.
- Pair/Unpair – Press the Pair/Unpair button to pair a Bluetooth device or to disconnect a paired Bluetooth device.
- Pair LED – The Pair Status LED will illuminate when MultiMix 10 Wireless is paired with a Bluetooth audio device.
- LED Meters – Displays the audio signal level of the main outputs.
- Master Fader – Adjusts the speaker's Main Out volume, which includes the Mic/Line inputs, Ext. In, and the audio of a paired Bluetooth device.
- Stereo Aux Return – Controls the signal level returning from the Aux inputs.
- Phones/Monitor Knob – Adjusts the signal level sent to the Monitor Out and the Phones Output.
- Phones Output – Connect headphones to this stereo 1/4" output.
Rear Panel

*
If your unit has a voltage selector switch, change its setting only when necessary (e.g., when traveling to a country or region with a different voltage). Selecting an improper voltage setting can damage the unit.
**
Channels 1-4 each have mic level and line level inputs. Attach either a microphone or a 1/4" cable to the mic/line channel, but do not attach both cables to the same channel at any one time. In extreme cases, doing so can damage your microphone.
Note: If you want to connect a standard turntable to MultiMix 10 Wireless, use a dedicated turntable-to-line-level preamplifier.
- Power Cable Input (IEC) – Insert the included power cable here.
- Voltage Selector* – If your unit has a voltage selector switch, change its setting only when necessary (e.g., when traveling to a country or region with a different voltage). Selecting an improper voltage setting can damage the unit.
- Power ON/OFF Switch – Turns MultiMix 10 Wireless's power on or off.
- Phantom Power Switch – Provides phantom power (+48V) for condenser microphones. Phantom power is applied to the XLR microphone inputs.
- Antenna – Adjusts the reception of the signal that is being received from a Bluetooth source such as a PC, Mac, iOS device, Android, etc.).
- MAIN OUT – Use standard 1/4" TRS cables to connect this output to the house speaker, recorder, or amplifier system. Control the level of this output using the MASTER fader.
- MONITOR OUT – Use standard 1/4" TS cables to connect this output to your monitor speaker or amplifier system. Control the level of this output using the PHONES/MONITOR knob.
- Aux Sends – Two mono 1/4" TRS auxiliary sends allow you to connect effects that can be blended in with the source (or "dry") signals. One typical example is to use one aux send for a reverb unit and the other for a monitor mix for the musicians.
- Stereo Aux Return – Connect the outputs of an external device to these inputs with 1/4" mono cables. This is usually reserved for outboard effects devices but can also be used as an extra input channel for synthesizers, drum machines, etc. If your source is mono, plug it into the left jack and it will be heard on both the left and right sides.
- Ext In (RCA) – These stereo RCA jacks accept consumer-level (-10dBv) inputs from sources such as tape decks, CD players, and MP3 players. Only connect consumer-level equipment to these jacks. Professional-level equipment operating at +4dBu will distort unless you significantly lower the volume on such equipment.
- Stereo Line In – Connect line-level devices to these inputs with 1/4" cables.
- Mic/Line In** – The first four channels of the mixer accept microphones via the XLR connectors or mono linelevel sources via the 1/4" connectors. Channels 9/10 can be used with the Ext In or with a paired Bluetooth device.
- Insert – 1/4" TRS jacks on channels 1-4 allow you to connect external processors (gates, compressors, pitch correction devices, etc.) into the signal path of these channels. The insert signal is brought into the channel directly after the preamplifier (controlled with the TRIM knob) and before the channel's EQ and fader. The insert jacks require use of an "insert" cable, which has a TRS (Tip-Ring-Sleeve) connector on one end for connection to MultiMix 10 Wireless and two TS (Tip-Sleeve) connectors on the other end. Attach the "Send" connector to the INPUT of your external processor. Then, attach the "Return" connector to the OUTPUT of your processor. See the insert cable diagram under USING MULTIMIX 10 WIRELESS FOR MULTITRACK AUDIO RECORDING.
Connecting Electric Guitars and Basses
Electric guitars and basses can be connected to the 1/4" line inputs as well. The combination of the Trim control and the fader level on the front panel will deliver more than enough gain to drive these sources. However, note that the line-level inputs are relatively low impedance, whereas most electric guitars and basses perform best when connected to a high impedance input closer to 200k Ohm or higher. The resulting impedance mismatch may dull the sound of the guitar or bass. If this occurs, use a direct box to connect high-impedance instruments to MultiMix 10 Wireless.
Using Multimix 10 Wireless for Multitrack Audio Recording
The Insert jack can also be used as a direct output to a multitrack recorder. The 'Send' provides the cleanest mic preamp signal by sending the signal to the recorder prior to it reaching the mixer's EQ and channel fader. Use a standard TRS cable and insert the plug on the mixer's side only until the first "click" (the ring connector). This will send the preamp signal to the recorder without interrupting the normal signal flow through the mixer.

Pairing a Bluetooth Device
- Turn on your Bluetooth device.
- Power on MultiMix 10 Wireless.
- Press the Pair/Unpair button on MultiMix 10 Wireless.
Note: You can pair with an iPhone, iPad, computer (Mac/PC), or Android device equipped with Bluetooth that supports A2DP. Android users should consider updating their OS if experiencing trouble with pairing or playing music. - Navigate to your Bluetooth device's setup screen, find "Alesis MultiMix" and connect.
Note: If your Bluetooth device prompts for a pairing code, enter '0000'. - MultiMix 10 Wireless's pairing LED will light up solid when it is 'paired'.
Note: If your Bluetooth device is not able to pair to the mixer, press the Pair/Unpair button on the mixer to break previous Bluetooth connections and reset the Bluetooth module. - To disconnect pairing, press the Pair/Unpair button on MultiMix 10 Wireless.
- To connect to a different Bluetooth device, repeat steps 4-5.
Note: Maximum range will be achieved when using devices with Bluetooth 4.0.
Specifications
Input Voltage: 115/230V AC, 50/60Hz
Frequency Response: 20Hz–50kHz, ±0.5dB
Dynamic Range: 108dB
Distortion: <0.005% THD+N (mic/line to L/R main out)
Maximum Gain: 70dB (mic in to L/R main out)
Headroom: 24dB
Specifications are subject to change without notice.
Documents / Resources
References
Download manual
Here you can download full pdf version of manual, it may contain additional safety instructions, warranty information, FCC rules, etc.
Advertisement


Need help?
Do you have a question about the MultiMix 10 Wireless and is the answer not in the manual?
Questions and answers