Table of Contents
Advertisement
Quick Links
Advertisement
Table of Contents

Related Manuals for Rollei DF-S 1300 SE


Summary of Contents for Rollei DF-S 1300 SE
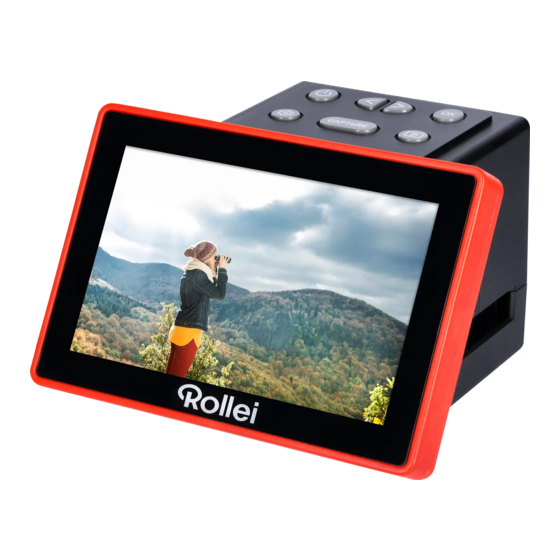
- Page 1 DF-S 1300 SE Film Scanner MANUAL IN ENGLISH www.rollei.cz...
-
Page 2: Before The First Use
(dry environment). 1. Introduction Thank you for purchasing the Rollei Slide Film Scanner DF-S1300 SE. Easily convert your negatives and slides into digital images that you can save and store. Store your precious memories on an SDcard (not included) or directly on your computer. You can also connect the slide film scanner directly to a TV to view the images. -
Page 3: Box Content
2. BoxContent – Slide film scanner – Negative holder – Slide holder – 110 mm film holder – 110 mm film inserter – 8 mm / super8 holder – Slider – USB-C cable – HDMI cable – Power supply unit –... - Page 4 3. ProductOverview 3 4 5 Front Setting button On / off button Left button Right button OK button Playback button CAPTUREbutton Holder slot LCDmonitor Rear USB-Cport SD memory card slot HDMI output Note:Theillustrations are for illustrative purposes only and may differ from the actual product. 4.
- Page 5 4. Inserting Slides/ Negatives Slide holder and inserter – 135 mm / 126 mm / 110 mm (2”x 2”) 2 x2 – 110 mm (1”x 1”) 1 x1 Negative holder and inserter – 135 mm / 126 mm negatives – 110 mm negatives –...
- Page 6 4. Inserting Slides/ Negatives Slider 1. Place the slides in the recess [4]. – Make sure that the slides are inserted upside down. – If your slides are lessthan 1.9 mm thick, set the switch to the 1.1-1.8 position [1]. –...
-
Page 7: Using The Device
5. Using the Device Getting started 1. Insert an SDcard (not supplied) into the SD card slot on the back of the slide film scanner with the label facing up. The SD card will click into place when properly inserted. Remove the SDcard by pressing on it until it clicks into place and pops out, then remove it from the slot. -
Page 8: Taking Pictures
6. Recording Mode Taking pictures Pressthe CAPTUREbutton [7] to switch to capture mode. The loaded picture is displayed on the LCDmonitor. Pressthe OK button [5] or the CAPTUREbutton [7] to preview the image. 1. Pressthe CAPTUREbutton [7] to capture and save an image. The screen displays ”SAVE..“. -
Page 9: Recording Mode
6. Recording Mode Adjusting brightness, colour and sharpness 1. Pressthe OK button [5] to select , then pressthe right button [4] to enter the COLOUR SETTING. Under COLOURSETTINGthere are 5 settings: EV= Brightness, R= Red, G= Green, B= Blue, SHARPNESSand RESET= Default setting for Brightness, Colour and Sharpness. - Page 10 7. Setting Mode Pressthe setting button [1] on the start page to enter SETTINGMODE;there are 6 settings in this mode: – FILM TYPE – RESOLUTION – TV STANDARD – USB-UPLOAD – FORMAT – LANGUAGE Pressthe left / right button [3 / 4] to select the desired setting and then pressthe OK button [5] to enter the submenu.
-
Page 11: Setting Mode
7. Setting Mode 2. Pressthe right button [4] to select NEGATIVE,SLIDE,BLACK& WHITE (use NEGATIVE as an example), select NEGATIVE and press the OK button [5] to open the negative submenu. 3. Pressthe right button [4] to select the film format (135, 110, 126KPK), select 135 (use for example 135) and press the OK button [5] to accessthe required holders and insert information. - Page 12 7. Setting Mode USB-UPLOAD In this mode you can accessyour SDcard from your computer. Note:Whileconnected to a computer, you cannot use the slide film scanner. 1. Use the supplied USB-Ccable to connect the slide film scanner directly to a computer. 2.
-
Page 13: Playback Mode
7. Setting Mode LANGUAGE You can choose from these languages: – German, English, Spanish, Italian, French, Portuguese, Dutch, Czech, Polish, Hungarian, Greek, Swedish, Danish, Finnish, Japanese 1. Select LANGUAGEfrom the settings menu, then press the OK button [5] to enter the language menu. 2. - Page 14 8. Playback Mode ROT A TE -90° 1. Enter the ”Rotate” setting as described above. 2. Usethe left / right button [3 / 4] to rotate the picture. +90° MIRROR 1. Enter the setting for horizontal mirroring / vertical mirroring as described above 2.
-
Page 15: Technical Data
9. TechnicalData Image sensor 14 megapixel CMOS sensor Scan quality 16 megapixels / 25 megapixels Lens Precision multi-element lens LCD monitor 5" colour TFTLCD Focus range Fixed focus Supported film types Colour negative film: 135, 126, 110 mm | Black / White, negative film: Automatic conversion 135, 126, 110 mm | Slides: 135, 126, 110, 8 mm, Super8 Exposure control... -
Page 16: Safety Instructions
10. Safety Instructions – Warning: This product contains small parts and is not suitable for children under 3 years. – Warning: Do not attempt to disassemble or modify this appliance. This appliance does not contain any user-serviceable parts. – Important. Do not exposethis product to liquids or high humidity. –... - Page 17 Safety Instructions – If the scanner or its accessoriesare damaged, they must be replaced or repaired by the manufacturer, its service department or a similarly qualified person in order to avoid hazards. – The housing must not be opened and repairs must only be carried out by a specialist. Contact a specialist workshop for this purpose.All liability and warranty claims are excluded in the event of repairs by the user,improper connection or incorrect operation.
- Page 18 10. Safety Instructions – Do not expose the scanner to high temperatures (e.g. heating heat). Never pour liquids on the scanner. – Do not immerse the scanner in water for cleaning and do not use a steam cleaner.Otherwise the scanner could be damaged.
- Page 19 Conformity Rollei GmbH & Co. KG that this device complies with the following directives. 2014 / 30 / EU EMC Directive 2014 / 35 / EU Low Voltage Directive 2009 / 125 / EC ERPDirective 2011 / 65 / EU RoHs Directive The full text of the EUDeclaration of Conformity is available at the following internet address: http://www.rollei.com/egk/dfs1300se...
-
Page 20: Service Hotline
Rollei GmbH & Co. KG In de Tarpen 42 22848 Norderstedt Service Hotline: +49 40 270750270 /rollei.foto.de @rollei_de Item No.: 20700 www.rollei.de...
Need help?
Do you have a question about the DF-S 1300 SE and is the answer not in the manual?
Questions and answers