
Related Manuals for OpenVox UC200 Series


Summary of Contents for OpenVox UC200 Series
- Page 1 UC200 Series IP PBX User's Manual OpenVox Communication Co., Ltd. UC200 Series IP PBX User Manual Version 1.0 OpenVox Communication Co., LTD. Website: www.openvoxtech.com...
- Page 2 UC200 Series IP PBX User's Manual OpenVox Communication Co., Ltd. Add: Room 624, 6/F, Tsinghua Information Port, Book Building, Qingxiang Road, Longhua Street, Longhua District, Shenzhen, Guangdong, China 518109 Tel: +86-755-66630978, 82535461, 82535362 Email: Business: sales@openvox.cn Support: support@openvox.cn Working hours: Monday to Friday 09:00-18:00 (GMT+8), except for holidays.
- Page 3 Thanks for choosing OpenVox products! Forword This document is copyrighted by OpenVox Communication Co., Ltd. all, without permission, the pictures and text in this document shall not be copied, reproduced for commercial purposes. All interpretation rights belong to OpenVox Communication Co., Ltd.
-
Page 4: Table Of Contents
UC200 Series IP PBX User's Manual Contents 1.Product Overview .......................... 5 2.Login ............................. 12 3.States ............................15 4.Networks ............................18 5.extensions ............................ 24 6.Relay ............................. 65 7.Call out routes ..........................77 8.Calling functions ........................... 89 9.Advanced Functions ........................113 10.Systems ............................ 141 OpenVox Communication Co., LTD. -
Page 5: 1.Product Overview
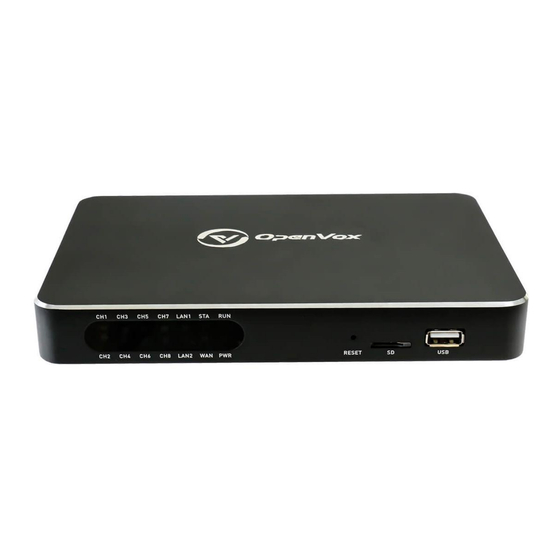
1.Product Overview 1.1 Product Description The UC200 series is equipped with up to 8 analog ports and 3 Ethernet interfaces for seamless connectivity with VoIP trunks and existing PSTNs. In addition, the UC200 supports a range of coding and signaling protocols including G711 (alaw/ulaw), G722, OPUS, G726, G729, GSM, iLBC, H264, VP8. - Page 6 UC200 Series IP PBX User's Manual 1.2 Product appearance Front Panel Diagram. Rear Panel Diagram. 1.3 Front and rear panel interface description Front Panel Description Rear Panel Description identifier clarification identifier clarification Power indicator DC12V/2A Power input port, input 12V/2A,...
- Page 7 UC200 Series IP PBX User's Manual 1.4 Indicator light descriptions indicator state of affairs descriptive define light resounding Equipment power-up Power Power indicator go out No power to the equipment. slow blink Equipment in working order flicker Device enters safe mode...
- Page 8 UC200 Series IP PBX User's Manual long press the reset configuratio flash to fast flash, at seconds and button for 3 seconds, n and web this time, release observe the first the indicator light managemen the button, after a change in the...
- Page 9 UC200 Series IP PBX User's Manual 1.6 Description of models Maximum model G.729 G.711 FXS/FXO number of SIP note number Concurrency Concurrency extensions 2 FXO channels UC200-2O2S 2 FXS channels 4 FXO channels UC200-4O4S 4 FXS channels UC200-8O 8 FXO channels UC200 * :: N: indicates no support;...
- Page 10 UC200 Series IP PBX User's Manual Extension user rights management Support multi-level IVR, user can customize IVR voice API supporting flexible MQTT protocol, providing billing authentication, parameter management, call control, etc. Built-in softswitch (IP-PBX) function, support 300 SIP extensions and 30 concurrent calls ...
- Page 11 UC200 Series IP PBX User's Manual Supports intelligent inbound routing, which can be routed to different destinations according to different callers and different call times. Support to set the destination address as hang-up, internal extension, extension number, tone, trunk, voice navigation, queue, ringing group, conference call, broadcast, DISA, etc.
-
Page 12: 2.Login
UC200 Series IP PBX User's Manual Configuration backup/restore Firmware upgrade: support web upgrade Bill Inquiry and Export System Log Export Built-in analog port recording tool and network debugging tool 2.Login 2.1.1 Description of the model 1. - Page 13 UC200 Series IP PBX User's Manual 2.1.3 Logging in to the IPPBX Web Page The default login account is admin and the default login password is admin. The default configuration state of the device applies only within the intranet security environment.
- Page 14 IP address of the logged-in user, making it impossible to continue logging in. 2.2 Configuration Wizard This section describes several common ways to configure the UC200 series. 2.2.1 Registering as a gateway to a server UC200 series as a whole registered to the server 2.2.2 Registration of other end devices to UC200...
-
Page 15: 3.States
UC200 Series IP PBX User's Manual 2.2.3 Mapping to PBX in Trunk Mode 3.State The submenus included under the Status menu are Overview, PBX Status, and Real-Time Information, which mainly display information related to the device. 3.1 Overview IPPBX system information: [Host Model], [Serial Number] [Number of Analog Extensions],... - Page 16 UC200 Series IP PBX User's Manual IPPBX network interface information: [WAN status], [LAN1 status], [LAN2 (IMS) status] 3.2 PBX Status Real-time display of status, channel call status and IPPBX concurrency status [Status] OpenVox Communication Co., LTD. Website: www.openvoxtech.com...
- Page 17 UC200 Series IP PBX User's Manual [Live call] [Number of concurrences] 3.3 Real-time information View CPU load conditions, network traffic conditions, and currently active network links. [Load] OpenVox Communication Co., LTD. Website: www.openvoxtech.com...
-
Page 18: 4.Networks
UC200 Series IP PBX User's Manual [Flow] [Link] 4.Networks 4.1 Network interfaces 4.1.1 Overview of the network OpenVox Communication Co., LTD. Website: www.openvoxtech.com... - Page 19 UC200 Series IP PBX User's Manual After logging into the IPPBX web page for the first time with the factory IP address, you need to change the network configuration of the IPPBX according to the network environment where the IPPBX is located.
- Page 20 UC200 Series IP PBX User's Manual 4.1.2 Configuring a static IP address This section describes how to configure a static IP address for the IPPBX. 1. Go to Network -> Interfaces. 2. Click [Edit] on the default LAN interface or WAN interface.
- Page 21 UC200 Series IP PBX User's Manual 4. Click [Save & Apply]. Note: Users can query the IP address by dialing *158 from an extension. 4.1.4 Configuring a PPPoE Network Connection This article describes how to configure a PPPoE connection on an IPPBX to obtain an IP address.
- Page 22 UC200 Series IP PBX User's Manual 4.2 DHCP/DNS 4.2.1 Basic configuration The LAN interface controls a range of IP addresses when connecting to a network device, allowing the network device to automatically obtain the IP address and subnet mask assigned by the server.
- Page 23 UC200 Series IP PBX User's Manual 4.4 Static routes 4.4.1 Adding static routes Static routing allows a specific IP or domain name to communicate data through a specified network port. If not configured, data communication occurs through the default network port.
-
Page 24: 5.Extensions
UC200 Series IP PBX User's Manual Static Route Configuration 1. Log in to the IPPBX webpage, go to Network -> Routes –> Static Routes, and click [Add]. 2. Set up routing rules for SIP trunks to route SIP trunks to the carrier's routers. - Page 25 UC200 Series IP PBX User's Manual Setting parameters. set up clarification prohibit the use A reboot of the device is required after enabling to take effect. of sth. Disabled analog extensions cannot make and receive calls. extension The extension number used to make and receive calls.
- Page 26 UC200 Series IP PBX User's Manual Enterprise], [Local], and [Domestic] routing out of the office. International Long Distance: When dialing an outgoing number, you are allowed to take the outgoing call routing authority of [Intra-Enterprise], [Local], [Domestic], and [International] routing out of the office.
- Page 27 UC200 Series IP PBX User's Manual Send voice When enabled, you need to fill in the e-mail address. The message to your message file received by the extension will be sent to the filled mailbox mailbox. Voicemail The password that needs to be filled in when the user dials *2 or Password *02 to access the message menu after setting the password.
- Page 28 UC200 Series IP PBX User's Manual set up clarification cloture Turn off Do Not Disturb mode. normally It's in do-not-disturb mode and no calls can come in. open In no-disturb mode for a set period of time. appointed Example: time The time period is 8:30-12:30.During this time period, no...
- Page 29 UC200 Series IP PBX User's Manual Conditional transfer is a very useful feature that can be done when the user is unable to answer an incoming call, or is in the middle of a call, or doesn't have time to answer an incoming call.
- Page 30 UC200 Series IP PBX User's Manual Listening Settings: In order to ensure the normal use of the listening function, you need to set up the listening function for both the listener and the listee at the same time. a) Set the [Monitor Privileges] and [Monitor Mode] of the listener.
- Page 31 UC200 Series IP PBX User's Manual ordinary Normal listening mode, can only be used for a relay listener listening, can not talk to any party in the call. Method: *90 + the extension number to listen to. eavesdrop Secret listening allows you to both listen and talk to the listener, but the other party talking to the listener cannot hear the listener's voice.
- Page 32 UC200 Series IP PBX User's Manual The ability to substitute all extensions within the device. security Usage: Dial *4 (substitute for an extension in the same situation group), *04 + the number to be substituted. Example of a substitute connection: ...
- Page 33 UC200 Series IP PBX User's Manual Single call time limit setting: set up clarification municipal Set the length of a single call when using local call routing. language internal Set the length of a single call when using the domestic route.
- Page 34 UC200 Series IP PBX User's Manual set up clarification roaming start using Allow extensions to dial roaming numbers. permission prohibit The roaming function is prohibited. the use of sth. extension This extension password is the [Roaming Login] password and code the extension [Login/Logout] password.
- Page 35 UC200 Series IP PBX User's Manual roaming prohibit The roaming function is prohibited. Call permission the use of sth. extension This extension password is the [Roaming Login] password and code the extension [Login/Logout] password. internal Allows calls to extensions within the device.
- Page 36 UC200 Series IP PBX User's Manual forward the current call to another call extension, or to an external number. forwardin prohibit the Call Forwarding is not available. use of sth. Enabled by default. When enabled, an extension, when acting as a called, can...
- Page 37 UC200 Series IP PBX User's Manual clarification hotline The Hotline function is available when checked. hotline Fill in the hotline number. number dial Waiting time for outgoing hotline numbers after taking off the delay phone. Hotline example: The manager of a company often calls to contact his assistant to deal with work matters. After setting up a hotline number, the manager can simply pick up the call handle and make a call to his assistant.
- Page 38 UC200 Series IP PBX User's Manual Minimum flash- Sets the minimum flash-off time in milliseconds. The default is 75ms. off time Maximum Sets the maximum flash-off time in milliseconds. The default is 800ms. flash-off time This prevents misjudging the jittery state of the handset as off-hook.
- Page 39 UC200 Series IP PBX User's Manual 3. On the [General Settings] screen, fill in the registration information of the SIP extension. [Extension Number]: Set the extension number for incoming and outgoing phone calls. [Display Name]: The name of the phone that the other party sees when the user dials.
- Page 40 UC200 Series IP PBX User's Manual [Start extension]: Fill in the start extension number, the system will start with this number to create extension numbers in batch. [Number of extensions]: The number of SIP extensions to be created in batch.
- Page 41 UC200 Series IP PBX User's Manual In the company, you need to set up the port mapping on the router connected to the IPPBX. If you do not set up the port mapping, the devices in the external network cannot connect and communicate with the IPPBX in the company.
- Page 42 UC200 Series IP PBX User's Manual 3. Configure NAT parameters for the IPPBX Users can modify the port configuration of the corresponding router in Advanced Feature -> SIP -> General Settings. 4. NAT Configuration Go to Advanced Features -> SIP -> NAT Settings to set NAT according to the IPPBX network environment.
- Page 43 UC200 Series IP PBX User's Manual Enable NAT and remote registration for the extension. Note: It is recommended to uncheck [Qualify] to disable heartbeat detection, otherwise remote extensions that have been registered are prone to drop out. 5.2.3 Modifying SIP extensions ...
- Page 44 UC200 Series IP PBX User's Manual 2. Under the Extension page, [check] the extension you do not need and click [Delete]. 3. Click [Save & Apply]. 5.3 SIP extension configuration This article will give users a detailed explanation, all the functions of the SIP extension settings.
- Page 45 UC200 Series IP PBX User's Manual Register Password Password required for SIP phone registration. How many phone terminals are allowed to register to the same Maximum number SIP extension. When an extension has an incoming call, all of registrations terminals ring at the same time.
- Page 46 UC200 Series IP PBX User's Manual Bound external port, this extension can directly call out to the DOD port outside world through the bound external port without permission setting. 5.3.2 SIP extension function settings voicemail When users are on a call or have other important matters that make it impossible to answer the incoming call, they can enable the voice mailbox function.
- Page 47 UC200 Series IP PBX User's Manual import Imported into the IPPBX internal beeps. speech self- Currently record your own cues. record Login/Logout Click "Extension" -> "FXS" -> "Features Settings" and find the [Login/Logout] function. Login: When you select Login, you can dial the number normally.
- Page 48 UC200 Series IP PBX User's Manual *79, cancel the do-not-disturb. Attention: After scrambling is turned on, any incoming calls, including ringing groups, IVRs, queues, etc., cannot be connected (except for broadcast groups). secretarial extension When an extension receives an incoming call, it transfers the call to the designated extension, which is the secretary extension.
- Page 49 UC200 Series IP PBX User's Manual Setting parameters: unconditional All incoming calls are transferred to the specified transfer destination. move quickly in When in occupancy, incoming calls are transferred to the an emergency specified destination. No answer When a call is not answered, the call is transferred to the transfer specified destination.
- Page 50 UC200 Series IP PBX User's Manual e) Set the [Listening Privileges] and [Listening Mode] of the listener. Log in to the IPPBX webpage, go to Extension -> SIP Extension, and click [Edit] next to the extension. g) On the extension edit screen, click the [Features Settings] screen.
- Page 51 UC200 Series IP PBX User's Manual Force insertion All three parties can make mutual calls. a relay of a listener Method: *92 + the extension number to listen When an extension call is unanswered, other extension users can answer the call on behalf of the extension user.
- Page 52 UC200 Series IP PBX User's Manual the same group, the other personnel can press [Same Group Pickup Feature Code*4] on the handset to pick up the incoming call on their behalf. Dial [*4] on your phone to answer the call on your behalf when the phone of a colleague in the same group rings.
- Page 53 UC200 Series IP PBX User's Manual Example: the extension is limited to 10 seconds for local calls, 20 seconds for domestic calls, and 30 seconds for international calls. By routing an outgoing route with routing privileges for a local call to an outside line, then the call can only be made for 10 seconds.
- Page 54 UC200 Series IP PBX User's Manual Password municipal Numbers that allow calls to be made to a municipal Calling language telephone number. Privileges internal Calls to domestic numbers are allowed. global Allows calls to international numbers. Usage: Roaming Feature Code (*88) + extension number + extension code + number to be dialed.
- Page 55 UC200 Series IP PBX User's Manual Usage: Call Roaming Feature Code (*88) + extension number + extension code + number to be dialed. Example: *88*2025*1234*136xxxxxxx. NOTE: Roaming call privileges, are not affected by extension privileges. Waiting When enabled, the analog phone is in a call and can still receive new incoming calls. And after pressing the tapping fork, you can hang up the other party's phone and talk to the new caller.
- Page 56 UC200 Series IP PBX User's Manual prohibit Called forwarding is not available. the use of sth. Usage: Press *03 for blind transfer during a call, press *3 for inquiry transfer. *03 Blind Transfer: When the first and second parties are talking, dialing *03+ (the third party's extension number) will transfer the call directly to the third party without their consent.
- Page 57 UC200 Series IP PBX User's Manual The manager of a company often calls to contact his assistant to deal with work matters. After setting up a hotline number, the manager can simply pick up the call handle and make a call to his assistant.
- Page 58 UC200 Series IP PBX User's Manual Allow calling in to other user groups: Once added, you can dial to other user group members. Allow other user groups to call in: Once added, allow members of other user groups to type in.
- Page 59 UC200 Series IP PBX User's Manual 3. Click [Save & Apply]. 5.4.3 Deleting subgroups If you need to delete the subgroup. The deletion procedure is as follows: 1. Go to Extension -> Department, search and find the extension group you want to edit, and click [Delete].
- Page 60 UC200 Series IP PBX User's Manual 1. Configuring SMTP If you want to enable sending voicemail to your own mail, then you must configure SMTP. the configuration is as follows: Configure the path: Go to Advanced Feature -> SMTP Settings and come to the SMTP configuration page.
- Page 61 UC200 Series IP PBX User's Manual Take QQ mailbox for example: If the tls/ssl connection is not enabled, transfer port 25. If the tls/ssl connection is enabled, the transfer port is 465. Connecting using TLS Enable TLS transport connections. Using the STARTTLS...
- Page 62 UC200 Series IP PBX User's Manual After the configuration is complete, first click [SAVE & APPLY], and then click [SMTP TEST]. If everything before the configuration is no problem, finally received exitcode = EX_OK, that the configuration is successful. 3. Enable voice message to mailbox By default, IPPBX disables the voice message to mailbox function.
- Page 63 UC200 Series IP PBX User's Manual 2. Note: Cue upload format, only supports 8000hz, mono, 16 bit width. 3. After uploading the cue, go to Advanced Feature -> Voice Prompts -> Hold On Music and click [Add]. 4. In the Prompts optional list, add to the Selected list.
- Page 64 UC200 Series IP PBX User's Manual enabled by default. storage location Stores the message in the specified location. 5.5.4 Voice mail function menu The menu is shown below. Dial *2 and enter your voicemail password to access the main menu of voicemail features.
-
Page 65: 6.Relay
UC200 Series IP PBX User's Manual 6.Relay Users need to configure at least one trunk on the IPPBX to make and receive outgoing numbers. 6.1 Analog relay 6.1.1 Analog Trunking Configuration Configuration Path: "Trunk" -> "FXO" -> "General Settings", edit the corresponding trunk in the [General Settings] page. - Page 66 UC200 Series IP PBX User's Manual type None (default): Once you make an outbound call using an analog trunk, the IPPBX starts counting time whether the call is answered or not. Reverse polarity detection: If the analog trunk supports antipode signaling, then you can choose antipode detection.
- Page 67 UC200 Series IP PBX User's Manual carrier and routed to the IPPBX phone system. However, compared to traditional analog trunks, SIP trunks are cheaper and are easier to deploy and implement as they enable phone line calls over IP. SIP trunk type The IPPBX supports the following types of SIP trunks: ...
- Page 68 UC200 Series IP PBX User's Manual 1. Go to Trunk SIP port 5060 -> SIP Trunk. transportation protocol 2. Fill in the user ID test relay name in Certified Name test the relay [Name] field. cryptographic Test123 3. Select Enable in the [Relay Status] field.
- Page 69 UC200 Series IP PBX User's Manual domain not provided, it is not required. 6. Users can modify other relay configurations according to their needs. 7. Click [Save & Apply]. Click into Trunk -> SIP Trunk to check the status of the trunk. If the trunk is successfully registered, the registration status will show that it is in effect.
- Page 70 UC200 Series IP PBX User's Manual Users can create a SIP account trunk in IPPBX for interfacing with IPPBX and other devices. The steps are as follows. 1. Go to Trunk -> SIP Trunk. 2. Fill in the relay name in the Relay [Name] field.
- Page 71 UC200 Series IP PBX User's Manual 1. Go to Trunk -> SIP Trunk. 2. Search and find the SIP trunk you want to edit and click [Delete]. 3. On the pop-up screen, click [Yes] to confirm the deletion. 4. Click [Save & Apply].
- Page 72 UC200 Series IP PBX User's Manual Certified Used for SIP authentication. Usually the same as Name the username. cryptographic The password for the trunk account, which is used to register with the SIP provider. From header Customize the UserName portion of the From fields header field in Invite messages.
- Page 73 UC200 Series IP PBX User's Manual authentication name of the trunk service provider. cryptographic Password for the SIP trunk account to register with the SIP provider. All outgoing calls from this trunk will apply this From header name to the Username portion of the From header fields field of the SIP INVITE signaling.
- Page 74 UC200 Series IP PBX User's Manual Support Enable the fax function. When enabled, it will consume some for T.38 performance. It is not recommended to turn on this item when you have a large number of concurrent calls. Maximum The number of concurrent calls allowed.
- Page 75 UC200 Series IP PBX User's Manual Set which field in this trunk to get the DID number from INVITE TO P Preferred Identity DID Get Diversion Remote Party Identify P Asserted Identify P Called Party ID...
- Page 76 UC200 Series IP PBX User's Manual Form header fields not have OpenVox Communication Co., LTD. Website: www.openvoxtech.com...
-
Page 77: 7.Call Out Routes
UC200 Series IP PBX User's Manual 7.Call out routes 7.1.1 Introduction to call routing Outbound routing is used to tell the IPPBX which extensions can use this outbound routing and which trunk to use for outgoing calls. Outbound Routing Application Principles When an extension user dials a number, the IPPBX performs the following actions strictly: 1. - Page 78 UC200 Series IP PBX User's Manual This wildcard represents the end of number matching and can be Wildcard used optionally when determining the length of the number. For "!" example, if you only need to match four-digit numbers, you can enter "_XXXX!"...
- Page 79 UC200 Series IP PBX User's Manual [Calling Number Matching]: Only extensions that satisfy the matching rules can make outbound calls. [Called Number Matching]: The number dialed by the extension user can only be called out externally if it meets the matching rules.
- Page 80 UC200 Series IP PBX User's Manual 1. Go to Call Control -> Outbound Routers . 2. Select the call routes that need to be modified in priority and click [Edit]. 3. In the [Priority] option field, adjust the priority, the higher the number the higher the priority.
- Page 81 UC200 Series IP PBX User's Manual Application of temporal conditioning to outbound routing: After a time condition is set for the outgoing route, an extension user of the IPPBX can only dial an outside line through this route within the time condition.
- Page 82 UC200 Series IP PBX User's Manual OpenVox Communication Co., LTD. Website: www.openvoxtech.com...
- Page 83 UC200 Series IP PBX User's Manual Set up breaks: Users can create a time condition based on their breaks and later apply that time condition to the inbound routing, after which all incoming calls during breaks will be directed to the appropriate destination.
- Page 84 UC200 Series IP PBX User's Manual calls during holiday time will be directed to the set destination. For example: IVR. when a customer calls into the IPPBX during holiday time, the IPPBX will inform the customer that the enterprise is on vacation via IVR voice.
- Page 85 UC200 Series IP PBX User's Manual Users can apply time conditions in inbound routing to direct incoming calls to different destinations based on office hours and schedules. 1. Go to Configuration "Call Control" -> "Inbound Routers" and click [Edit]. 2. In the Inbound Routing [Time Profile] field, select a time rule.
- Page 86 UC200 Series IP PBX User's Manual 2. There are three types of blacklist and whitelist restrictions: [Calling in]: Blacklists in which added member numbers cannot call into the IPPBX or specified extensions; In the whitelist, added member numbers can call into the IPPBX or specified extensions, ignoring blacklist restrictions.
- Page 87 UC200 Series IP PBX User's Manual Represents any numeric number with a length greater than 0. For example, "_9011." represents that any number Wildcard "." beginning with 9011 (excluding 9011) will be added to the list. This wildcard represents the end of number matching and can be used optionally when determining the length of Wildcard "!"...
- Page 88 UC200 Series IP PBX User's Manual Prohibit numbers from calling in to the specified extension. When an extension user encounters a nuisance call, the nuisance call can be blacklisted so that it cannot call into the nuisance extension. Prohibit an extension from calling a number that matches the rule in question.
-
Page 89: 8.Calling Functions
UC200 Series IP PBX User's Manual up a whitelist as follows. 8.Calling Functions 8.1 IVR The abbreviation for Voice Guidance is called IVR. when an incoming call is made to the IVR, the IVR will be heard to play a voice. The user dials the number according to the IVR voice prompts and will be guided to the corresponding destination by IPBBX. - Page 90 UC200 Series IP PBX User's Manual 1. Go to Call Feature -> IVR and click [Add or Edit]. 2. In the [Basic Settings] screen of IVR, users can change the following settings. set up descriptive Set the IVR number. switchboard descriptive Give a description of the IVR.
- Page 91 UC200 Series IP PBX User's Manual the IPPBX. see Creating IVR Tones for details. Forced to listen to the You must listen to the full IVR voice before you can press a key. whole voice Number of Defines the number of times the system will automatically play timeout a tone.
- Page 92 UC200 Series IP PBX User's Manual event will be triggered. When the IVR key is set to Invalid, the system will trigger the Invalid Key event. null Example: IVR button 0 destination is invalid, invalid destination for the tone, prompt: input is invalid.
- Page 93 UC200 Series IP PBX User's Manual 8.2 Queues The IPPBX queue feature is suitable for small call centers. When the caller dials the queue number, the device will ring the free extensions in the queue according to the set ringing order. If there is no free extension, the caller will hear the voice played by the system to indicate the queue status.
- Page 94 UC200 Series IP PBX User's Manual Seat ringing The amount of time the sitter's ringing timeout expires. time The unit is seconds. The time interval between when a queue member completes a call with a customer and continues to answer new rest calls.
- Page 95 UC200 Series IP PBX User's Manual The system plays a patient waiting tone to the System customer service that is waiting in the queue. The default Announcement is to broadcast once every 20 seconds. 4. Click [Save & Apply]. 8.3 Ringer sets Assign multiple extensions to a group, e.g., a company can set up a ringing group for the technical...
- Page 96 UC200 Series IP PBX User's Manual 3. Click extensions of the ringing group in sequence. [Save & [Order]: The system will ring the idle member Apply]. extensions in the ringing group in the order specified in the configuration file. Select the maximum time in seconds that a Ringer timeout customer can wait in a ringing group.
- Page 97 UC200 Series IP PBX User's Manual 8.4 Telephone conferences 8.4.1 New conference calls Before using a conference call, the user needs to create a conference call in the IPPBX. 1. Go to Call Feature -> Conference and click [Add]. 2. On the Conference Call Configuration screen, change the following settings:...
- Page 98 UC200 Series IP PBX User's Manual members Designate the conference administrator, who does not janitors need a password to access the conference call. 3. Click [Save & Apply]. 8.4.2 Teleconference use IPPBX internal extension, you can directly dial the conference call number to enter the...
- Page 99 UC200 Series IP PBX User's Manual Press 6 Turn up the conference call volume. Press 7 Turn down your volume. Press 8 Exit the voice menu. Press 9 Turn up the volume on yourself. Press # Members of the Conference are invited.
- Page 100 UC200 Series IP PBX User's Manual [Number]: Set the broadcasting phone number. [Description]: describes the broadcast group to make it easy to distinguish between different broadcast groups. [Type]: Select two-way intercom. [Auto Answer]: optional. When enabled, extensions that support the auto broadcast function will be automatically taken off the air.
- Page 101 UC200 Series IP PBX User's Manual 1. Go to Call Feature -> Paging/Intercom and click [Add]. 2. Set up one-way broadcast groups. [Number]: Set the broadcasting phone number. 【Description】: describes the broadcast group to make it easier to distinguish between different broadcast groups.
- Page 102 UC200 Series IP PBX User's Manual 2. Set up an auto broadcast group. [Number]: Set the broadcasting phone number. 【Description】: describes the broadcast group to make it easier to distinguish between different broadcast groups. [Type]: Select Auto Broadcast. [File]: Select the audio file to play the broadcast.
- Page 103 UC200 Series IP PBX User's Manual [Auto Answer]: optional. When enabled, extensions that support the auto broadcast function will be automatically taken off the air. [Password]: Optional. After setting the password, users need to enter the password to dial the phone number of the broadcast group.
- Page 104 UC200 Series IP PBX User's Manual One Pass Setup: 1. Go to "Call Feature " -> "Follow Me" Click [Add]. 2. On the No. 1 Configuration screen, change the following settings: set up descriptive Select the extensions that need to be configured with a extension OnePass.
- Page 105 UC200 Series IP PBX User's Manual Select the extension for which you need to set up extension speed dialing. shortcut number You can set up speed dial numbers. Destination address Destination phone number. 3. Click [Save & Apply]. 8.8.2 Speed Dial Feature Codes The default speed dial prefix is *99.
- Page 106 UC200 Series IP PBX User's Manual To quick call the destination number 12345678, you need to set the phone number to 912345678. 8.9 DISA DISA, users call IPPBX through the outside line, when the destination of the inbound route is...
- Page 107 UC200 Series IP PBX User's Manual they need to make a call to the company's customer service, but they want to use the company's phone number to call the customer service, at this time, DISA can be a good solution to this problem.
- Page 108 UC200 Series IP PBX User's Manual they will hear the prompt to enter the password, and after entering the password correctly, they will hear the dial tone, and then dial the outbound number, which can be called out through the outbound routing specified by DISA.
- Page 109 UC200 Series IP PBX User's Manual 8.10 T.38 Fax settings 8.10.1 Fax to Mail Configure fax-to-email: Go to Advanced Feature -> SMTP to make sure that SMTP is configured correctly and the mailbox function can be used normally, otherwise IPPBX cannot send faxes to users' mailboxes.
- Page 110 UC200 Series IP PBX User's Manual 8.11 Demolition calls The Forced Disconnect Call feature allows an authorized user to forcibly disconnect another user from an active call. Before a user can use this feature, you need to configure the Forced Disconnect Call feature code and assign permissions to that user.
- Page 111 UC200 Series IP PBX User's Manual Usage Authorized users can dial [Feature Code + Called Number] on their own phones to force disconnect the call from the specified extension. Forced insertion example Employee A (extension 2000) and Employee B (extension 3000) are on a call; Administrator C (extension 1000) has an urgent matter to check with Employee A.
- Page 112 UC200 Series IP PBX User's Manual Ro dialed the number for Ming. At this time, Ming was on a call and was unable to answer Luo's call, and Luo's call request was hung up. Xiao Luo called [*371001] at this time to turn on the callback function in case of busy.
-
Page 113: 9.Advanced Functions
UC200 Series IP PBX User's Manual 8.11.7 Using Call Parking The user can dial this feature code on the handset to park the incoming call to the system- assigned parking number; the system will play the parking number after successful parking, and the call can be resumed by dialing this parking number on other handsets (*6701). - Page 114 UC200 Series IP PBX User's Manual The device needs to match the detected DTMF number with the number bit chart during the call to determine whether the collection is finished to shorten the delivery time. The configuration is as follows: Click Advanced Feature->Preferences->Dialing Detection to set the rules related to...
- Page 115 UC200 Series IP PBX User's Manual Number Bitmap Configuration Example 1: A user wants to dial an IPPBX internal extension without waiting and dial out immediately. You can configure it as follows Note: The Number Bitmap Only function is only for the FXS channel.
- Page 116 UC200 Series IP PBX User's Manual IPPBX supports call recording function. internal and external calls, queues, ring groups, IVRs, conference calls of IPPBX can be recorded. The call recording function is very practical, which can help the company to examine employees, record important voice information, and also provide effective legal evidence for business disputes.
- Page 117 UC200 Series IP PBX User's Manual In the Extension to Record field, select the extension you want to record to the Selected box. Note: Extensions with intercom turned on will also be recorded when talking to an outside number. Click [Save & Apply].
- Page 118 UC200 Series IP PBX User's Manual The IPPBX automatically deletes the oldest recording files when the storage utilization of the external storage device exceeds 80%. Enable automatic cleanup reminders. Go to Advanced Feature -> Storage -> Auto Cleanup to change the default auto cleanup settings for automatic recording files based on recording usage.
- Page 119 UC200 Series IP PBX User's Manual Search for call logs on the CDR and Recordings screen that have recording files. Click [Download Button] to download the searched recording file. Deleting individual recording files. Under the recording file option, click [Delete button] to delete the recording file.
- Page 120 UC200 Series IP PBX User's Manual Manage call logs. Export Call Logs: Click the Export button to export all call logs. Delete call logs: Click Clear to clear all call logs. 9.3 Cues 9.3.1 Tone Options Set the IPPBX prompt tone related settings.
- Page 121 UC200 Series IP PBX User's Manual • Setting the waiting music Go to Advanced Feature -> Voice Prompts -> Music On Hold and click [Add]. Enter the waiting music. [Name]: Set the name of the waiting music. 【Description】: Add a description to the waiting music, easy to find and recognize.
- Page 122 UC200 Series IP PBX User's Manual 9.4 SIP Settings 9.4.1 Basic SIP Settings Click Advanced Feature -> SIP -> General Settings to enter the [General Settings] page. General settings set up instructions Bind IP address Usually no setup is required, and it is bound to all network ports by default.
- Page 123 UC200 Series IP PBX User's Manual Maximum The maximum time period allowed to register to the IPPBX. The registration time default is 3600 seconds. period Minimum The minimum time period allowed to register to the IPPBX. The registration time default is 60 seconds.
- Page 124 UC200 Series IP PBX User's Manual Select [Public IP Address] in the [NAT Type] field. The user configures NAT for the IPPBX according to the network environment. [External IP Address]: Enter the fixed IP address and SIP external port of the router.
- Page 125 UC200 Series IP PBX User's Manual 9.4.3 SIP Codecs Codec is a compression or decompression algorithm used to transmit voice packets over a network. Codec selection: IPPBX supports the following voice codecs: [G711], [alaw], [ulaw], [GSM], [H264], [G722], [G726], [G729], [iLBC].
- Page 126 UC200 Series IP PBX User's Manual 9.4.5 Session timer The SIP session timer is used to determine if a session has been terminated. Both user agents and proxy servers can determine whether a session is alive or not by using the SIP session timer.
- Page 127 UC200 Series IP PBX User's Manual [Adaptive]: Allow the jitter buffer time to vary within a certain range, the default is 0ms-200ms. after the system collects the sound, it sends the sound to the destination with the adaptive jitter buffer size.
- Page 128 UC200 Series IP PBX User's Manual This option is only available for [Internal Calls]. If you need to set it for external calls, please set it in "Advanced" of SIP trunk. Sets whether to send Diversion in the SIP header field;...
- Page 129 UC200 Series IP PBX User's Manual [Maximum number of voice messages per folder]: Maximum number of messages allowed for each extension, default 20. [Maximum Message Time]: The maximum time for a single message, default 120 seconds. [Minimum Message Time]: Messages less than the length of time will be deleted, default 3 seconds.
- Page 130 UC200 Series IP PBX User's Manual address, you can also fill in the domain name common SMTP server address format: SMTP.XXXX.com. Example. QQ's server address: SMTP.qq.com. NetEase's service address: SMTP.126.com/SMTP.163.com. Fill in the port number of the SMTP mailbox server: The filling of the port number depends on the rules of the mailbox you are using.
- Page 131 UC200 Series IP PBX User's Manual Query extension number *114 Enable Call Waiting Cancel Call Waiting blind switch Ask for a transfer Enabling unconditional transfers Elimination of unconditional *071 transfers fail to materialize fail to stop a meeting and try to...
- Page 132 UC200 Series IP PBX User's Manual Close the door and call back. demolish by force Alarm settings three-way call Call Follow phone self-test *116 certification billing 9.7.2 Modifying feature codes Users can modify the value of the feature code by themselves. Note: The device needs to be rebooted after modifying the feature code.
- Page 133 UC200 Series IP PBX User's Manual [Hard disk] (Max. 2TB) [Web Disk Mounting] 9.8.2 Storage location You can set your own storage location for both call logs and recordings, and voice messages. 9.8.3 Storing the Settings List Users can check the usage of [Local Storage], [External Storage], and [Network Storage] in the Storage Settings list, as well as determine whether the mount is successful.
- Page 134 UC200 Series IP PBX User's Manual d. Click Advanced Sharing (D)... , set the Advanced Sharing properties. Check Share this folder and set Allow all permissions, click OK. 2. Turn off your computer's firewall feature, otherwise other users may not be able to access the shared files.
- Page 135 UC200 Series IP PBX User's Manual c. Select Turn off Windows Defender Firewall. d. Click OK. 3. Add a network disk to the IPPBX web interface. a. Go to Advanced Feature -> Storage -> General and check Network Disk. b. On the Network Disks page, fill in the following configuration: [IP Address]: Fill in the IP address of the shared computer.
- Page 136 UC200 Series IP PBX User's Manual [Workgroup]: Optional. If your network disk has a workgroup set up, please fill in the correct group name here, otherwise it can be left blank. Samba Version]: Select the Samba version of the network disk, and the default is that the system will match automatically.
- Page 137 UC200 Series IP PBX User's Manual computer. How do I set up a network disk when my computer access password is empty? If the computer does not have an access password set, we recommend that you set an access password for the computer and fill in that password when setting up the IPPBX network disk to try to remount the network disk.
- Page 138 UC200 Series IP PBX User's Manual Note: Some computers with password protected sharing turned off and the username and password left blank may not mount successfully. Eventually, you have to enable the password protection and set the password. And disabling password protection is not supported for security reasons.
- Page 139 UC200 Series IP PBX User's Manual 9.8.5 Automatic cleaning In order to avoid the situation, the storage is full, resulting in the subsequent information can not be stored. It is recommended that users set up the auto-clean function, which can help users automatically clean up system files, including call logs and voice messages.
- Page 140 UC200 Series IP PBX User's Manual 9.9 Troubleshooting 9.9.1 Network packet capture If there is an abnormality in SIP calls, SIP trunk calls, etc., users can use the network packet capture tool to get and download the packets, check the packet capture data, and determine the cause of the problem.
-
Page 141: 10.Systems
UC200 Series IP PBX User's Manual Click [Download]. Download the recording file. Tip: It is recommended that users use Audition software to open recording files and analyze them. 9.9.3 Networks • Ping The Ping command is based on the TCP/IP protocol and sends test packets from the local computer to a remote URL. - Page 142 UC200 Series IP PBX User's Manual Setting the time synchronization. NTP is used to provide time synchronization between routers, switches and workstations. Time synchronization is useful in that it allows related event records on multiple network devices to be viewed together, helping to analyze more complex failures and security events.
- Page 143 UC200 Series IP PBX User's Manual 10.3.1 Firewalls Users are recommended to configure the network firewall after the initial IPPBX activation to avoid the IPPBX being invaded and stolen by criminals. Firewall Rules IPPBX is equipped with firewall rules by default, which can ensure that all devices in the same intranet can access IPPBX.
- Page 144 UC200 Series IP PBX User's Manual TCP + UDP ICMP [Source Address]: Filter the source address for accessing the IPPBX. [Source Port]: Filter the source port accessing the IPPBX, value range: integer from 1 to 65535. When the value is empty, the rule applies to any source port.
- Page 145 UC200 Series IP PBX User's Manual Go to System->Security ->SIP Auto Defense users can set up automatic defense rules according to the application. [Enable]: When enabled, the setting takes effect. [Verification Period]: Set the verification period. The unit is minutes, default 3 minutes.
- Page 146 UC200 Series IP PBX User's Manual [Enable]: When enabled, the setting takes effect. [Verification Period]: Set the verification period. The unit is minutes, default 3 minutes. [Maximum number of failures in the cycle]: During the authentication cycle, if the user logs...
- Page 147 UC200 Series IP PBX User's Manual specified by the user. If users want to restore the previously backed up data, they only need to upload the previous backup file, then they can restore it back. • Generating backup files Users can create IPPBX backup files in the IPPBX web page.
- Page 148 UC200 Series IP PBX User's Manual Users can download the latest version of firmware through the website, and then log in to the WEB management page and upload the new version of firmware through the web page to upgrade the IPPBX.
- Page 149 UC200 Series IP PBX User's Manual 10.5 Safety Precautions When registering sip extensions in the public network environment, the following modifications are recommended to prevent the user's extensions from being stolen and resulting in huge telephone charges: 1. Change the SIP extension password.
Need help?
Do you have a question about the UC200 Series and is the answer not in the manual?
Questions and answers