Table of Contents
Advertisement
Quick Links
Advertisement
Table of Contents

Related Manuals for DOREGRILL MAG Series


Summary of Contents for DOREGRILL MAG Series
- Page 1 Spit-roast...
-
Page 3: Eneral Information
1.2 Importance of the manual This manual is intended to provide installers and users of DOREGRILL equipment with all the necessary information for its optimal use, to extend its lifespan through regular and proper maintenance, to address minor incidents and breakdowns that often do not require the intervention of a specialist, and to prevent any risk of injury to its users by adhering to the warnings and recommendations. -
Page 4: Reserved Rights
1.3 Reserved rights User Manual for Electric MAG Series Rotisseries The rights reserved for this technical manual, " " remain the property of the manufacturer. No part of this manual may be reproduced and distributed without the written permission of the manufacturer. -
Page 5: Transport And Handling
2 TRANSPORT AND HANDLING 2.1 Transport and delivery Our rotisseries are set, tested, and inspected in our workshops. They are carefully packaged to ensure their safe arrival at the destination. They are delivered on a pallet, securely strapped and wrapped in film. The device is protected by cardboard packaging, bubble wrap, polystyrene, and foam corner protectors to safeguard the corners and withstand normal transport conditions. -
Page 6: Technical Description
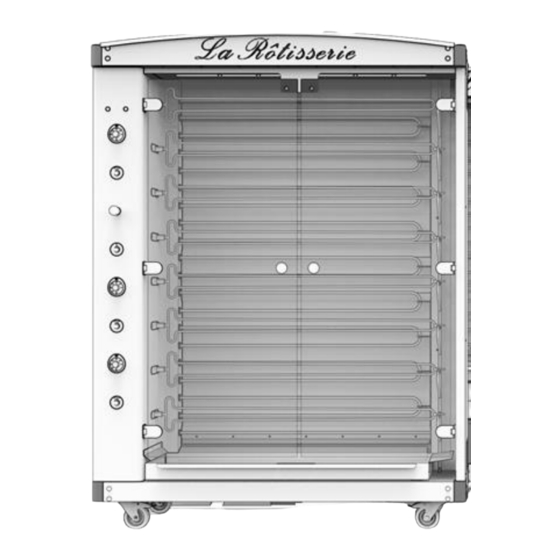
3 TECHNICAL DESCRIPTION 3 .1 General description The electric MAG models are mounted on wheeled carts, two of which are equipped with brakes. (Fig. 2) The rotisseries consist of the following components - Structure: base 1, ceiling 2, enameled vertical walls 3, brushed stainless steel side panels 4. - A removable technical housing with tool access 5, containing the technical components (motors and heating elements). - Page 7 3 .2 General components Fig. 2...
-
Page 8: Control Panel
3 .3 Control panel Power indicator light Heating indicator light Mechanical thermostat for heating elements 8, 9, 10 and 11 Switch for spits 6, 7, and 8 Emergency stop button Light switch Mechanical thermostat for heating elements 5, 6 and 7 Switch for spits 4 and 5 Mechanical thermostat for heating elements 1, 2, 3 and 4 Switch for spits 1, 2, and 3... -
Page 9: Electrical Diagram
3 .4 Rotisserie dimensions Please refer to chapter 8, "Technical Specifications." 3 .5 Technical specifications Please refer to chapter 8, "Technical Specifications." 3 .6 Intended use Our rotisseries are intended for cooking meats and poultry prepared in the context of hot food and catering departments for food industry professionals. -
Page 10: General Instructions
4 SETUP 4.1 General instructions The installation of the rotisseries in question (positioning and connection) must be carried out imperatively by authorized personnel, possessing the technical and professional skills required to perform this installation in compliance with the standards in force in the country where this equipment is used. - Page 11 5 U SE 5.1 C ontrols 5.1.1 Ignition of the heating elements The electric MAG is equipped with shielded infrared heating elements, allowing for the cooking of 8, 6, or 4 spits depending on the model (MAG 8, MAG 6, and MAG 4). To ignite the heating elements, turn the thermostat dial clockwise to the desired temperature.
- Page 12 5.1.4 Emergency stop button or "Panic button" This switch should only be used to immediately interrupt the operation of various electrical functions of the rotisserie (spit rotation, ambient lighting, etc.). To act, simply press the switch. Do not forget, when the incident is resolved, to pull on the head of the switch to reactivate the rotisserie.
- Page 13 5.2 Implementation The implementation of the Electric MAG rotisseries requires certain precautions to ensure their safe use. IMPO RTANT: Ensure that the protection of the electrical circuit is sufficient and complies with standard NF C 15-10 0 , which requires a dedicated circuit for high- power appliances and protection by an appropriate differential device.
- Page 14 5.2.2 Cooking It is recommended to pierce the poultry before roasting to improve tenderness and browning. Place each of the prepared spits as previously described (§ 5.1.4). Adjust the spits in depth based on the size of the poultry to be roasted and the desired cooking speed.
-
Page 15: Maintenance
6 MAINTENANCE 6.1 Daily After Cooking - Empty the sauce drawer for cleaning - Disassemble the spits and place them in a large container with water and an appropriate detergent - Apply a grease-destroying product to the interior walls of the appliance (sides, bottom, and ceiling) : - Either with a brush (liquid) - Or using a spray (aerosol) -
Page 16: Thermal Shock
7 C AU SES OF G LASS BREAKAG E IN TOU G HENED G LASS 7.1 Thermal shock 7.2 Impact on the glass 7.3 Handling IMPO RTANT: G lass, whether tempered or not, is a fragile material that must be handled with care. -
Page 17: Technical Specifications
8 TECHNICAL SPECIFICATIONS MAG 8 MAG 4 MAG 6 DIMENSIONS 1470 MM Overall length 1470 MM 1470 MM 670 MM Overall depth 670 MM 670 MM 1973 MM Height of the rotisserie 1120 MM 1483 MM 1973 MM Height of the rotisserie on the stand/trolley 1973 MM 1973 MM 230 KG... - Page 18 Resistance power chart : Power Power Resistance Power ratings ratings for ratings for numbers for MAG 8 MAG 4 MAG 6 1 (Down) 2 000 W 2 000 W 2 000 W 6 400 W 6 400 W 6 400 W 10 000 W 10 800 W 10 800 W...
-
Page 19: Installation
(using the standardized dimensions immediately above) minimum specifications indicated below DOREGRILL can provide you, upon request and as an option, with the appropriate hood to meet your needs. IMPORTANT: Maintain a minimum air gap of 100 mm at the back and on the sides of the rotisserie to ensure proper ventilation and protect neighboring appliances or walls. - Page 20 IMPO RTANT: Maintain a minimum air gap of 10 0 mm at the back and on the sides of the rotisserie to ensure proper ventilation and protect neighboring appliances or walls. IMPO RTANT: It is strictly prohibited to place dishes or any other object on top of the rotisserie or obstruct the ex haust chimney and ventilation areas in any way.
- Page 21 WALL-MOUNTED HOOD CENTRAL HOOD...
-
Page 22: Maintenance / After-Sales Service
10 MAINTENANCE / AFTER-SALES SERVICE Any repairs on your device should be carried out by a qualified professional. 10.1 Fault finding This section is intended to list the main breakdowns that any user may encounter, provide possible causes, and offer ways to remedy them without external intervention. DEFECTS OBSERVED POSSIBLE CAUSES REMEDIES TO BE APPLIED... - Page 23 10.2 Specific repairs 10 .2.1 Changing a Light Bulb This operation can be performed by the user. - Disconnect the electrical power supply to the rotisserie. (butterfly nut) - Unscrew the wingnut and the washer. Slide and remove the glass screen. - Remove the burnt-out light bulb and replace it with an identical model.
- Page 24 11 ILLUSTRATED COMPOSITION TABLE...
- Page 25 11.1 Base...
- Page 26 11.2 C ontrol Panel and Door...
-
Page 27: Drive System
11.3 Drive System... -
Page 28: Heating Elements
11.4 Heating Elements... - Page 29 11.5 Spits Side...
- Page 30 11.6 C eiling...
- Page 31 11.7 Back panel...
- Page 32 11.8 Gravy Tray...
- Page 33 11.9 C over...
- Page 34 11.10 Electrical Diagram MAG 8...
- Page 35 11.11 Electrical Diagram MAG 6...
- Page 36 11.12 Electrical Diagram MAG 4...
- Page 37 12 AC C ESSORIES AC 0 0 0 19 English spit AC 0 0 0 10 Shank spit AC 0 0 0 24 Forks spit AC 0 0 0 46 Simplifil spit AC 0 0 0 40 Large piece spit AC 0 0 0 6 1 Multi-purpose basket AC 0 0 16 5 Butterfly basket AC 0 0 0 77 Intermediate dish...
- Page 38 MA0 0 148 MAG 4 warming cabinet MA0 0 151 MAG 6 Storage cabinet MA0 0 150 MAG 4 Storage cabinet...
Need help?
Do you have a question about the MAG Series and is the answer not in the manual?
Questions and answers