Table of Contents
Advertisement
Quick Links
Advertisement
Table of Contents

Related Manuals for DOREGRILL MAG INOX Series


Summary of Contents for DOREGRILL MAG INOX Series
- Page 1 MAG INOX Serie Spit roaster oven INSTRUCTIONS FOR USE...
- Page 2 Dear customer, You have just acquired a MAG INOX DOREGRILL, and we thank you for choosing our equipment. Always at the forefront of progress in its specialty, DOREGRILL offers machines in which we put all our know-how to best meet your expectations, combining comfort and ease of use.
-
Page 3: Table Of Contents
TABLE OF C ONTENTS Marking Importance of the manual All rights reserved General warning Shipping and delivery Unpacking and handling General description General components Dimensions of the rotisserie Technical data Purpose of use Electrical diagram General instructions Control panel 5.1.1 Lighting the Radiants .......................... - Page 4 Blows dealt to the glass Moving General information Set up Electrical connection Evacuation des vapeurs 9.5.1 Generality ..............................25 9.5.2 Installation of a Fixed Rotisserie ......................26 9.5.3 Installation of a mobile rotisserie ......................27 9.5.4 Gas natural supply ............................. 27 9.5.5 Propane Supply from Cylinder Batteries .....................
-
Page 5: Marking
1.2 Importance of the manual This manual is intended to provide installers and users of DOREGRILL equipment with all the information necessary for its optimum use, to prolong its life through regular and appropriate... -
Page 6: All Rights Reserved
In case of a gas change, and to comply with the European Directive 90/396/EEC on gas appliances, it is essential to order various components required for the transformation from DOREGRILL Company and to have the transformation carried out only by a qualified 'GAS' technician. -
Page 7: Shipping And Delivery
SHIPPING AND HANDLING 2.1 Shipping and delivery Our rotisseries are adjusted, tested and controlled in our workshops. The burners are pre-heated to simplify the start-up. They are carefully packaged in order to guarantee their arrival at their destination in the best conditions. They are delivered on pallets, strapped and filmed. -
Page 8: General Description
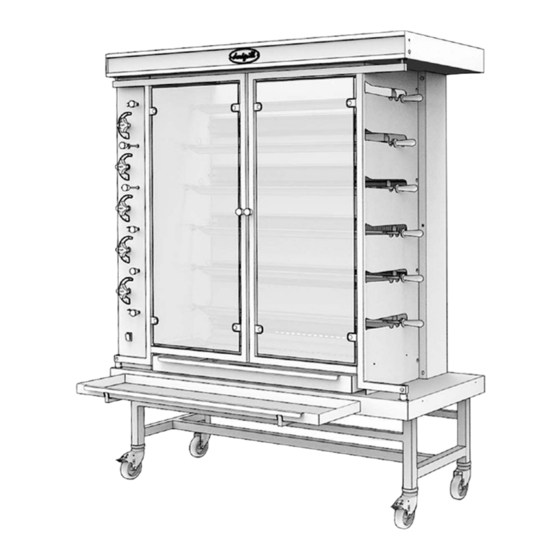
TEC HNIC AL DESC RIPTION 3.1 General description MAG INOX models are mounted on a cart with casters, two of which are braked. (Picture. 2) The rotisserie consists of -A structure (base 1, ceiling 2, vertical walls 3, side and rear coverings 4) in brushed stainless steel. -
Page 9: General Components
3.2 General components Picture. 2 - (General components) - Page 10 3.3 C ontrol panel Picture. 3 - (Control panel)
-
Page 11: Dimensions Of The Rotisserie
3.4 Dimensions of the rotisserie See chapter 8 « Technical data » 3.5 Technical data See chapter 8 « Technical data » 3.6 Purpose of use Our roasting pans are intended for the cooking of meat and poultry prepared in the context of the hot sections and catering of food professionals. -
Page 12: General Instructions
SET U P 4.1 General instructions The installation of the rotisserie (positioning and connection) must be carried out by authorized personnel, having the technical and professional skills required to carry out this installation in compliance with the standards in force in the country where the equipment is used. See Chapter 9 «... -
Page 13: Control Panel
U SE 5.1 Control panel 5.1.1 Lighting the Radiants Press the valve wheel and turn it to the left to the high flame position. Wait for a moment to replace the gas with air in the radiant, then light it using a lighter or a gas lighter. - Page 14 Installation : First, insert the drive square of the spit into the flared end of the motor reducer, and if necessary, rotate it slightly to ensure its proper functioning. Then place the round part, or pivot, located at the other end onto the support. Adjustment of the spits on the motor side : To adjust their position, simply slide the end of each of the gear motors into the slots.
-
Page 15: Application
5.2 Application IMPORTANT : It is strictly forbidden to place dishes or any other objects on top of the rotisserie, or to obstruct by any means, the exhaust chimney and ventilation areas. 5.2.1 Preparation 5.2.2 Switching on the burners Slowly open the shut-off valve downstream from the supply line, or in the case of bottled gas supply, the trigger regulator at the bottle outlets. -
Page 16: Cooking
5.2.3 Cooking It is recommended to puncture the poultry before roasting to enhance tenderness and golden (§ color. Place each of the skewers prepared according to the previously mentioned method 5.1.4) Adjust the depth of the skewers based on the size of the poultry to be roasted and the desired cooking speed. -
Page 17: Daily After Cooking
C LEANING IMPORTANT : Never use a high pressure cleaner. Only use food approved "special oven" cleaning products2 Never spray any kind of product (water, detergent, etc.) on the radiators. 6.1 Daily after cooking When the roaster is still warm, cover the burners with the radiant protectors and quickly clean the following parts : Radiant protectors -Inside panel... - Page 18 Disassembly of the Doors: The doors can be easily disassembled, but this is a delicate operation due to the fragility of the elements and the surface, which may be hot.
-
Page 19: Thermal Shock
MAIN C AU SES OF G LASS BREAKAG E IN TEMPERED G LASS 7.1 Thermal shock There cannot be a difference of more than 176°F between two specific points of the ice. When this is the case, the breaking point is reached and the ice can explode instantly. Example : cleaning hot ice with a cold sponge. - Page 20 TEC HNIC AL SPEC IFIC ATIONS SOLID 4 SOLID 6 DIMENSIONS Total length 57 3/4" 57 3/4" Total depth 23 1/2" 23 1/2" Roaster height 43" 57" Weight (empty) 352 lbs 463 lbs Maximum load 88 lbs 132 lbs TECHNICAL COMPONENTS Number Spits Use length...
- Page 21 Table of power and burners consumption : Nominal heating power Propane Number of KW by LHV ( 14.85’’ W.C burners on 8.0’’ W.C( (59°F, 14.7 psi) (propane) 23 884 BTU/h 1,199 lb/h 195,75 GPH 47 768 BTU/h 2,399 lb/h 391,50 GPH 95 536 BTU/h 4,797 lb/h 783 GPH...
- Page 22 INSTALLATION 9.1 General information The installation of the rotisseries, including positioning and connection, must be performed exclusively by an authorized professional with the technical and professional skills required to carry out this installation in compliance with the standards applicable in the country where this equipment is used.
- Page 23 IMPORTANT: Smoke extraction with an extraction tower is mandatory for any appliance with a power above 20 kW. The company DOREGRILL can provide, upon request and as an option, the appropriate hood according to your needs. The hood, equipped with a removable grease filter, will be connected to the exterior via a rigid duct with an internal diameter of 315 mm, fitted with a suitable extraction fan unit (ranging from 1500 to 2300 m³/h, depending on the configuration).
- Page 24 WALL MOUNTED EXHAUST HOOD CENTRAL EXHAUST HOOD...
-
Page 25: Generality
9.5 Fixed or mobile connection, natural or propane gas IMPORTANT: The rotisserie is factory-set for a specific gas type. If you intend to use a different type of gas from the original configuration, it is mandatory to change the injector block for each of the radiant burners to adapt the appliance to the new gas type (refer to the section "Injector Block Replacement"... -
Page 26: Installation Of A Fixed Rotisserie
9.5.2 Installation of a Fixed Rotisserie To connect the rotisserie to the permanent gas supply line, use an approved gas and propane (Picture. 4) metal flexible hose, such as TUBOGAZ ( ), meeting the NF D 36-123 standard NATURAL – Values in KW l hv at 8.0’’ W.C Table 01 Diameter ½’’... -
Page 27: Installation Of A Mobile Rotisserie
9.5.3 Installation of a mobile rotisserie GAS SUPPLY A-G Implementation elbow B-C Self-locking To connect the rotisserie to the gas supply piping, use an coupler (Male and female part) approved metallic flexible type TUBOGAZ or similar. This flexible D-E Hose end fitting F 3-piece union fitting must comply with standard NF D 36-123 and be equipped with a H Marking line... - Page 28 - If the created space is in an open area, the taps and other accessories at the bottle station must be protected against impacts and weather by a cover or shelter. The company DOREGRILL can provide, as an option, the complete propane supply kit (hoses, T- pieces, changeover regulator, regulator, and flexible hoses).
-
Page 29: Localization Of Faults
MAINTENANC E / AFTER-SALES SERVIC E Any interventions on your device must be carried out by a qualified professional. 10.1 Localization of faults This section aims to list the main breakdowns that any user may encounter, provide their possible causes, and offer ways to remedy them without external intervention. OBSERVED FAULTS POSSIBLE CAUSES REMEDIES TO BE APPLIED... - Page 30 OBSERVED FAULTS POSSIBLE CAUSES REMEDIES TO BE APPLIED Gas Circuit -The shut-off valve -Open the shut-off valve in the pipeline downstream of the supply line is closed -The gas inlet valve to the -Open the gas inlet valve at the rear of the rotisserie rotisserie is closed -The end fitting of the metal...
-
Page 31: Specific Repairs
10.2 Specific repairs 10.2.1 Changing a light bulb This operation can be performed by the user. Disconnect the power supply of the rotisserie. IMPORTANT: Before changing a still hot light bulb, wait a few minutes for it to cool down to avoid any risk of burns. Unscrew the wing nut (or butterfly) and the gasket. - Page 32 CE opening cover To access the injectors, start by opening the technical casing : TC Opening cover TC opening cover 2- Once the is unscrewed, remove the technical cover by unscrewing the 4 knurled screws. Remove it by tilting it towards you while lifting it. Knurled screws 3- With the outer panel...
- Page 33 6- Using two adjustable wrenches, loosen the injector F ½’’ fitting block from the . Be cautious not to lose F ½’’ fitting. the blue gasket that sits inside the Injector block F ½’’ fitting Secondary Injector 7- Loosen the secondary injector using a 10mm wrench.
- Page 34 8- Once the injectors are disassembled, replace them with the new injectors. Make sure to adhere to the values engraved on each injector. Note that for natural gas, you need a primary injector, (Refer to the Injector Table) but not for propane gas Ø...
- Page 35 ILLU STRATED C OMPOSITION TABLE 11.1 Electrical Diagram SOLID 6...
- Page 36 11.2 Electrical Diagram SOLID 4...
- Page 38 WWW.151 SDESIGN.COM...
Need help?
Do you have a question about the MAG INOX Series and is the answer not in the manual?
Questions and answers