Table of Contents
Advertisement
Quick Links
Advertisement
Table of Contents

Related Manuals for Empress Effects ZOIA EUROBURO


Summary of Contents for Empress Effects ZOIA EUROBURO
- Page 1 E U R O B U R O U S E R _ M A N U A L F I R M W A R E _ V E R S I O N _ 2 . 3 0...
- Page 2 FOR SUPPORT AND TO REPORT BUGS Please Call 1-855-ZOIA - SOS (1-855-964-2767) or email support@empresseffects.com FOR FIRMWARE UPDATES www.empresseffects.com/ZOIA-firmware FIND GREAT ZOIA PATCHES www.patchstorage.com/platform/ZOIA TO UNDERSTAND WHAT ALL THE VARIOUS MODULES DO, CHECK OUT THE MODULE INDEX www.empresseffects.com/ZOIA-module-index TO MAKE FEATURE REQUESTS, JOIN OUR IDEA FORUM www.empresseffects.com/idea-forum FOR HELPFUL TIPS AND TRICKS...
- Page 3 On our website (www.empresseffects.com) you will find lots of further information and details on the following points: DOWNLOAD This manual is also available as a PDF file for you to download, KEYWORD SEARCH Use the search function in the electronic version of this manual to find your topics of inteterest quickly.
- Page 4 ISO 7010 SAFETY WARNINGS GENERAL INFORMATION Signal Word Meaning DANGER! This combination of symbol and signal word indicates an immediate dangerous situation that will result in death or serious injury if it is not avoided CAUTION! This combination of symbol and signal word indicates a possible dangerous situation that can result in minor injury if it is not avoided.
- Page 5 Warning Signs Type of Danger General warning sign Electricity Hazard Hot Surface Sudden Loud Noises...
- Page 6 INTENDED USE This pedal is designed for enhancing guitar tones in live performances and studio recordings. Use as outlined in the user manual. The manufacturer is not liable for damages resulting from improper use or use under non-recommended conditions. SAFETY DANGER! Danger for children Dispose of plastic bags and packaging...
- Page 7 DANGER! Power Supply Issues Use the right voltage and current for your pedal’s power supply to prevent damage and safety risks. Check the power supply’s condition, and for multiple pedals, opt for a dedicated supply to avoid overloading by daisy- chaining CAUTION! Overheating...
- Page 8 NOTICE! Allergies or Sensitivities Allergy Alert: Some pedal materials, like adhesives and coatings, may cause reactions. Stop use and seek medical advice if needed. NOTICE! Fire Hazard Keep away from direct heat and open flames. viii...
-
Page 9: Table Of Contents
TABLE OF CONTENTS INTRODUCTION CONNECTING POWER CONTROLS HEADPHONE OUT CV INPUTS AND OUTPUTS SCREEN LAYOUT THE BASICS MODULE LAYOUT CONNECTIONS PAGES PATCHES STARRED LIST CONFIG MENU TYPING TEXT MIDI FIRMWARE UPDATES SAVING AND LOADING PATCHES SPECIFICATIONS REGULATORY COMPLIANCE INFORMATION THANK YOU... -
Page 10: Introduction
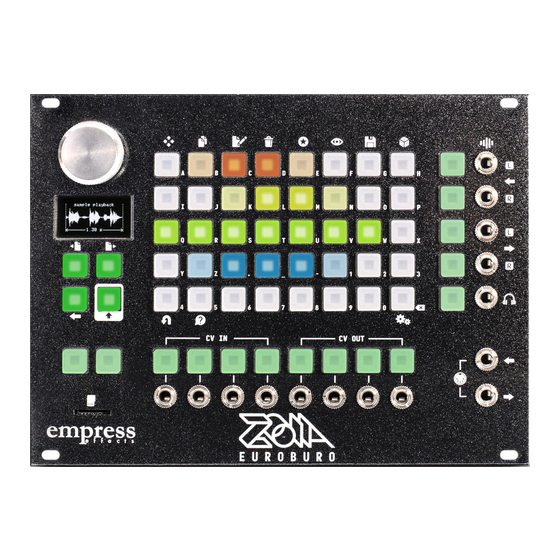
INTRODUCTION WHAT IS ZOIA? ZOIA is an open canvas to paint your sonic ideas. FM synthesis, CV tools, MIDI tools, audio effects, interface options - all at your fingertips. ZOIA transforms the rigmarole of interfacing a studio full of music gear and condenses it into one handy little module, which you can then interface with your own studio full of music gear. - Page 11 THE BIG PICTURE The ZOIA Euroburo is, in essence, a fully featured modular synthesizer within a single module. Modules are laid out on the button grid, with each module consisting of a number of parameters. Each parameter is represented by a button on the grid which accesses a specific function of that module.
-
Page 12: Connecting Power
CONNECTING POWER EURORACK POWER SUPPLY To connect power from a eurorack power supply, use the included ribbon cable and connect it to the bottom corner of the lower pcb as pictured. Note the polarity as marked on the pcb. DESKTOP POWER SUPPLY The Euroburo can be used as a standalone unit by purchasing the optional desktop addon which includes an enclosure, power supply, and power connector board. -
Page 13: Controls
CONTROLS THE KNOB The rotary knob is used for many different interactions with the ZOIA. Navigate between and select patches, options, pages, modules, or connections. Dial in parameters within modules, or move a cursor around while typing. Hold the knob down while turning to fine tune a parameter. - Page 14 View Cycle through screens of the selected parameter. View its value, audio/CV visualization, or connection list. Save Save pages or patches. Random Randomly modifies a parameter or connection. UTILITY BUTTONS Page Left/Right Scroll to next/previous page. Back Back out of active selection or menu. Shift Hold to access action buttons or to capitalize text.
-
Page 15: Headphone Out
OTHER BUTTONS Undo Undoes the last action if it’s one of the following: add/ modify/delete connection, add/move/copy/delete module, modify parameter. Help Press for help on currently selected item. Backspace When typing, delete character at cursor. Config Press Shift and Config to open the config menu. See Config Menu, page 24. -
Page 16: Cv Inputs And Outputs
CV INPUTS AND OUTPUTS The four CV input and CV output modules allow you to connect the Euroburo to other eurorack modules. To change the functional voltage range ( -5V to 5V, 0V to 5V, or 0V to 10V) and the range of CV signals it will accept or produce, select one of the CV I/O buttons and press edit. - Page 17 CV input module are saved with your patch. CV INPUT AND OUTPUT TRANSPOSE By default, ZOIA Euroburo’s CV inputs and outputs interpret CV signals on a scale ranging from A to A. Many eurorack modules use a scale ranging from C to C modules. To increase...
-
Page 18: Screen Layout
SCREEN LAYOUT There are many ways ZOIA displays information on the screen. Here are two of the most common views. PAGE # PATCH NAME The patch screen (left) is visible when no module, list, or connection is selected. It gives you general information at a glance as to the patch you’re on and the performance of the ZOIA. -
Page 19: The Basics
THE BASICS SIGNALS Each button of a module has several characteristics. With a few exceptions, each button of any given module acts as either an input or an output of either an audio or a CV path. Audio signals flow from the output button of one module to the input button of another module. - Page 20 MODULES A module is a collection of inputs, outputs, and parameters, each of which is represented by a button on the grid. Many modules have various optional parameters so you can tailor them to your needs. Individual modules can be renamed, and you can also choose a module’s colour so that it’s easy to identify on the grid.
- Page 21 Integrated Interface Modules: these modules are similar to standard interface modules, but are permanently situated next to the i/o jacks on your Euroburo. They include audio input and output modules, a headphone outout module, CV input and output modules, and 2 pushbutton modules which you can connect into your patch.
- Page 22 SELECT A MODULE Press one of the grid buttons occupied by the module. That button will light up, allowing you to adjust its parameter. This also selects the whole module for moving, copying, or deleting. EDIT A PARAMETER Select a grid button on the module and use the rotary knob to modify the value of the selected parameter.
- Page 23 a different page, simply select the module, press move, navigate to the destination page, then press an unoccupied grid button. COPY A MODULE Select a module and press copy. Select where you want to place it on the grid, then from the menu, select which connections, if any, you’...
-
Page 24: Module Layout
MODULE LAYOUT KNOB UTILITY BUTTONS HELP BUTTON ASSIGNABLE BUTTONS MICRO SD SLOT UNDO BUTTON CV INPUTS & CONNECTION... - Page 25 ACTION BUTTONS AUDIO INPUTS & CONNECTION BUTTONS AUDIO OUTPUTS & CONNECTION BUTTONS HEADPHONE OUTPUT & VOLUME BUTTON CONFIG. MENU BUTTON MIDI I/O V OUTPUTS & CONNECTION BUTTONS...
-
Page 26: Connections
CONNECTIONS A connection links one button to another. Use them to allow modules to interact with each other or themselves. Think of a connection like a patch cable. For example, you can connect an oscillator to a VCA, a stompswitch to a tap tempo, or you can feed a delay line back on itself to create repeats. - Page 27 SELECT A CONNECTION Press both buttons if on the same page, or press one, then the other if the connection is across pages. From this state you can adjust the strength of the connection by turning the knob. You can also select a connection by switching to that parameter’s connection list.
- Page 28 Once that is set, the connection strength you set with the knob will determine how far in any given direction your parameter will travel. Click the knob while making a connection to toggle between seeing your connection strength expressed as a % (useful for CV connections) and a dB value (useful for audio connections).
-
Page 29: Pages
PAGES A page is represented by one full 8x5 grid of buttons. Each patch can contain up to 64 pages, numbered 0 through 63. Each page can be named, and connections can be made across pages. PAGE LIST Press page left or page right to enter and navigate through the page list. - Page 30 COPY A PAGE Scroll to the page you want to copy. Press copy. Now select another page. The page that you are copying will be inserted in front of the second page that you select. DELETING A PAGE Press page left or page right to enter the page list, scroll to the page you wish to delete and press...
-
Page 31: Patches
PATCHES A patch represents the entire collection of pages in your page list, including all modules, connections, button values, and page names that you’ve created. Think of it as the project file that encompasses the whole of your work that you can then save, name, and navigate between using either the knob or the MIDI PC commands. - Page 32 a good idea to save edits to patches with a version number as part of the file name to prevent accidental overwriting. (ie. Hot Fuzz 3) SELECT A PATCH There are two ways to do this: 1. Knob method: With no module selected, you can use the knob to scroll through your Patch List.
-
Page 33: Starred List
DELETE A PATCH Scroll to a patch from the patch list and press delete. A confirmation screen will come up. Press save to continue or back to abort. STARRED LIST When you have a nice big patch built and you’ d like to be able to quickly and easily adjust frequently used parameters from the same place, you can add them to the Starred List. -
Page 34: Config Menu
will allow you to view and assign midi CC’s to the starred parameters. Selecting the ‘learn’ option will assign the next CC received by ZOIA to that parameter. You can set which channel ZOIA will listen for starred CC’s in the Config Menu. CONFIG MENU The Config Menu is the global options menu for the ZOIA. -
Page 35: Typing Text
Starred CC ch: Select which channel ZOIA will listen to for starred parameter MIDI CC messages. MIDI CC Setup: on (default): Loading a patch with MIDI CC Out modules will send the corresponding MIDI CC messages with the initial values upon patch load. Patches to SD: Manually export all the patches from ZOIA’s internal memory onto the SD card. -
Page 36: Midi
space key, delete a character using the delete key, or enter a capital letter by pressing the shift key and the letter. Use the rotary knob to move the cursor around, and click the knob to enter your changes, or press back to cancel. -
Page 37: Saving And Loading Patches
ZOIA pedal, make sure that the orientation of the card is such that the pins are facing upward, or else the ZOIA won’t see the card. If you’re using ZOIA Euroburo, the pins on your microSD card should be facing downward. - Page 38 If you’re using the ZOIA pedal, make sure that the orientation of the card is such that the pins are facing upward, or else the ZOIA won’t see the card. If you’re using ZOIA Euroburo, the pins on your microSD card should be facing downward.
-
Page 39: Specifications
SPECIFICATIONS Input Impedance: >= 1MΩ Output Impedance: 100Ω Frequency Response (-3dB): 10Hz – 23.4kHz Total Harmonic Distortion: 0.22% Dynamic Range: 105.5 dBA Required Current (eurorack case): +12v 300mA Required Current (desktop enclosure): 9-12v 300mA Power Input Connector: 2.1mm Barrel Connector Size: 34hp Eurorack Format Module Depth (module only):... -
Page 40: Regulatory Compliance Information
CAN ICES-003(B) / NMB-003(B) CE (European Union) This declaration of conformity is issued under the sole responsibility of Empress Effects Inc- 105-62 Steacie Dr, Kanata Ontario K2K 2A9. The device identified on the front page of this manual is in conformity with the requirements of the European Union’s Electromagnetic... - Page 41 • EN 55035:2017/A11:2020 – Electromagnetic compatibility of multimedia equipment - Immunity Requirements Name: Colin King Title: Design Engineer Company: Empress Effects Inc Date: August 19, 2023 Location: 105-62 Steacie Dr, Kanata Ontario K2K 2A9 WEEE (2012/19/EU) This product must not be disposed of with regular household waste. In...
-
Page 42: Thank You
THANK YOU The ZOIA wouldn’t be possible without our team of beta testers, factory patch makers, videographers, and co-op coders. Thanks to KNOBs, Andreas Paleologos, Daniel Fisher, Mitch Lantz, Simon Labelle, JT Norton, Ash Sargant, Nihal / Fireghosting, Evan Sirchuk, Gabriel Tanaka, Paul Uhl, Ian Pritchard, Benn Jordan, Erik Ångman, Joseph Pailo, aBunchOfPedals, Jake Miller, Patrick Zdunich, Eric Nyffeler, Alexander C. - Page 43 FOR SUPPORT AND TO REPORT BUGS Please Call 1-855-ZOIA - SOS (1-855-964-2767) or email support@empresseffects.com FOR FIRMWARE UPDATES www.empresseffects.com/ZOIA-firmware FIND GREAT ZOIA PATCHES www.patchstorage.com/platform/ZOIA TO UNDERSTAND WHAT ALL THE VARIOUS MODULES DO, CHECK OUT THE MODULE INDEX www.empresseffects.com/ZOIA-module-index TO MAKE FEATURE REQUESTS, JOIN OUR IDEA FORUM www.empresseffects.com/idea-forum FOR HELPFUL TIPS AND TRICKS...
Need help?
Do you have a question about the ZOIA EUROBURO and is the answer not in the manual?
Questions and answers