Table of Contents
Advertisement
Congratulations on your purchase of Precision Aerobatics
Dear Addiction X owner,
Congratulations on your purchase of the Addiction X
V2. After assembling a few in different ways and
sequences, I found the following sequence and
methods to be the smoothest and easiest for you. A lot
of work and effort was invested into this manual so
please put the time to read and follow it to get the
best results. I hope you enjoy your new Addiction X as
much as we do.
Shaun Vanunu
PA Designer
Chief engineer
Be sure you have read and understood this entire manual before you assemble this model
Do not overlook the warnings and instructions enclosed herewith or those provided by other manufacturers, and the official
Why Getting a Thrust motor?
AMA (Academy of Model Aeronautics) Safety Code (see at the end of this manual). They were designed to assist you in
preventing damage or injury.
We believe that if you chose the best model plane out there you'll
want to get the most out of it – the answer is our iPAs
The instructions below are our suggestions only on how to assemble this model. There are other ways and methods to do
so.
including Thrust
®
A winning combination thoroughly tested with proven performance.
Precision Aerobatics has no control over the final assembly, the materials and accessories you use when assembling this kit
or the manner in which the assembled model and the installed radio system and electronic parts, are used and maintained.
Thus, no liability is assumed or accepted for any damage resulting from the use of the assembled model aircraft or from this
Go to www.vimeo.com/channels/PrecisionAerobatics to watch hundreds of
instruction manual including but not limited to direct, indirect, incidental, special, and consequential damages. In no event
videos of PA models using Thrust / Quantum setups.
shall Precision Aerobatics' liability exceed the original purchase price of this kit.
2x 3S (11.1V) LiPo
BY THE ACT OF ASSEMBLING AND OPERATING THE ASSEMBLED MODEL YOU ASSUME
Radio controlled model aircraft that are not properly assembled, operated and maintained can cause serious damage to body
and property. If you are not an experienced pilot and airplane modeller you must use the help of an experienced pilot or
preferably an authorized flight instructor who will assist you with the assembly and flying of this model.
SAFETY NOTES:
1.
Before assembling and flying this model read carefully any instructions and warnings of other manufacturers
for all the products you installed or used on your model (especially radio equipment and power source).
2.
Check thoroughly before every flight that the airplanes components are in good shape and function correctly.
If you find a fault do not fly the model until you have corrected it.
3.
Radio interference caused by unknown sources can occur at any time without notice. In such a case, your
model will be uncontrollable and completely unpredictable. Make sure to perform a range check before every
flight. lf you detect a control problem or interference during a flight, immediately land the model to prevent
a potential accident
4.
Youngsters should only be allowed to assemble and fly these models under the instruction and supervision
of an experienced adult.
5.
Do not operate this model in a confined area.
6.
Do not stand in line with, or in front of a spinning propeller and never touch it with any object.
Precision Aerobatics quality control team checks each plane before it leaves the factory to ensure that each kit is in fine
condition. We have no bearing on the condition of any component parts damaged by use, modification or assembly of this
model. Inspect the components of this kit now. If you find any parts damaged or missing, contact the hobby shop who
supplied this kit immediately. We do not accept the return or replacement of parts on which assembly work has already
begun. Precision Aerobatics reserves the right to change this warranty at any time without notice.
Enjoy your new model. Precision Aerobatics Team
111
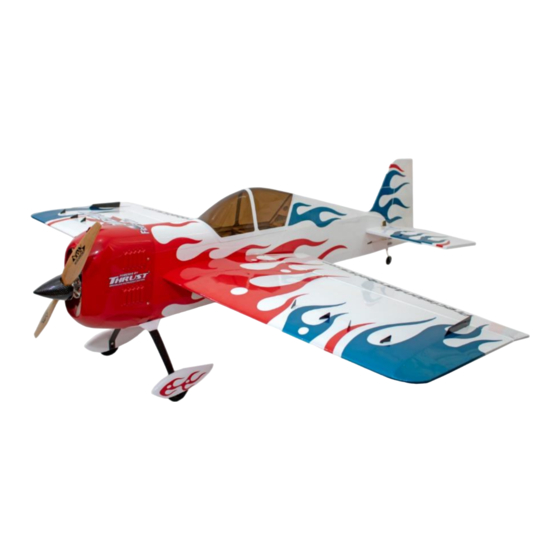
Addiction X V2
Warning – This is not a toy!
: 1.
motor and Quantum Pro ESC!
AND ACCEPT FULL LIABILITY FOR YOUR ACTIONS.
Equipment Selection
®
set up
1
Copyrights ©2013 Precision Aerobatics. All rights reserved
www.PrecisionAerobatics.com
Advertisement
Table of Contents

Related Manuals for Precision Aerobatics Addiction X V2


Summary of Contents for Precision Aerobatics Addiction X V2
- Page 1 Do not stand in line with, or in front of a spinning propeller and never touch it with any object. Precision Aerobatics quality control team checks each plane before it leaves the factory to ensure that each kit is in fine condition.
-
Page 2: Equipment Selection
Equipment selection At Precision Aerobatics we have gone to great lengths developing the Addiction X V2 (ADX V2) in order to provide you with an aircraft like no other. We have used unique engineering and untraditional production techniques, including our revolutionary PA FiberFusion®... -
Page 3: Pre-Assembly
Also, if you are a high speed/energy flyer, it’s recommended to use a small piece of sticky tape over the rear top canopy as precaution. www.PrecisionAerobatics.com Copyrights ©2013 Precision Aerobatics. All rights reserved... -
Page 4: Aileron Installation
NOTE: Sealing the ailerons hinge gap is an extremely important step, it is an integral part of the Addiction X design, therefore, skipping this step will have a detrimental effect on the flight characteristics and possible flutter! www.PrecisionAerobatics.com Copyrights ©2013 Precision Aerobatics. All rights reserved... -
Page 5: Aileron Servo Installation
If it still binds, unfasten the bolt, slightly widen the clevis fork with a flat screwdriver and refasten the bolt lightly. Once satisfied, apply green or red permanent Loctite. You may also install the metal clevis for the elevator at this stage. www.PrecisionAerobatics.com Copyrights ©2013 Precision Aerobatics. All rights reserved... - Page 6 Finally verify that the servo arm is also in the neutral (90°) position BEFORE the epoxy sets. Do the same with the other wing panel. www.PrecisionAerobatics.com Copyrights ©2013 Precision Aerobatics. All rights reserved...
- Page 7 Wing root LED night flying Illuminating your Addiction X V2 for night flying is done via main flight battery, therefore, additional battery is not required. Use the PA light harness to switch on the lights. Plug it into the battery balancer plug before takeoff (leave the three LED strip plugs permanently plugged in).
- Page 8 (as with the stabilizer). Once satisfied, glue the wedge in with CA. You may use scraps of covering material previously cut to cover the balsa wedge. www.PrecisionAerobatics.com Copyrights ©2013 Precision Aerobatics. All rights reserved...
- Page 9 Note: Try to pull the rudder out of the fuselage/fin to verify the integrity of the hinges gluing. Properly glued hinges will not allow the rudder to detach. www.PrecisionAerobatics.com Copyrights ©2013 Precision Aerobatics. All rights reserved...
-
Page 10: Elevator Servo Installation
"shave off" a bit of ply. Elevator servo Alternatively, you may use a small flat file. Test fit servos during the process. www.PrecisionAerobatics.com 101010 Copyrights ©2013 Precision Aerobatics. All rights reserved... - Page 11 CAUTION- Once glued the motor box is extremely robust, however, following any crash, propeller ground strike or hard landing it is essential that the cowl be removed and all joints inspected for cracks and www.PrecisionAerobatics.com 111111 Copyrights ©2013 Precision Aerobatics. All rights reserved...
- Page 12 The long rod in front of the bulkhead should not protrude out the sides of the fuselage as this will interfere with the cowl. Shorten this rod if required using a file. Next, gently work the motor box in until it sits perfectly flush with the fuselage www.PrecisionAerobatics.com 121212 Copyrights ©2013 Precision Aerobatics. All rights reserved...
- Page 13 Verify CF corner stringers do not protrude Pierce a hole in the covering to Cover the entire CF rod with epoxy Epoxy Glue motor box lugs and CF pins fit the rod www.PrecisionAerobatics.com 131313 Copyrights ©2013 Precision Aerobatics. All rights reserved...
-
Page 14: Motor And Esc Installation
If it doesn’t, power down the ESC and swap the position of any two motor cables or reprogram your Quantum ESC for reversed rotation. We strongly recommend removing the propeller as a safety precaution before powering up the ESC. www.PrecisionAerobatics.com 141414 Copyrights ©2013 Precision Aerobatics. All rights reserved... - Page 15 Route the battery and RX cables Install ESC as forward as possible NOTE: Install the motor with the cables positioned downwards Install air baffles For cosmetic reasons, air baffles can be painted black www.PrecisionAerobatics.com 151515 Copyrights ©2013 Precision Aerobatics. All rights reserved...
- Page 16 As a rule of thumb, the approximate correct tension is when a bass Install rudder servo in the motorbox tone is emitted when the cables are plucked in a similar way to a guitar string. www.PrecisionAerobatics.com 161616 Copyrights ©2013 Precision Aerobatics. All rights reserved...
- Page 17 Tip: Once you set up the exact CG per the manual, use a piece of sticky tape or a marker to mark the position of the battery (rear end) as a reference point when swapping packs between flights. Batteries can be mounted flat or upright www.PrecisionAerobatics.com 171717 Copyrights ©2013 Precision Aerobatics. All rights reserved...
-
Page 18: Wheel Pants
CA glue into the hole to stiffen the thread. Once the glue has cured, install the wheel pants with the screws. Note: if the LG strut doesn’t fit into the recess on the wheel pant then light filing of the strut sharp edges may needed. www.PrecisionAerobatics.com 181818 Copyrights ©2013 Precision Aerobatics. All rights reserved... -
Page 19: Installing The Landing Gear
Being a cosmetic step only, you may choose to skip this step and leave it uncovered. Cowling Attachment Notch the cowling to clear the LG Mark the location to drill Partially peel off the masking tape www.PrecisionAerobatics.com 191919 Copyrights ©2013 Precision Aerobatics. All rights reserved... -
Page 20: Propeller And Spinner Installation
CG and avoid carrying unnecessary weight. It's recommended to use temporary Loctite on the propeller adaptor mounting bolts. Note: While fastening the propeller nut, hold the prop and spinner backplate firmly by hand to prevent it from slipping. Don't use tools as you might deform it. www.PrecisionAerobatics.com 202020 Copyrights ©2013 Precision Aerobatics. All rights reserved... -
Page 21: Wing Attachment
Secondly the ADX has a long wing root, and as such production tolerance allows for some gap to be present. If a gap is present simply follow the step above and sand down the wing tube to improve the fitting. www.PrecisionAerobatics.com 212121 Copyrights ©2013 Precision Aerobatics. All rights reserved... -
Page 22: Center Of Gravity (Cg)
The ADX V2 is an excellent precision aerobatics sport flyer and an amazing slow 3D performer; therefore, in order to achieve the best of both worlds we spent many hours testing the CG to find the “sweet spot” that offers a peak in overall performance. -
Page 23: Control Setup
Flying style affects current consumption so flight duration may vary from one modeller to another. We suggest to initially set your flight timer at a very conservative setting. Then gradually adjust the flight duration after www.PrecisionAerobatics.com 232323 Copyrights ©2013 Precision Aerobatics. All rights reserved... -
Page 24: Applying The Decals
Due to the reflection avoid using direct flashlight and even dim the room light. Use a heated paperclip or a sharp modelling knife to reveal the pre-cut slots on both sides of the wing. www.PrecisionAerobatics.com 242424 Copyrights ©2013 Precision Aerobatics. All rights reserved... - Page 25 Do not keep it in the car or garage as temperature rises affect the plane. Shown on a different plane Pin holes Slit open the VG slots Sharpened paper clip Make a few pin holes www.PrecisionAerobatics.com 252525 Copyrights ©2013 Precision Aerobatics. All rights reserved...
- Page 26 Small VG slots Vortex Generator set www.PrecisionAerobatics.com 262626 Copyrights ©2013 Precision Aerobatics. All rights reserved...
-
Page 27: Optional Extras
The bag holds 8 propellers up to 16” in length and is sold for only $14.95. www.PrecisionAerobatics.com 272727 Copyrights ©2013 Precision Aerobatics. All rights reserved... - Page 28 PA light harness Addiction X pull pull complete set including rudder AC-2176 double servo arm AC-1654 White cover 60x200cm roll AC-2177V2 Addiction X vortex generators AC-1657 Metallic blue covering 60x200cm roll www.PrecisionAerobatics.com 282828 Copyrights ©2013 Precision Aerobatics. All rights reserved...
Need help?
Do you have a question about the Addiction X V2 and is the answer not in the manual?
Questions and answers