Table of Contents
Advertisement
Quick Links
Advertisement
Table of Contents

Related Manuals for Energizer eZ40BC-RS


Summary of Contents for Energizer eZ40BC-RS
- Page 1 USER MANUAL...
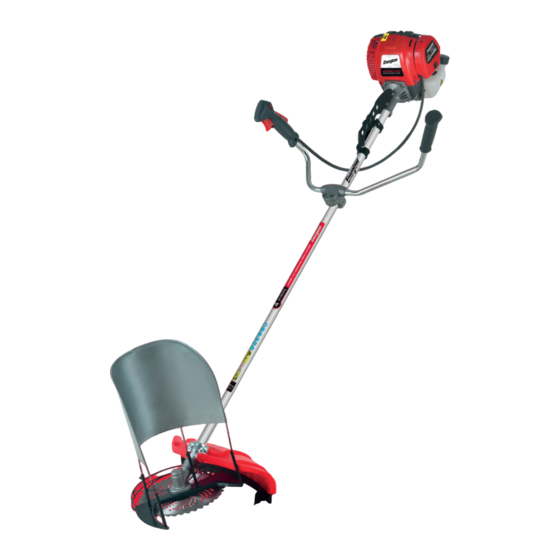
- Page 3 Thank you for purchasing your Energizer ® Agricultural Wheat Reaper This manual will show you the great features of Energizer ® eZ40BC-RS...
-
Page 4: Table Of Contents
INDEX CONTENTS 1. SAFETY FIRST 2. WARNING LABELS ON THE MACHINE 3. SYMBOLS ON THE MACHINE 4. FOR SAFE OPERATION 5. MAINTENANCE 6. SET UP 7. FUEL 8. OPERATION 9. MAINTENANCE OF ENGINE AND SHAFT 10. STORAGE 11. TROUBLESHOOTING GUIDE 12. -
Page 5: Safety First
WARNING Before using this agricultural wheat reaper read and understand these instructions. Keep these instructions for future reference. 1. SAFETY FIRST Instructions contained in warnings within this manual marked with symbol concern critical points which must be taken into consideration to prevent possible serious bodily injury, and for this reason you are requested to read all such instructions carefully and follow them without fail. -
Page 6: Symbols On The Machine
3. SYMBOLS ON THE MACHINE For safe operation and maintenance, symbols are carved in relief on the machine. According to these indications, please be careful not to make a mistake. (a). The port to refuel the “mix gasoline”. Position: fuel tank cap. (b). - Page 7 would be di cult to gain a clear view of the working area. c. During rain storms, during lightning storms, at times of strong or gale-force winds, or at any other times when weather conditions might make it unsafe to use the product. WORKING PLAN 1.
-
Page 8: Maintenance
HOT RESTART If the engine is operated at higher ambient temperatures, then turn it o and let it rest for a short time. USING THE PRODUCT IMPORTANT: Cut only materials recommended by the manufacturer and use only for tasks explai- ned in the manual. -
Page 9: Set Up
5. A er refueling, screw the fuel cap back tightly onto the fuel tank and then carry the unit to a spot 3 m or more away from where it was refueled before turning on the engine. TRANSPORTATION 1. When hand-carrying the product, cover the cu ing part if necessary, li up the product and carry it paying a ention to the blade. -
Page 10: Fuel
BLADE 1. Put the angled bar into the side holes of the inner holder and the gear case. 2. Remove the blade bolt (le -handed) and the outer holder from the gear sha . 3. Put the blade onto the inner holder. Make the marked side face the holder. - Page 11 Fuel filler cap Maximum-fuel level ENGINE OIL Oil is a major factor a ecting performance and service life. Use 4-stroke automotive detergent oil. RECOMMENDED OIL Use 4-stroke motor oil that meets or exceeds the requirements for API service label on the oil container to be sure it includes the le ers SJ or later (for equivalent).
-
Page 12: Operation
Fuel filler cap Oil filler neck WARNING: 5. Select bare ground for fueling. 6. Move at least 10 feet (3 meters) away from the fueling point before starting the engine. 7. Stop the engine before refueling the unit. At that time, be sure to su ciently agitate the mixed gasoline in the container. - Page 13 WARNING: The product is equipped with a centrifugal clutch mechanism, so the cu ing a ach- ment begins to rotate as soon as the engine is started by pu ing the thro le into the start position. When starting the engine, place the product onto the ground in a flat clear area and hold it firmly in place so as to ensure that neither the cu ing part nor the thro le come into contact with any obstacle when the engine starts.
- Page 14 NOTE: Warm up the engine before adjusting the idling speed. CUTTER APPLICATION CHART Replace by a suitable recommended cu ing a achment according to the object to be cut. When replacing a blade, always be sure to use products which have been certified. WARNING: When sharpening, removing, or rea aching the blade, be sure to wear thick, sturdy gloves and use only proper tools and equipment to prevent injury.
- Page 15 CUTTING METHOD 1. Use the front le side for cu ing. 2. Guide the blade from your right to le with it tilted slightly to your le . 3. When mowing a wide area, start working from your le end to avoid interference of cut grass. 4.
-
Page 16: Maintenance Of Engine And Shaft
CUTTING WORK (LINE HEAD USAGE) WARNING 1. Always wear eye protection such as safety goggles. Never lean over the rotating cu ing head. Rocks or other debris could be thrown into eyes and face and cause serious personal injury. 2. Keep the debris guard in place at all times when the unit is operated. TRIMMING GRASS AND WEEDS Always remember that the TIP of the line does cu ing. - Page 17 BLADE (1) Saw blade. √ (2) 8-teeth blade. √ 1.9-2.2 mm (3) 3-teeth blade. R1-1.5 mm √ R2-3 mm R3-4 mm 1-2 mm √ R2-3 mm R3-4 mm 3-4 mm Check the blade and the fasteners for looseness, cracking, or bending. Check the cu ing edges and reform with a flat file.
- Page 18 FUEL FILTER When the engine runs short of fuel supply, check the fuel cap and the fuel filter for blockage. SPARK PLUG Starting failure and misfiring are o en caused by a fouled spark plug. Clean the spark plug and check that the plug gap is in the correct range.
-
Page 19: Storage
IMPORTANT: If waste gets stuck and causes blockage around the intake air cooling vent or between the cylinder fans, it may cause the engine to overheat, and that in turn may cause mechanical failure on the part of the agricultural wheat reaper. PROCEDURES TO BE PERFORMED AFTER EVERY 100 HOURS OF USE 1. -
Page 20: Technical Specifications
12. TECHNICAL SPECIFICATIONS Power: 1.2 kW Speed: 7000 rpm Displacement: 38.9 cc Idling speed: 2800-3200 rpm Fuel tank capacity: 650 ml Oil tank capacity: 120 ml Sha diameter: 28 mm Includes: 1 pc Crop cu er, 1 pc 40T Blade, 1 pc A3 Trimme head, 1 pc Grass protector, 1 pc B3 Strap,... -
Page 21: Warranty
WARRANTY Product model Date of sale Company Serial number Client's signature Username Please read and agree to the terms of the warranty. The manufacturer warrants the product against faulty materials and workmanship for a period of 1 year from the date of first purchase to the original purchaser. The warranty is applicable when the product is used in a “home owner”... - Page 22 ©2021 Energizer. Energizer, Energizer Character and certain graphic designs are trademarks of Energizer Brands, LLC and related subsidiaries and are used under license by GBR Corporation Ltd.
Need help?
Do you have a question about the eZ40BC-RS and is the answer not in the manual?
Questions and answers