Table of Contents
Advertisement
Quick Links
Advertisement
Table of Contents

Related Manuals for Omron 3G3FV


Summary of Contents for Omron 3G3FV
- Page 1 Technical manual for the Omron 3G3FV flux vector inverter (closed loop operation with Interflite software control) Issue 2 – 05/12/2023 - Last technical change 20/07/2006 WE RESERVE THE RIGHT TO ALTER WITHOUT GIVING PRIOR NOTICE TECHNICAL DATA, DIMENSIONS AND WEIGHTS DESCRIBED IN THIS MANUAL...
-
Page 2: Table Of Contents
CONTENTS. A. Introduction Page 3 B. Sequence of events Page 4 C. Input and output connections Page 5 D. Control Panel Page 6 E. Parameters and description Page 7 F. Monitoring Page 8 G. Auto-tuning Pages 9-10 H. Commissioning procedure Pages 11-12 I. -
Page 3: Introduction
Variable Voltage Thyristor Controlled regulator systems. This manual will hopefully give a summarised version of the Omron control options and assist in setting up. Further, more detailed, information is available in the Omron 3G3FV programming and... -
Page 4: Sequence Of Events
SECTION B Sequence of Events Starting Starting is initiated by the receipt of either an UP or a DOWN direction signal. Acknowledgement of the direction signal, is fed back to the processor, via the inverter’s RUN contact in the STR feedback line. The direction relays, also energise the STR relay, which pulls in the MC contactors that allow power to reach the motor. -
Page 5: Input And Output Connections
SECTION C. Input and output connections The following is a list of the interflite outputs that interface with the inverter: - Output Description Run command, Baseblock NO Multi-accel/decel time2 enable Multi-step speed reference 3 Multi-step speed reference 2 Multi-step speed reference 1 The following is a list of the inverter inputs: - Terminal Description... -
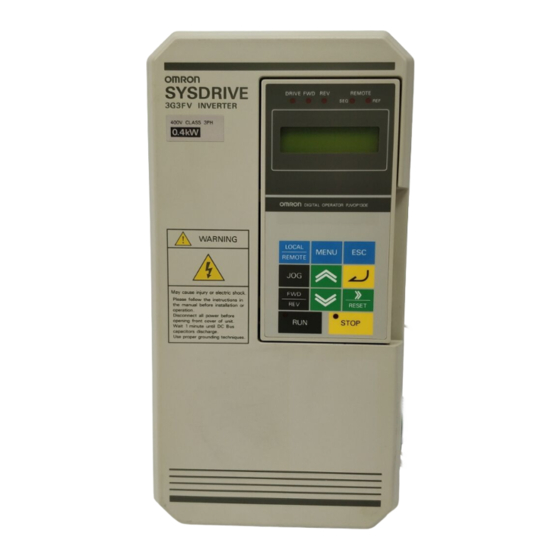
Page 6: Control Panel
SECTION D Control panel The removable keypad is the device used for controlling and programming the Omron 3G3FV. The control panel has 11 keys and the display has 2 lines. The Control Panel can be attached directly to the inverter or it can be mounted externally. To change a parameter enter the group the... -
Page 9: Parameters And Description
Parameters and description COMPLETE PARAMETER SETTINGS The following table is the list of all the default parameter settings for the Omron inverter. Use these tables as reference when you are customising macros for your Omron application. The modified constants section at the end of the manual is a list of all the parameters that have been changed from this default list for each individual application. - Page 10 PARAMETERS FACTORY SETTING UNIT 3.00 SPEED SEARCH 3.01 SPDSRCH AT START Enabled (D) 4.00 DELAY TIMERS 4.01 DELAY-ON TIMER 0.0(D) 4.02 DELAY-OFF TIMER 0.0(D) 5.00 PID CONTROL 5.01 PID MODE Disabled (D) 5.02 PID GAIN 1 (D) 5.03 PID I TIME 1 (D) 5.04 PID I LIMIT...
- Page 11 PARAMETERS FACTORY SETTING UNIT 3.00 MOTOR COMP SLIP 3.01 SLIP COMP GAIN 5.00 ASR TUNING 5.01 ASR P GAIN 1 20 (D) 5.02 ASR I TIME 1 0.5 (D) 5.03 ASR P GAIN 2 20 (D) 5.04 ASR I TIME 2 0.5 (D) 5.06 ASR DELAY TIME...
- Page 12 PARAMETERS FACTORY SETTING UNIT 5.00 TORQUE CONTROL 5.01 TORQ CONTROL SEL 0 (D) 5.02 TORQ REF FILTER 0 (D) 5.03 SPEED LIMIT SEL 1 (D) 5.04 SPEED LMT VALUE 0 (D) 5.05 SPEED LMT BIAS 10 (D) 5.06 REF HOLD TIME 0 (D) MOTOR 1.00...
- Page 13 PARAMETERS FACTORY SETTING UNIT 5.00 MOTOR 2 SETUP 5.01 MOTOR 2 RATED FLA 5.02 MOTOR 2 SLIP FREQ 5.03 MOTOR 2 NO-LOAD 1 5.04 MOTOR 2 # POLES 5.05 MOTOR 2 TERM OHMS 5.06 MOTOR 2 LEAK OPTIONS 1.00 PG OPTION SETUP 1.01 PG PULSE/REV 1024 (D)
- Page 14 PARAMETERS FACTORY SETTING UNIT 9.00 EFO SETUP 9.01 EFO SELECTION 0 (D) 9.02 FO DTCT SEL 0 (D) 9.03 EFO FAULT SEL 1 (D) 9.04 TRACE SAMPLE TIM 0 (D) TERMINALS 1.00 DIGITAL INPUTS 1.01 TERMINAL 3 SEL External fault 1.02 TERMINAL 4 SEL Fault reset...
- Page 15 PARAMETERS FACTORY SETTING UNIT 5.00 SERIAL COM SETUP 5.01 SERIAL COMM ADR 1F (D) 5.02 SERIAL BAUD RATE 3 (D) 5.03 SERIAL COM SEL 0 (D) 5.04 SERIAL FAULT SEL 3 (D) 5.05 SERIAL FLT DTCT 1 (D) PROTECTION 1.00 MOTOR OVERLOAD PROTECTION 1.01 MOL FAULT SEL...
- Page 16 PARAMETERS FACTORY SETTING UNIT 8.00 HARDWARE PROTECTION 8.01 DB RESIST PROT Disabled (D) 8.02 OH PRE-ALARM LVL 95 (D) 8.03 OH PRE-ALARM SEL Continue operation 8.05 PH LOSS IN SEL Disabled 8.07 PH LOSS OUT SEL Disabled 8.10 GF FAULT SEL Enabled (D) OPERATOR 1.00...
-
Page 17: Monitoring
SECTION F Monitoring The following describes the Monitoring Signals. To put the Omron inverter in the ready to run state whereby the unit is controlled by the ILE controller the MENU button is pressed and ‘MAIN MENU OPERATION’ is displayed then the ENTER button is pressed. The monitoring section is entered by pressing the up arrow until you come to FUNCTION U1 MONITOR then press the enter button to enter this mode. - Page 18 U1-11 O/P STATUS Status of the three outputs. 1 indicates that the O/P is energised and 0 indicates that the O/P is de-energised.
-
Page 21: Autotuning
SECTION G Autotuning The tuning run requires that the motor is completely off load for best performance, although with a flange mounted motor good performance can be obtained with just the gearbox coupled and the ropes removed. The tuning run is performed as follows: - Note : The motor will run independently of any signals received. -
Page 22: Commissioning Procedure
SECTION H Commissioning procedure N.B Commissioning procedure is to be carried out by competent personnel only. WARNING : DO NOT TURN POWER ON & OFF MORE THAN 5 TIMES EVERY 15 MINUTES OR INTERNAL COMPONENTS MAY BE DAMAGED !!! Equipment Required. 1. - Page 23 same as the UP direction, if not refer to section I. 6. Check high speed in the UP direction and set to contract speed ensuring the lift slows and levels 7. If the lift overshoots floor level or has a long levelling time into floor then adjust the slowing distance combined with deceleration rate C1-02 and the s cuves C2-03,4 to acquire a reasonable comfort level with a minimum levelling time.
- Page 25 SECTION I Ride quality adjustments The following parameters show how the performance of the inverter can be improved to suit individual applications. Slip Comp Gain C3-01 can be adjusted in steps of 0.1 to equalise the levelling speeds in the up and down direction, there is a desired maximum setting of 2.0 and a minimum setting of 0.5 setting this value too high will lead to vibration.
-
Page 26: Single Floor Run Operation
SECTION J Single floor run operation. Only applicable on speeds above 1mps. Single floor runs on high speed lifts are accomplished by using a different acceleration and deceleration rate. A single floor run is detected by the Interflite, which selects a medium speed. When the slowing vane is reached OP4 on the IFIODTC board is used to select deceleration rate 2 to slow to levelling speed. - Page 27 Setting up procedure for single floor runs. 1. Setting Decel time 3. (parameter C1-05) 1.1. Set up the slowing vanes and floor levels as normal using multi floor runs. 1.2. At the shortest floor set a medium speed (D1-07 frequency reference 7) which can be achieved before the slowing vane on a single floor run.
-
Page 28: Fault Finding
SECTION J Fault Finding The following section shows the common fault codes with a description of the fault and cause. -
Page 34: Modified Constants
SECTION K Modified constants The following sheet is a print out of all the parameters that have been changed from the factory default values for this application.
Need help?
Do you have a question about the 3G3FV and is the answer not in the manual?
Questions and answers