Greenheck SQ Installation, Operation And Maintenance Manual
Direct drive square inline mixed flow fans
Hide thumbs
Also See for SQ:
- Brochure & specs (49 pages) ,
- Installation, operation and maintenance manual (9 pages) ,
- Quick start manual (2 pages)
Table of Contents
Advertisement
Quick Links
®
Installation, Operation and Maintenance Manual
Please read and save these instructions for future reference. Read carefully before attempting to assemble, install,
operate or maintain the product described. Protect yourself and others by observing all safety information. Failure
to comply with these instructions will result in voiding of the product warranty and may result in personal injury
and/or property damage.
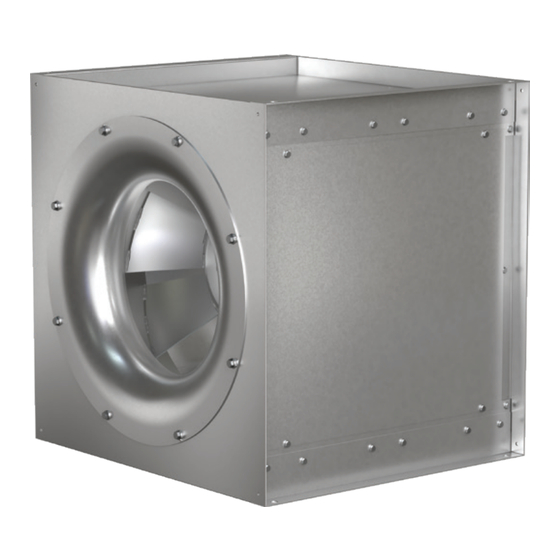
Square Inline Mixed Flow Fans
Fans are direct-driven with mixed flow wheels and feature ridged
construction, high-efficiency and low sound levels. These compact inline fans
are the ideal selection for indoor and outdoor clean air applications including
intake, exhaust, return, or make-up air systems. The square housing design,
compact size, and straight-thru airflow also provide the system designer the
flexibility to mount in horizontal and vertical orientations. Each fan displays a
permanently stamped metal nameplate with complete model number, mark,
and unique serial number for future identification.
General Safety Information
Only qualified personnel should install this fan.
Personnel should have a clear understanding of these
instructions and should be aware of general safety
precautions. Improper installation can result in electric
shock, possible injury due to coming in contact with
moving parts, as well as other potential hazards. If more
information is needed, contact a licensed professional
engineer before moving forward.
1. Follow all local electrical and safety codes, as well as
the National Electrical Code (NEC) and the National
Fire Protection Agency (NFPA), where applicable.
Follow the Canadian Electric Code (CEC) in Canada.
2. The rotation of the wheel is critical. It must be free
to rotate without striking or rubbing any stationary
objects.
3. Motor must be securely and adequately grounded.
4. Do not spin fan wheel faster than max cataloged fan
RPM. This could cause catastrophic wheel failure.
Adjustments to fan speed significantly affects motor
load. If the fan RPM is changed, the motor current
should be checked to make sure it is not exceeding
the motor nameplate amps.
5. Do not allow the power cable to kink or come in
contact with oil, grease, hot surfaces or chemicals.
Replace cord immediately if damaged.
6. Verify that the power source is compatible with the
equipment.
7. Never open access doors to a duct or fan while the
fan is running.
8. Never remove covers protecting electrical
components while fan is energized.
®
Square Inline Mixed Flow Fans
DANGER
Always disconnect, lock, and tag power source before
installing or servicing. Failure to disconnect power
source can result in fire, shock, or serious injury.
CAUTION
When servicing the fan, motor may be hot enough
to cause pain or injury. Allow motor to cool before
servicing.
DANGER
Pour écarter les risques d'incendie, de choc électrique
ou de blessure grave, veiller à toujours débrancher,
verrouiller et étiqueter la source de courant avant
l'installation ou l'entretien.
ATTENTION
Lors de toute intervention sur la soufflante, le moteur
peut être suffisamment chaud pour provoquer une
douleur voire une blessure. Laisser le moteur refroidir
avant toute maintenance.
Square Inline Mixed Flow Fans
Document 485448
Model SQ Direct Drive
1
Advertisement
Table of Contents

Related Manuals for Greenheck SQ


Summary of Contents for Greenheck SQ
- Page 1 Document 485448 Model SQ Direct Drive Square Inline Mixed Flow Fans ® Installation, Operation and Maintenance Manual Please read and save these instructions for future reference. Read carefully before attempting to assemble, install, operate or maintain the product described. Protect yourself and others by observing all safety information. Failure to comply with these instructions will result in voiding of the product warranty and may result in personal injury and/or property damage.
- Page 2 Receiving Storage Environment The ideal environment for the storage of fans and Upon receiving the product check to ensure all items accessories is indoors, above grade, in a low humidity are accounted for by referencing the delivery receipt or atmosphere which is sealed to prevent the entry of packing list.
-
Page 3: Dimensional Data
FRONT VIEW SIDE VIEW TOP/BOTTOM VIEW F / G INLET 0.75 in. Ø 0.50 Isolator Mount 0.75 in. Max. Fan Fan Size A Sq. B Sq. (Isolator) (Isolator) (Hole Spacing) (Holes Per Side) Weight^ 11-3/8 14-3/8 14-1/2 13-1/8 6-1/2 15-1/8... -
Page 4: Typical Installation
FLEXIBLE DUCT SIZE 7-16 (QTY 2) (BY OTHERS) • SQ-7 to SQ-16 will consist of 2 pieces per inlet/outlet • SQ-18 to SQ-33 will consist of 4 pieces per inlet/outlet 2. Mount square duct adapter to inlet and/or outlet using appropriate number of flange pieces and 5/16... - Page 5 Side Discharge Fans are configurable with a variety of discharge options - inline, left, right or any combination of the three. This option can help to reduce system effect the overall footprint of the ductwork. Side Discharge (R&L) Outlet Dimensions Width Height Size...
- Page 6 Filtration 2. Square duct adapter will come in (2) or (4) piece designs depending on unit size (see below). The filter box is designed to provide a compact and convenient clean air solution while eliminating the costly SIZE 18-33 (QTY 4) process of designing, fabricating, and installing custom filter assemblies.
- Page 7 STEP 2 - Filter Replacement and Cleaning Outdoor Cover Follow filter replacement and or cleaning intervals The outdoor cover can be applied to any ducted recommended by filter supplier. horizontal base mount outdoor application. UL/cUL 705 listed for outdoor use. The components for this kit are shipped separate from the fan for field installation.
- Page 8 2. Connect wiring to motor leads in junction box on top STEP 5 - Install Side Panels of the fan, replace the junction box cover. 1. Install one side of outdoor cover to fan with drip 3. Connect wiring to disconnect or power supply edge down, use provided self-tapping sheet metal BOTTOM 4.
-
Page 9: Operation
Pre Start-Up Checks Before Fan Installation Operation Before starting up or operating fan, check all fasteners IMPORTANT: The fan has been checked for for tightness. In particular, check the cap screws in wheel bushing. mechanical noises at the factory prior to shipment. -
Page 10: Maintenance
Maintenance Tapered Bushing Hub Installation DANGER and Removal Always disconnect, lock and tag power source before For wheel hubs utilizing a tapered bushing interface, servicing. Failure to disconnect power source can follow this procedure for installation and removal. result in fire, shock or serious injury. WARNING Bushing Removal 1. -
Page 11: Maintenance Log
Maintenance Log Date ___________________Time _____________ AM/PM Date ___________________Time _____________ AM/PM Notes: ___________________________________________ Notes: ___________________________________________ _________________________________________________ _________________________________________________ _________________________________________________ _________________________________________________ _________________________________________________ _________________________________________________ _________________________________________________ _________________________________________________ Date ___________________Time _____________ AM/PM Date ___________________Time _____________ AM/PM Notes: ___________________________________________ Notes: ___________________________________________ _________________________________________________ _________________________________________________ _________________________________________________ _________________________________________________ _________________________________________________ _________________________________________________ _________________________________________________ _________________________________________________ Date ___________________Time _____________ AM/PM... -
Page 12: Troubleshooting
As a result of our commitment to continuous improvement, Greenheck reserves the right to change specifications without notice. Product warranties can be found online at Greenheck.com, either on the specific product page or in the literature section of the website at Greenheck.com/Resources/Library/Literature.
Need help?
Do you have a question about the SQ and is the answer not in the manual?
Questions and answers