Advertisement
INTRODUCTION

This product and other substances that may become airborne from its use contain chemicals, including lead, known to the State of California to cause cancer, birth defects, or other reproductive harm. Wash hands after handling. For more information go to www.P65warnings.ca.gov.

Read this manual before using or performing maintenance on this product. Failure to follow the instructions and safety precautions in this manual can result in serious injury or death.
PRODUCT REGISTRATION
For trouble-free warranty coverage, it is important to register your Westinghouse product.
You can register by:
- Completing and mailing the product registration card included in the carton.
- Registering your product on-line at: wpowereq.com/pages/warranty-registration
- Scanning the above QR code with your smartphone camera to be directed to the mobile registration link.
![]()
- Sending the following product information to:
Westinghouse Outdoor Power
Warranty registration
777 Manor Park Drive
Columbus, OH 43228


Keep your purchase receipt for troublefree warranty coverage.
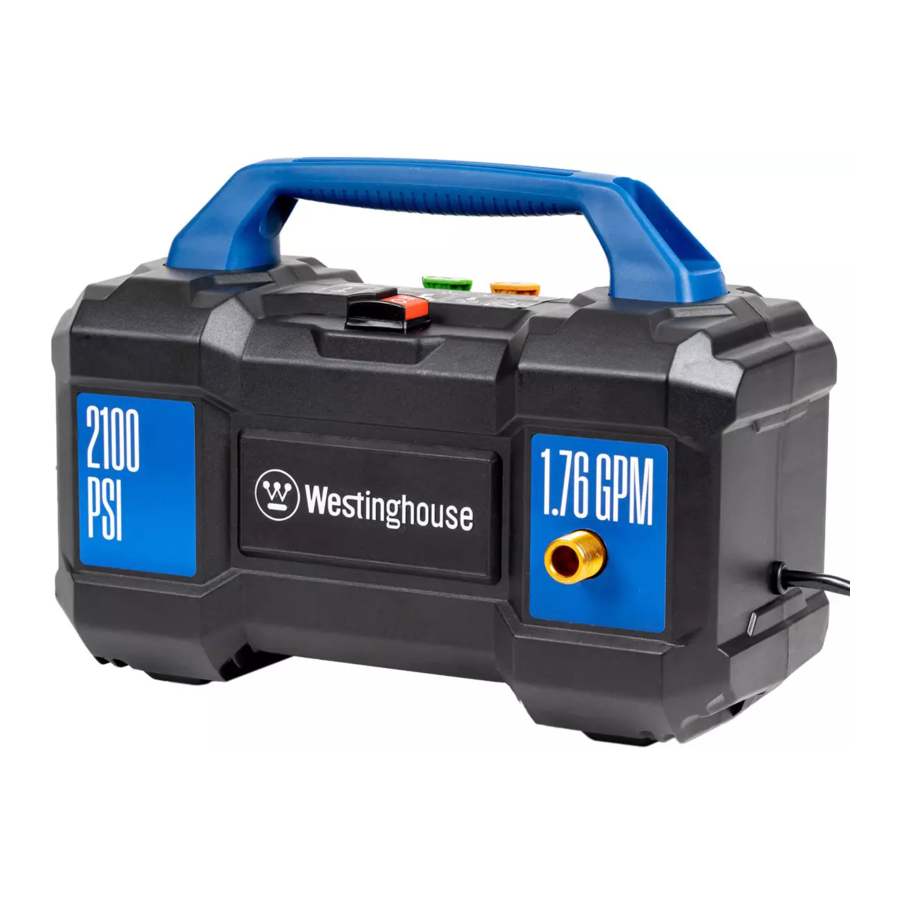
SPECIFICATIONS
Water Temperature: Cold Water Only
Peak Pressure: 2100 PSI
Rated Max Pressure: 1800 PSI
Maximum Water Flow Rate: 1.76 US GPM (5.3 LPM)
Rated Water Flow Rate: 1.2 US GPM (4.54 LPM)
Phase: Single
Input: 120 V, AC only, 60 Hz, 13 Amps
NEVER spray directly at a person, animal, electrical device, or the unit itself. Failure to heed this warning could result in serious injury, electric shock, or death.
 NOTICE
NEVER allow the pressure washer pump to run for more than one minute after you have turned off the water supply. This can cause the motor and pump to overheat and fail. ALWAYS unwind the garden hose completely and remove any objects that may be restricting or preventing the flow of water to the machine.
NOTICE
PLEASE READ BEFORE RETURNING THIS PRODUCT FOR ANY REASON.
If you have a question or experience a problem with your Westinghouse purchase, call us at 1-855-944-3571 to speak with an agent.
SAVE THIS MANUAL FOR FUTURE REFERENCE.
SAFETY
SAFETY DEFINITIONS
The words DANGER, WARNING, CAUTION, and Follow all safety information contained in this user's NOTICE are used throughout this manual to highlight manual as well as the information on the product important information. Make sure that the meanings labeling.
can cause the motor and pump to overheat and fail. ALWAYS unwind the garden hose completely and remove any objects that may be restricting or preventing the flow of water to the machine.
This safety alert symbol appears with most safety statements. It means attention, become alert, your safety is involved! Please read and abide by the message that follows the safety alerts symbol.
Indicates a hazardous situation which, if not avoided, will result in death or serious injury.
Indicates a hazardous situation which, if not avoided, could result in death or serious injury.

Indicates a hazardous situation which, if not avoided, could result in minor or moderate injury.
NOTICE
Indicates a situation which can cause damage to the pressure washer, personal property, and/or the environment, or cause the equipment to operate improperly.
NOTE: Indicates a procedure, practice or condition that should be followed for the pressure washer to function in the manner intended.
SAFETY SYMBOLS
| Symbol | Description |
| | Safety Alert Symbol |
 | Risk of Injection. |
 | Electric Shock |
 | Risk of Explosion. Never spray flammable liquids. Flammable liquids and their vapors can be explosive. |
 | Do Not Operate in Wet Conditions |
 | Read Manufacturer's Instructions |
 | Kickback. |
 | Double-insulated construction |
 | Wear eye and ear protection |
IMPORTANT SAFETY INSTRUCTIONS
To reduce the risk of injury, the user must read and understand the instructions before using this product.
Risk of liquid injection. Never spray humans or animals, as injury could result. Engage trigger lock when the pressure washer is not in use.
When using this product, basic, precautions should always be followed, including the following:
- ALWAYS take time to read all the instructions before using the product.
- It is recommended to carefully read understand all operating aspects of the pressure washer outlined in this manual to avoid personal injury and/or damage to property and to maximize your pressure washing experience.
- Understand and know how to safely stop the product and bleed pressures quickly. Be fully familiar with all controls.
- Follow the maintenance instructions as specified in the manual.
- DO NOT use your pressure washer when you are under the influence of alcohol or drugs. Use this power tool carefully and only when you are alert.
- Keep operating area clear of all people, animals and hazardous objects.
- DO NOT overreach or stand on unstable support. Keep good footing and balance at all times.
- The pressure washer is equipped with a Ground Fault Circuit Interrupter (GFCI) which greatly reduces the chance of electric shock while the unit is in use. If replacement of the plug or cord is needed, use only identical replacement parts.
KEEP THESE INSTRUCTIONS FOR FUTURE REFERENCE.
GROUND FAULT CIRCUIT INTERRUPTER PROTECTION
This pressure washer has a ground-fault circuit-interrupter (GFCI) built into the plug of the power-supply cord. A GFCI provides additional protection from the risk of electric shock. If replacement of the plug or cord is necessary, use identical replacement parts that include GFCI protection.
SERVICING OF A DOUBLE-INSULATED APPLIANCE
In a double-insulated product, two systems of insulation are provided instead of grounding. Grounding means are not provided for a double insulated product, nor should grounding means be added to the product.
Servicing a double-insulated product requires extreme care and knowledge of the system, and should only be done by qualified service personnel.
A double-insulated product is marked with the words "DOUBLE INSULATION" or "DOUBLE INSULATED". This symbol ![]() may also be marked on the product.
may also be marked on the product.
- Failure to read and follow the instructions in user manual(s) could result in death, bodily injury, and/or property damage.
- When using the pressure washer near children, make sure they are closely supervised by an adult to avoid injury. NEVER let a child use the pressure washer.
- This pressure washer conforms to CSA and other safety and consumer standards. DO NOT modify or rebuild any part of your pressure washer.
- Watch your balance and footing while using your pressure washer. Surfaces become slippery when wet and are extra slippery when using a detergent or cleaner.
- NEVER operate the pressure washer in bare feet, sandals, or open-toed shoes.
- DO NOT touch the high pressure spray with your fingers, hands, feet and be careful to avoid any contact with your eyes as the powerful spray can cause blindness or blast holes in the skin.
- ALWAYS wear eye protection to prevent injury to eyes when operating the pressure washer.
- To avoid accidents causing injury, ALWAYS use the trigger safety lock when the pressure washer is not in use even if the spraying stops for a moment.
- Point the spray gun in a safe direction when beginning to use your pressure washer.
- NEVER spray directly at a person, animal, electrical device, or the unit itself. The pressure washer can break glass if hit with direct contact.
- Hold the spray gun and lance with two hands (one hand to pull the trigger and the other to stabilize the gun) until you get used to the "recoil".
- When you stop the pressure washer, water pressure may remain in the system. To release the pressure, point the spray gun in a safe direction and pull the trigger.
- NEVER spray flammable liquids.
- NEVER use the pressure washer in areas that contain combustible dust, liquids or vapors.
- Examine the hose regularly. Replace if damaged. Due to the high pressure involved, it cannot be repaired if cut or damaged.
- Only use detergent specifically formulated for pressure washers and follow instructions on the detergent's label.
- Detergent can be harmful to your skin, eyes and lungs. Please be cautious when handling any chemicals. Dish and laundry soap is too thick and will clog the nozzle of your detergent bottle.
NOTICE
Store the pressure washer indoors in a heated environment to prevent the water in the unit from freezing and expanding. When the water freezes and expands, the highpressure pump will crack and render the pressure washer inoperable. It is recommended you use pump saver (not included) to protect pumps from freezing and cracking.
- NEVER use hot water with your pressure washer. It will overheat and damage the seals and components in the high-pressure pump that cannot be repaired.
- NEVER leave the pressure washer "ON" while it is unattended.
- ALWAYS turn the water supply "ON " before turning the pressure washer power to "ON". Running the pump dry of water will cause damage to the internal components and render the pressure washer inoperable.
- NEVER use a water supply to your pressure washer that exceeds 150 PSI maximum.
- NEVER disconnect the high pressure hose from the pressure washer while the system is pressurized.
- NEVER permanently engage the trigger mechanisms on the spray gun.
- NEVER operate the pressure washer unless all components are properly and securely connected.
- NEVER allow the pressure washer pump to run for more than one minute after you have turned off the water supply. This can cause the motor and pump to overheat and fail.
- NEVER use an extension power cord.
- NEVER use an extension power cord since it causes voltage drop and can burn the motor. Also increases risk of electric shock to the operator.
- NEVER use lances or other parts that are not compatible for this specific Westinghouse unit.
- NEVER spray any electrical outlet with your pressure washer.
- Inspect the power cord before using. DO NOT use it if it is damaged.
- Keep all connections dry and off the ground. DO NOT touch the plug with wet hands.
SAFETY LABELS AND DECALS
The following information is on your pressure washer's labels and decals.

- Water and Detergent Information
- For cold water use only.
- Use only pressure washer detergents
- Specifications
- California Proposition 65
Cancer and reproductive harm - www.P65Warnings.ca.gov/product - EZ Start Instructions
Refer to the "EZ Start Instructions" label and the instructions in the Operations section when starting and stopping the pressure washer. - Nozzle Label
- 15° Yellow
- 25° Green
- Safety Symbols
- Caution Statement
Before servicing, cleaning or removing parts, shut off the power and relieve the pressure. - WARNING
- Failure to read and follow the instructions in user manual(s) could result in death, bodily injury, and/or property damage.
- ALWAYS point gun in safe direction and squeeze spray gun trigger to release pressure and avoid kickback each time.
- The spray gun kicks back- Hold firmly with two hands.
- Risk of liquid injection. Never spray humans or animals, as injury could result. Engage trigger lock when the pressure washer is not in use.
- Risk of eye injury. Always use caution. Wear safety googles with side shields.
- Risk of electrocution. Never spray water on any electric power sources.
- Do not store the machine or accessories in a place where the temperature could drop below 40°F (4.5°C).
ELECTRICAL
DOUBLE INSULATION
Double insulation eliminates the need for a three-wire grounded power cord. Double insulated products do not need to be grounded because exposed metal parts are covered in protective insulation that isolates them from internal metal motor components.
A double insulated system is designed to protect against shock caused by a break in the product's internal insulation. To avoid electric shock, follow all ordinary safety procedures.
NOTE: Double insulated products should only be serviced by qualified service technicians. For more information, contact Westinghouse customer service toll-free at 1 (855) 944-3571.
AC MOTOR
The electric motor in this product was designed to work with a nominal 120V/60Hz AC power supply (average U.S. household circuit). It is not intended to operate on direct current (DC). A significant voltage drop will result in a loss of power and could damage the motor.
GROUND FAULT CIRCUIT INTERRUPTER PROTECTION
See Figure 1:

FIG. 1
- TEST Button
- RESET Button
This pressure washer has a ground-fault circuit-interrupter (GFCI) built into the plug of the power-supply cord. A GFCI protects against ground fault currents such as a current that would flow through a person standing on a wet surface while holding a product with faulty insulation. GFCI plugs do not protect against shocks, short circuits, and overloads. If replacement of the plug or cord is necessary, use identical replacement parts that include GFCI protection.
To test the GFCI:
- Plug the power supply cord into a receptacle.
- Press the TEST button and listen for a "click" indicating that the connection to the power supply was broken.
- Press the RESET button to restore power to the device. The LED light will turn on when power is restored.
Test the GFCI monthly to ensure proper operation.
COMPONENTS

- Lance
- Spray Gun
- Handle
- On/Off Button
- Threaded Outlet
- Foam Cannon
- Water Inlet
- High Pressure Hose
- Nozzles
- Power Cord
- Turbo Nozzle
UNDERSTANDING YOUR PRESSURE WASHER
See Figure 2.
To reduce the risk of injury and product failure, read and understand the information in this user's manual as well as the information on the product labeling.
FOAM CANNON
Use the foam cannon to generate thick clinging foam to break up grease, grime, and stains.
HANDLE
Use the handle when transporting the unit.
HIGH PRESSURE HOSE
The high pressure hose included with this unit is light weight, flexible, and durable. When not in use, the hose can be stored on the hose retainer.
NOZZLES
Nozzles of varying sizes are included with this unit and can be used for different cleaning applications.
ON/OFF BUTTON
Push once to start the pressure washer. Push again to stop the pressure washer.
SPRAY GUN
Use the spray gun and lance to control and direct the stream of water.
TURBO NOZZLE
The turbo nozzle delivers a powerful rotating 0° spray pattern that cleans large areas faster than standard nozzles.
ASSEMBLY
Do not connect the pressure washer to a power supply until it is fully assembled. To avoid accidental starting and possible serious injury, only connect a power supply when the pressure washer is ready for use.
REMOVING CARTON CONTENTS
This product requires assembly. Do not attempt to operate this product if any items in the INCLUDED LIST are already assembled when you remove the carton contents. These items are not assembled by the manufacturer and should require customer assembly. Using an improperly assembled product can be hazardous and could result in serious personal injury.
- Carefully cut down the sides of the packaging and remove the carton contents.
- Inspect the carton contents. Verify that all the items in the INCLUDED LIST are present and undamaged.
- Recycle or dispose of the packaging materials properly.
INCLUDED LIST
See Figure 3:

- High Pressure Hose
- Spray Gun
- Lance
- Nozzles
- Foam Cannon
- Turbo Nozzle
Pressure Washer, Spray Gun, Lance, Nozzles (15° and 25°), High Pressue Hose, Foam Cannon, Turbo Nozzle, Quick Start Guide, User Manual
If any parts are missing, contact our service team at service@wpowereq.com or call 1-855-944-3571.
CONNECTING THE LANCE TO THE SPRAY GUN
See Figure 4:

FIG. 4
- Spray Gun
- Lance
- Push the lance into the spray gun and turn clockwise to tighten.Do not overtighten.
- Gently pull on the lance to be certain it is secured.
CONNECTING THE HIGH PRESSURE HOSE TO THE SPRAY GUN
See Figure 5:

- Spray Gun
- High Pressure Hose
- Collar
- Uncoil and straighten the high pressure hose to remove any bends or kinks.
- Pull the collar on the high pressure hose back and push the hose fitting firmly into the spray gun.
- Screw the collar onto the spray gun and tighten securely.
![warning]() NOTE: Be careful not to damage the threads on the spray gun doing so could cause the gun to leak during use.
NOTE: Be careful not to damage the threads on the spray gun doing so could cause the gun to leak during use. - Gently pull on the hose to be certain it is secured.
CONNECTING THE HIGH PRESSURE HOSE TO THE PRESSURE WASHER
See Figure 6:

FIG. 6
- Threaded Outlet
- High Pressure Hose
- Uncoil and straighten the high pressure hose to remove any bends or kinks.
- Pull the collar on the high pressure hose back and push the hose fitting firmly into the threaded outlet on the pressure washer.
- Screw the collar onto the outlet and tighten securely.
![warning]() NOTE: Be careful not to damage the threads on the outlet doing so could cause the unit to leak during use.
NOTE: Be careful not to damage the threads on the outlet doing so could cause the unit to leak during use. - Gently pull on the hose to be certain it is secured.
CONNECTING A GARDEN HOSE TO THE PRESSURE WASHER
See Figure 7:

- Garden Hose
- Water Inlet
NOTICE
Follow local regulations and ordinances when connecting your pressure washer to a water supply. Some jurisdictions may prohibit you from connecting directly to public drinking water in order to prevent the possibility of chemicals feeding back into the system. Connections made through a backflow preventer or receiver tank are generally permitted.
NOTICE
The water used in this device must come from a water main. DO NOT use this device with water from a lake, pool, pond, etc. NEVER use hot water with this product.
- Turn the water faucet completely off.
- Uncoil and straighten the garden hose to remove any bends or kinks.
- Flush water through the hose for several seconds to remove debris and then turn the faucet off again.
- Inspect the screen inside the water inlet for damage or clogs. Clean or replace as needed. NEVER connect a garden hose without the screen in place.
- Insert the garden hose into the water inlet.
- Thread the collar on the inlet onto the garden hose. Tighten securely.
NOTICE
ALWAYS turn the water supply "ON " before turning the pressure washer power to "ON". Running the pump dry of water will cause damage to the internal components and render the pressure washer inoperable.
OVERVIEW
This pressure washer can produce very high levels of water pressure and can be used for a variety cleaning applications such as cleaning decks and walkways, washing vehicles and equipment; and removing dirt from home exteriors and fences.
OPERATION
Do not alter or modify this product unless instructed to so in this manual or by the manufacturer. Do not use attachments or accessories that are not recommended for use with this product. Making unauthorized modifications and using incompatible accessories can damage the unit and may void your warranty.
ALWAYS wear eye protection to prevent injury to eyes when operating the pressure washer.
NEVER spray directly at a person, animal, electrical device, or the unit itself. Failure to heed this warning could result in serious injury, electric shock, or death.
STARTING AND STOPPING THE PRESSURE WASHER
See Figure 8:

FIG. 8
- On/Off Button
- Connect a garden hose as described previously and turn the water on.
![warning]() NOTICE
NOTICE
ALWAYS turn the water supply "ON " before turning the pressure washer power to "ON". Running the pump dry of water will cause damage to the internal components and render the pressure washer inoperable. - Connect a garden hose and turn the water on.
- Put the on/off switch in the OFF position (O).
- Completely unwind the power cord and connect it to a grounded 120 volt outlet.
Keep all connections dry and off the ground. Do not touch the plug with wet hands.
- Hold the spray gun with both hands and point the lance in a safe direction.
- Release the safety lock and squeeze the trigger to release water and air out of the hose. Continue squeezing the trigger until there is a steady stream of water, then release and lock the trigger. Refer to Using the Spray Gun later in this section.
- Put the on/off button in the ON position (I) to start the pressure washer. The unit will run for several seconds and shut off. This is a normal function of the auto-start feature.
![warning]() NOTE: The unit could be pressurized even if you don't hear the motor and pump running. Always be cautious when you are around a pressure washer.
NOTE: The unit could be pressurized even if you don't hear the motor and pump running. Always be cautious when you are around a pressure washer. - Put the on/off switch in the OFF position (O) to stop the pressure washer.
- When you stop the pressure washer, water pressure may remain in the system. Point the spray gun in a safe direction and pull the trigger to release the water pressure.
USING THE SPRAY GUN
See Figure 9:

- Trigger
- Safety Lock
Hold the spray gun and lance with two hands (one hand to pull the trigger and the other to stabilize the gun) until you get used to the "recoil". Do not lose control of the spray gun doing so could result in injury to yourself and others.
- Start the pressure washer.
- Release the safety lock by pushing it down into the slot in the trigger.
- Squeeze and hold the trigger to start the flow of water.
- Release the trigger to stop the flow of water.
- Lock the trigger by pushing it up to its original position.
NOTE: Squeeze the trigger to make sure its locked and will not move. ALWAYS keep the spray gun locked when it's not in use.
INSTALLING NOZZLES
See Figure 10:

- Nozzle
- Lance
- Collar
- Push Nozzle In
- Pull Collar Back
- Remove Nozzle
ALWAYS turn off the pressure washer, release the pressure in the spray gun, and lock the trigger before removing or installing a nozzle. NEVER point the lance at your face. Failure to heed this warning could result in serious injury.
- Stop the pressure washer and turn the water faucet completely off.
- Point the spray gun in a safe direction and pull the trigger to release the water pressure.
- Lock the trigger.
- Push the nozzle into the lance until it clicks into place and is secure.
- To remove the nozzle, pull the collar back and move the nozzle away from the lance.
| NOZZLE | GENERAL USE |
 Turbo | High Pressure. Use to clean concrete, remove tough stains, and strip paint. Use with caution. |
 | Moderate pressure. Safe to use on brick and paved patios. |
| FOAM CANNON | GENERAL USE |
 | Low Pressure. Safe for cars, windows and decks. |
CLEANING WITH THE PRESSURE WASHER
See Figures 11 - 13. To clean with detergent:

FIG. 11
- Lance
- Foam Cannon
- Soap Bottle

To clean with detergent:
- Stop the pressure washer and turn the water faucet completely off.
- Point the spray gun in a safe direction and pull the trigger to release the water pressure.
- Separate the soap bottle from the foam cannon by twisting it counterclockwise.
- Fill the soap bottle with a properly formulated detergent to-water ratio, following the detergent manufacturer's instructions.
![warning]() NOTE: Use detergents designed for pressure washers. The detergent should be the consistency of water. DO NOT use thick, gel-like detergents.
NOTE: Use detergents designed for pressure washers. The detergent should be the consistency of water. DO NOT use thick, gel-like detergents. - To reinstall the soap bottle, place it on the foam cannon and turn it clockwise.
- Install the foam cannon onto the lance. The foam cannon is installed and removed in the same manner as the nozzles.
- Turn the water on and start the pressure washer.
- Squeeze the trigger and wait several seconds for detergent to appear in the water stream.
- Start cleaning at the bottom of the surface and work your way up in a side-to-side motion. Do not allow soap to dry on the surface being cleaned.
- Release the trigger to stop the pressure washer.
- Allow the motor to come to a complete stop before squeezing the trigger again.
![warning]() NOTE: Squeezing the trigger rapidly will cause the auto-start feature to miss an on/off cycle and may prevent the washer from turning on. Use slow, deliberate trigger pulls to avoid this.
NOTE: Squeezing the trigger rapidly will cause the auto-start feature to miss an on/off cycle and may prevent the washer from turning on. Use slow, deliberate trigger pulls to avoid this. - When you are finished, remove excess detergent from the soap bottle and fill it with clean water. Spray the water through the foam cannon to flush the system.
To clean without detergent:
- Stop the pressure washer and turn the water faucet completely off.
- Point the spray gun in a safe direction and pull the trigger to release the water pressure.
- If installed, remove the foam cannon.
- Install an appropriate nozzle for the task you are performing.
- Turn the water on and start the pressure washer.
- Release the safety lock and begin pressure washing by squeezing the trigger all the way into the handle.
![warning]() NOTE: Always test in a small inconspicuous area to avoid or reduce damage.
NOTE: Always test in a small inconspicuous area to avoid or reduce damage. - Start cleaning at the bottom of the surface and work your way up in a side-to-side motion.
OPERATING TIPS
- It is normal to hear the motor run intermittently when the trigger is not being squeezed. The pump is priming itself to operate when the trigger is squeezed again.
- To avoid damaging surfaces:
- Always use an appropriate nozzle
- Reduce water pressure by adjusting the angle of the stream or by increasing the distance from the nozzle to the surface.
- Always spray detergent on a dry surface. Do not pre-soak surface. Wetting the surface first dilutes the detergent and reduces its cleaning ability.
- For tough stains, it may be necessary to reapply the detergent and use a bristled brush to scrub the stain.
- Keep a nozzle cleaning tool nearby for unclogging the nozzles.
- The O-rings in the high pressure hose should be cleaned regularly and lubricated with non-water soluble grease such as petroleum jelly.
- Turn off the pressure washer after five minutes of inactivity.
CARE AND MAINTENANCE
ALWAYS turn off the pressure washer, release the pressure in the spray gun, and unplug the pressure washer before performing maintenance.
Replace damaged or worn items with recommended or equivalent replacement parts. Using an incorrect or incompatible part might create a hazard that could result in serious personal injury.
NOTICE
Check the physical condition of the product prior to each use. Look for loose bolts, fluid leaks, and other signs of wear. Replace all damaged items. For replacement parts or assistance, contact our customer service team.
To prolong the life of this product, follow the care and maintenance instructions in this section. Contact customer service before servicing any recall or warranty parts.
CLEANING THE PRESSURE WASHER
Do not store or operate your pressure washer in dirty, dusty, or corrosive environments. Do not allow foreign materials and debris to clog the vents on the unit.
NEVER clean the pressure washer with a garden hose. Water can damage the pressure washer's electrical components. If the unit needs to be cleaned, use a soft brush and damp cloth to clean the exterior and use low pressure air (no greater than 25 psi) to clean the vents.
Never use gasoline as a cleaning agent.
CLEANING THE NOZZLES
See Figure 14:

FIG. 14
- Nozzle Cleaning Tool
- Nozzle
- Stop the pressure washer and turn the water faucet completely off.
- Release the pressure in the spray gun and unplug the pressure washer.
- Remove the nozzle from the spray gun.
- Use a nozzle cleaning tool or fine needle to clean debris from the inside of the nozzle.
- Using a garden hose, back flush water through the nozzle.
- When the nozzle is clean, place it back on the lance or in the nozzle storage area.
CLEANING THE WATER INLET SCREENS
See Figure 15:

FIG. 15
- Water Inlet
- Screen
The screens inside the water inlet should be cleaned periodically. Remove the screens, rinse them with clean water, and place them back in the inlet.
STORAGE
See Figure 16:

NOTE: Use commercially available pump protectors to extend the life of the pump. Follow the manufacturer's instructions for use.
- Release the pressure in the spray gun and unplug the pressure washer. Wrap the cord around the cord retainer.
- Disconnect the garden hose and the high pressure hose.
- Tilt the pressure washer to allow excess water to drain from the threaded outlet.
- Remove all nozzles and place them in the nozzle storage area.
- Disassemble the spray gun and lance.
- Store the pressure washer and accessories in a dry, covered location away from extreme heat which could dry out the pump seals and extreme cold which could cause freeze damage.
Maintenance parts can be purchased directly from the factory. A partial list of maintenance parts is below. For a complete list of maintenance parts or for additional information email us at service@wpowereq.com or call 1-855-944-3571.
Inlet Filter: 04000182-0
Foam Cannon: 02000510-0
Turbo Nozzle: 02000313-0
15˚ Nozzle: 03000260-0
25˚ Nozzle: 03000270-0
Do not use attachments or accessories that are not recommended for use with this product. Making unauthorized modifications and using incompatible accessories can damage the unit and void your warranty.
TROUBLESHOOTING
| PROBLEM | POSSIBLE CAUSE | CORRECTION |
| Unit will not turn on. | Pressure washer is not connected to a power source or the power source isn't grounded | Connect the power cord to a grounded 120 Volt outlet |
| Water pressure is in the hose | Pull the trigger to release the water pressure. | |
| GFCI is tripped | Press the RESET button on the power cord | |
| Defective motor or power cord. | Contact Westinghouse customer service toll-free at 1 (855) 944-3571. | |
| The unit is running but there is no water flow. | Improper water source | Connect the pressure washer to a water main. Do not use this device with water from a lake, pool, pond, etc. |
| Clogged nozzle | Clean the nozzle | |
| Defective spray lance | Replace the lance | |
| Water is leaking where the hose connects to the spray gun. | Defective or missing O-ring between the high pressure hose and the spray gun. | Replace the o-ring. |
| The pressure washer turns on for 2 seconds, shuts off, and will not turn back on. | The auto-start feature is turning the unit off. | When the pressure washer is turned on, the motor may run for 1 - 2 seconds to prime the pump. Then it will automatically shut off until the spray gun trigger is squeezed. This is normal and does not indicate a problem. |
HAVE QUESTIONS?
Email us at service@wpowereq.com or call 1-855-944-3571
Documents / Resources
References
![www.p65warnings.ca.gov]() http://www.p65warnings.ca.gov
http://www.p65warnings.ca.govWarranty Registration | Westinghouse Outdoor Equipment
![www.p65warnings.ca.gov]() http://www.p65warnings.ca.gov/product
http://www.p65warnings.ca.gov/product

Download manual
Here you can download full pdf version of manual, it may contain additional safety instructions, warranty information, FCC rules, etc.
Advertisement


Need help?
Do you have a question about the ePX3100V and is the answer not in the manual?
Questions and answers