Advertisement
Quick Links
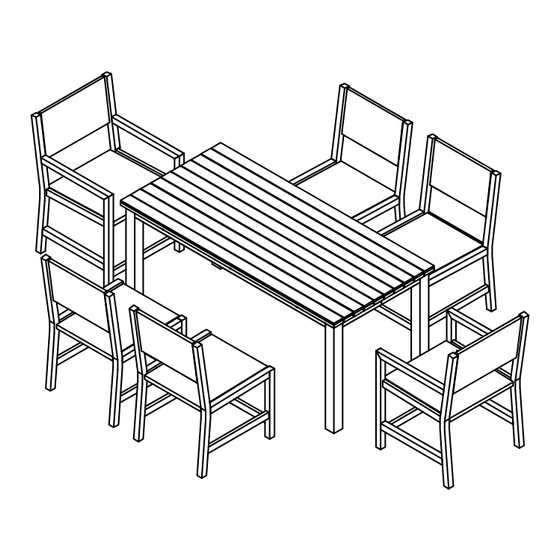
ASSEMBLY INSTRUCTION DINNING SET
MONTAGEANLEITUNG ESSZIMMERSET
WF317971 ; WF317972 ; WF317973 ; WF317974
Notice
1.
50% Tighten before fixings all screws, Allen wrench is recommended
instead of an electric drill.
2.
Place the item on a flat ground to adjust and make sure it remains
stable.
3.
Tighten up all screws with tools gradually.
If the screws are not aligned with holes during assembly, please loosen
4.
all all the other screws to 50% and continue the assembly process.
5.
If the item is not stable, please loosen all the screws, adjust it on a flat
ground and tighten up all screws again.
6.
Note: If one or more screws are fully tightened during assembly,
chances are the others will not be aligned with holes. In addition, all the
holes are disigned to be relatively larger to provide more space for the
adjustment of the screws.
Setzen Sie vor der Installation die Schrauben in die Löcher ein und ziehen Sie
ÿsie fest, aber ziehen Sie sie nicht zu 100 % an, 70 % bis 80 % reichen aus.
Schließlich, nachdem alle Schrauben installiert sind, ziehen Sie alle Schrauben
zu 100 % an. Wenn Sie auf diese Probleme stoßen Wenn beispielsweise die
Löcher nicht ausgerichtet werden können oder einige Teile nicht installiert
werden können, überprüfen Sie bitte, ob die Schrauben richtig verwendet
werden, und passen Sie den festen Sitz der Schrauben an.
0 1 /13
Advertisement

Related Manuals for Otto WF317971


Summary of Contents for Otto WF317971
- Page 1 ASSEMBLY INSTRUCTION DINNING SET MONTAGEANLEITUNG ESSZIMMERSET WF317971 ; WF317972 ; WF317973 ; WF317974 Notice 50% Tighten before fixings all screws, Allen wrench is recommended instead of an electric drill. Place the item on a flat ground to adjust and make sure it remains stable.
- Page 2 (x4) 02/13...
- Page 3 2 pcs 3 pcs 2 pcs 4 pcs 2 pcs 2 pcs 2 pcs 2 pcs 2 pcs 4 pcs 4 pcs 4 pcs 4 pcs 4 pcs 03/13...
- Page 4 Bolt M6x55 mm Bolt M6x60 mm Bolt M8x50 mm (48 pcs)+extra 3 pcs (12 pcs)+extra 2 pcs (8 pcs)+extra 1 pc Schraube M8x50 mm Schraube M6x60 mm Schraube M6x55 mm (8 Stück) + 1 Stück extra (12 Stück) + 2 Stück extra (48 Stück) + 3 Stück extra Bolt M6x35 mm Screw M6x70 mm...
- Page 5 Bolt Bolt Bolt Bolt M8x50 mm M6x55 mm M6x60 mm M6x35 mm Please note that the shapes of bolt 1 and 2 and 3 and 4 are similar. Please install according to the instructions and distinguish them! Bitte beachten Sie, dass die Formen der Bolzen 1 und 2 und 3 und 4 ähnlich sind.
- Page 6 WF 317971 B x3 C x2 A x2 D x4 WF 317972 N x 2 J x 2 L x 2 K x 2 M x 2 WF 317973 N x 2 L x 2 J x 2 K x 2 M x 2 WF 317974 I x2...
- Page 7 Step 1 A x 2 B x 3 2 x 12 5 x 6 Connect Two Top Table (A) , tighten Bolt (2) , Screw (5) with Allen Key (8). Verbinden Sie die beiden oberen Tische (A), ziehen Sie die Schraube (2) und die Schraube (5) mit dem Inbusschlüssel (8) fest.
- Page 8 Step 3 100% D x 4 1 x 8 Connect the Part from Step 2 & the Leg Table (D),(D) tighten Bolt (1) & flat Washer & Allen Key (8). Verbinden Sie das Teil aus Schritt 2 mit dem Beintisch (D), (D) und ziehen Sie die Schraube (1), die Unterlegscheibe und den Inbusschlüssel (8) fest.
- Page 9 Step 5 100% Finish Table Finish-Tabelle Step 6 x2 G x 1 F x 1 3 x 2 Cornect seater chair (G) with leg chair (F), tighten bolt (3), Allen key (8) Cornect-Sitzstuhl (G) mit Beinstuhl (F), Schraube (3) festziehen, Inbusschlüssel (8) Step 7 x 2 E x 1 3 x 2...
- Page 10 Step 8 x 2 Connect the Part from Step 7 & brace your feet (I), Screw (5), Allen key (8) Verbinden Sie das Teil aus Schritt 7 und stützen Sie Ihre Füße ab (I), Schraube (5), Inbusschlüssel (8). Step 9 x2 H x 1 Connect the Part from Step 8 &...
- Page 11 Step 11 x4 L x 1 K x 1 3 x 2 Cornect seater chair ( L) with leg chair (K), tighten bolt (3), Allen key (8) Cornect-Sitzstuhl (L) mit Beinstuhl (K), Schraube (3) festziehen, Inbusschlüssel (8) Step 12 x4 J x 1 3 x 2 Connect the Part from Step 11 &...
- Page 12 Step 13 x4 N x 1 5 x 2 Connect the Part from Step 12 & brace your feet (N), Screw (5), Allen key (8) Verbinden Sie das Teil aus Schritt 12 und stützen Sie Ihre Füße ab (N), Schraube (5), Inbusschlüssel (8).
- Page 13 Step 15 x4 100% Finish Armrest Beenden Sie die Armlehne Step 16 13/13...
Need help?
Do you have a question about the WF317971 and is the answer not in the manual?
Questions and answers