Table of Contents
Advertisement
Quick Links
Advertisement
Table of Contents

Related Manuals for CLA-VAL D35


Summary of Contents for CLA-VAL D35
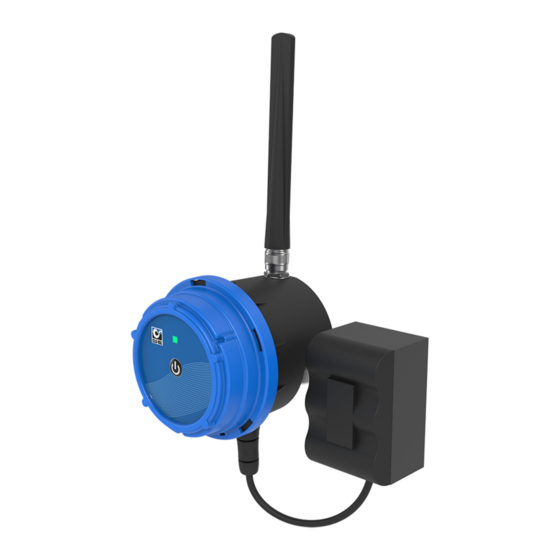
- Page 1 CLA-VAL D35 Autonomous Electronic Valve Controller User Manual CLA-VAL Europe www.cla-val.ch cla-val@cla-val.ch 1 - D35001UE A 07/23 © Copyright CLA-VAL Europe - Specifications subject to change without notice - no contractual illustrations. Reduce your waste - Sort your rubbish...
-
Page 2: Table Of Contents
9.2 Navigation Menus ........................12 9.3 Simplified / Advanced Mode ....................12 CLA-VAL Europe www.cla-val.ch cla-val@cla-val.ch 2 - D35001UE A 07/23 © Copyright CLA-VAL Europe - Specifications subject to change without notice - no contractual illustrations. Reduce your waste - Sort your rubbish... - Page 3 10.2 Non-Conformity Return (NCR) ....................29 Accessories ........................30 CLA-VAL Europe www.cla-val.ch cla-val@cla-val.ch 3 - D35001UE A 07/23 © Copyright CLA-VAL Europe - Specifications subject to change without notice - no contractual illustrations. Reduce your waste - Sort your rubbish...
-
Page 4: Introduction
Do not connect or disconnect the battery of the product in hazardous locations such as a damp room. Using batteries other than those supplied by CLA-VAL may lead to a risk of explosion and void the product warranty. The battery provided with the product is not rechargeable and must be disposed properly at end of life. -
Page 5: D35 Characteristics
Refer to the D3500 wiring diagram for connection details. CLA-VAL Europe www.cla-val.ch cla-val@cla-val.ch 5 - D35001UE A 07/23 © Copyright CLA-VAL Europe - Specifications subject to change without notice - no contractual illustrations. Reduce your waste - Sort your rubbish... -
Page 6: Sensor Mounting
Installation is not recommended for signal quality under -95 dBm. As the cellular network quality may fluctuate strongly across the site, it is recommended to test at different locations. If network quality at the installed location is not sufficient, it may be necessary to relocate the D35 or extend its antenna with adequate CLA-VAL extension cables. -
Page 7: Network Quality Between -80 Dbm And -95 Dbm
NETWORK QUALITY BETWEEN -80 dBm and -95 dBm If the signal quality at the valve level is between -80 dBm and -95 dBm, check if the D35 can be installed closer to the well opening, while maintaining a maximum distance of 3 m to the pressure sensors. If this is not possible, an antenna extension with optional CLA-VAL antenna extension cables might be necessary. -
Page 8: Orientable Bracket Installation
An optional orientable wall-mounted or valve bracket for D35 is also available. 5.3.3 STRANDARD INSTALLATION The standard installation of the D35 on the wall should be, as close as possible to the well opening, but not further than 3 m from the pressure sensor(s) connection(s) on the valve. CLA-VAL Europe www.cla-val.ch... -
Page 9: Connection
A 3FF/Micro-SIM format is necessary for data communication compatible with LTE cat-M1, NB-IoT, or GPRS. CLA-VAL can optionally provide a SIM card. If another SIM card than the one supplied by CLA-VAL is used refer to chapter 9.12 « Custom SIM Card »... -
Page 10: Operating Mode
Switch to "Acquisition" mode on your D35 as indicated in Figure 4 (from "Standby" mode, press the button for 5 seconds) INSTALLATION VALIDATION The simplest and fastest way to verify the successful start of the product is to use the D35 LED. The LED flashes green every 10 seconds when in "Acquisition" mode. -
Page 11: Tool & Configuration
The default password is: D35_< last 4 digits of the series serial number > We strongly recommend changing the default password at first installation. Note: The network generated by the D35 has no Internet access. Any error messages about this can be ignored. Enter the address http://192.168.4.1... -
Page 12: Navigation Menus
Note: Some parameters require switching to "ADVANCED MODE". These settings are indicated in the manual by the following icon: CLA-VAL Europe www.cla-val.ch cla-val@cla-val.ch 12 - D35001UE A 07/23 © Copyright CLA-VAL Europe - Specifications subject to change without notice - no contractual illustrations. Reduce your waste - Sort your rubbish... -
Page 13: Basic System Settings
Periodic synchronization is recommended. This operation can only be performed if the D35 is connected to the cellular network (option). If not, go directly to step 8. -
Page 14: Input/Output: Color Coding
Autonomous Electronic Valve Controller Click on "SYNCHRONIZE NOW" to update your unit's clock immediately. This operation can only be performed if the D35 is connected to the cellular network (option). If not, go directly to step 8. Check that the time displayed on the clock under the navigation menu is correct. If not, you can manually set the time in "Manually set date and time". -
Page 15: Analogue Input Settings
Click on an input to reach its configuration page. CLA-VAL Europe www.cla-val.ch cla-val@cla-val.ch 15 - D35001UE A 07/23 © Copyright CLA-VAL Europe - Specifications subject to change without notice - no contractual illustrations. Reduce your waste - Sort your rubbish... -
Page 16: Input Test
When you exit the "Configuration" mode, all overridden inputs are automatically released. CLA-VAL Europe www.cla-val.ch cla-val@cla-val.ch 16 - D35001UE A 07/23 © Copyright CLA-VAL Europe - Specifications subject to change without notice - no contractual illustrations. Reduce your waste - Sort your rubbish... -
Page 17: Connecting A Flowmeter
Click "SAVE" to apply the changes. 1. + 2. + 3. CLA-VAL Europe www.cla-val.ch cla-val@cla-val.ch 17 - D35001UE A 07/23 © Copyright CLA-VAL Europe - Specifications subject to change without notice - no contractual illustrations. Reduce your waste - Sort your rubbish... -
Page 18: Setting The Parameters Of A Solenoid
When you exit the "Configuration" mode all outputs that have been forced are automatically released. CLA-VAL Europe www.cla-val.ch cla-val@cla-val.ch 18 - D35001UE A 07/23 © Copyright CLA-VAL Europe - Specifications subject to change without notice - no contractual illustrations. Reduce your waste - Sort your rubbish... -
Page 19: Event Setting
Click "SAVE" to apply the changes. 9.10 VALVEFLOW™ SETTING (OPTION) The ValveFlow allows calculating the flow through a CLA-VAL valve, thanks to inlet pressure, outlet pressure, and valve opening. Configure the ValveFlow by clicking on " ValveFlow ". -
Page 20: Valvapps
To activate the operation of the Actions, select the "Enabled" box. Click on "SAVE". CLA-VAL Europe www.cla-val.ch cla-val@cla-val.ch 20 - D35001UE A 07/23 © Copyright CLA-VAL Europe - Specifications subject to change without notice - no contractual illustrations. Reduce your waste - Sort your rubbish... - Page 21 The action with the value closest to 1 has priority, in case of a tie the order of the actions prevails. CLA-VAL Europe www.cla-val.ch cla-val@cla-val.ch 21 - D35001UE A 07/23 © Copyright CLA-VAL Europe - Specifications subject to change without notice - no contractual illustrations. Reduce your waste - Sort your rubbish...
- Page 22 Minimum duration [s]: The maximum time the condition can be true. Set the value to 0 to disable this feature. Only available in advanced mode CLA-VAL Europe www.cla-val.ch cla-val@cla-val.ch 22 - D35001UE A 07/23 © Copyright CLA-VAL Europe - Specifications subject to change without notice - no contractual illustrations. Reduce your waste - Sort your rubbish...
- Page 23 When?: The list of days and months when the condition is valid. CLA-VAL Europe www.cla-val.ch cla-val@cla-val.ch 23 - D35001UE A 07/23 © Copyright CLA-VAL Europe - Specifications subject to change without notice - no contractual illustrations. Reduce your waste - Sort your rubbish...
-
Page 24: Custom Sim Card (Communication Option)
Click the "SAVE" button in the "SIM card settings" section to apply the configuration. CLA-VAL Europe www.cla-val.ch cla-val@cla-val.ch 24 - D35001UE A 07/23 © Copyright CLA-VAL Europe - Specifications subject to change without notice - no contractual illustrations. Reduce your waste - Sort your rubbish... -
Page 25: Checking The Quality Of The Network (Communication Option)
Check the dBm value by hovering over the network quality icon. CLA-VAL Europe www.cla-val.ch cla-val@cla-val.ch 25 - D35001UE A 07/23 © Copyright CLA-VAL Europe - Specifications subject to change without notice - no contractual illustrations. Reduce your waste - Sort your rubbish... -
Page 26: Register On Link2Valves (Communication Option)
Choose the transfer interval and the time when the transfer will start. This interval will determine the frequency of communications of the D35 and Link2Valves. Please note that a faster interval will have a negative impact on the battery life and generate potential additional data communication costs. -
Page 27: Logging Setting
Associate the D35 unit with your Link2Valves user account. First, enter the email address of your Link2Valves account. If you do not have one, please contact CLA-VAL to get one for free. Then click on "REGISTER NOW" and wait for the message "Success! ". -
Page 28: Battery Control
Go in advanced mode, click on Click on the " System" menu. CLA-VAL Europe www.cla-val.ch cla-val@cla-val.ch 28 - D35001UE A 07/23 © Copyright CLA-VAL Europe - Specifications subject to change without notice - no contractual illustrations. Reduce your waste - Sort your rubbish... -
Page 29: Support
Click on the "UPLOAD FIRMWARE" button and wait a few minutes. Completely power off the D35 to apply the update. To do so, press the product button for 5 seconds to turn off the WiFi. Make sure the LED flashes green every 10 seconds, indicating that the product is in "Acquisition" mode Then press the main button for 10 seconds to completely switch off the D35 (a red flash appears after 10 seconds) Once this step is complete you can restart the device and go back to configuration mode. -
Page 30: Accessories
Internal battery replacement MEXE-B11-01 External High-Capacity battery replacement CLA-VAL Europe www.cla-val.ch cla-val@cla-val.ch 30 - D35001UE A 07/23 © Copyright CLA-VAL Europe - Specifications subject to change without notice - no contractual illustrations. Reduce your waste - Sort your rubbish...
Need help?
Do you have a question about the D35 and is the answer not in the manual?
Questions and answers