
Related Manuals for Candy CA6 N5B3EYTX


Summary of Contents for Candy CA6 N5B3EYTX
- Page 1 FULL USER MANUAL (EN) Quick guide l (FR) Guide rapide (IT) Guida veloce www.candy-home.com CANDY HOOVER GROUP Via Comolli 16 Brugherio - Italy...
- Page 2 English Deutsch Français Italiano Español Nederlands Português Slovenčina Slovenščina Polski Čeština Dansk Suomi Norsk Svenska Hrvatski WELCOME Română Thank you for choosing our product. To ensure your safety and get Türkçe the best results, please read this manual carefully, including the sa- fety instructions, and keep it for future reference.
-
Page 3: Table Of Contents
SUMMARY 1.SAFETY INFORMATION SAFETY INFORMATION GENERAL WARNINGS PRODUCT INTRODUCTION • Do not use a steam cleaner for cleaning operations. 2.1. Overview of the product • CAUTION: in order to avoid a hazard due to inadvertent re- 2.2. Accessories 2.3. Control panel setting of the thermal cut-out, this appliance must not be supplied 2.4. - Page 4 mospheric agents. • WARNING: Accessible parts may become hot during use. Young • This appliance is designed to be used at altitude lower than 2000m. children should be kept away. ELECTRICAL WARNINGS INSTALLATION WARNINGS • The socket must be suitable for the load indicated on the tag and •...
- Page 5 cables is not recommended; putting food inside the oven. ln any case, the condensation disap- – in case of malfunction and/or poor operation, switch off the pears when the oven reaches the cooking temperature. appliance and do not tamper with it. •...
-
Page 6: Product Introduction
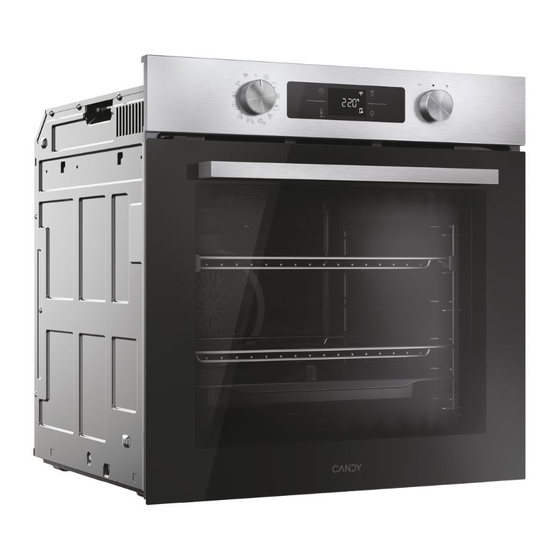
Telescopic Guides (only if present*) Softclose/Soft open hinges (only if present*) 2. PRODUCT INTRODUCTION 2.1. OVERVIEW OF THE PRODUCT 1. Control panel 2. Shelf positions numbers 3. Grids 4. Trays 5. Fan cover 6. Oven door Telescopic oven rails are shelves that can be Soft close and open hinges control the door’s 7. -
Page 7: Control Panel
Light Press to turn on/off the oven cavity light. Hereby, Candy Hoover Group Srl declares that the radio equipment is in compliance with Direc- tive 2014/53/EU and with the relevant statutory requirements for the UK market. The full text of the declaration of conformity is available at the following internet address: www.candy-group.com... - Page 8 HOW TO INTERACT WITH THE APP Your appliance may be connected to your home wireless network and operated remotely using the Step 2 app. Connect your appliance to ensure it stays up to date with the latest software and features. •...
- Page 9 HOW TO CHANGE WIFI SETTINGS Step 5 Once the appliance is enrolled, the user can change the WIFI settings between: • WIFI ON: It is only possible to monitor the oven status by App. • After turning on, the hOn app will start •...
-
Page 10: Before Starting
3. BEFORE STARTING It’s also possible to activate Remote Control during cooking process by pressing related button. 3.1. INFORMATION TO START PRESS REMOTE When you first turn on the oven, you might notice some smoke. Don’t worry, just wait for the smoke to CONTROL clear before using the oven. -
Page 11: First Usage
3.2. FIRST USAGE BRIGHTNESS: The display shows the symbol “br”. The numbers represent the level of brightness in- When the appliance is switched On for the first time, the initial step is to set time of day, choose be- tensity, editable turning the right knob. To confirm press tween 13 ampere or 16 ampere, select brightness and sound level. -
Page 12: Operation Of Product
4. OPERATION OF PRODUCT COOKING DURATION Allows to preset the cooking time required for the recipe chosen. 4.1. HOW THE PRODUCT WORKS ACTIVATION: press to enter in the Time menu. Tap as many times as you need to select “Cooking SWITCHING ON/OFF THE OVEN duration”... -
Page 13: Cooking Functions
ADDITIONAL FUNCTIONS 4.2. COOKING FUNCTIONS CHILD LOCK FAST PREHEATING OPTION This function allows you to lock the screen to prevent any unwanted use by minors. To activate the In order to accelerate preheating phase, the fast-preheating option can be selected by pressing the screen lock, press and hold down the Remote Control and Lamp buttons simultaneously. -
Page 14: Special Functions
5. COOKING GUIDELINES IDEAL FOR: whole pieces of 5.1. GENERAL COOKING TABLE meat (roasts) or gratinated foods. Use with the door 200°C Yes/Fast closed. Slide the drip tray Cooking N°of Cooking Cooking Shelf **Gratin(***) L4/L5 Category Recipe T°C Preheat time after 150-250°C preheat under the shelf to collect... - Page 15 Cooking Cooking N°of Cooking Cooking Shelf N°of Cooking Cooking Shelf Category Recipe T°C Preheat time after Category Recipe T°C Preheat time after levels program accessory position levels program accessory position preheating* (min) preheating* (min) Metal grid Metal grid Static 200°C L1 or L2 30-50 + Quiche tin...
-
Page 16: Everyday Cooking Tables
5.2. EVERYDAY COOKING TABLE Cooking Cooking Shelf Cooking time Recipe Serving size T°C Food category menu allows to cook a variety of recipes without preheating the oven, thanks to dedi- program accessory position (min) cated cooking programs tailored to each category needs. After selecting the cooking program, the default time will be shown and can be edited by turning the Beef roast 500-800g... -
Page 17: Care & Cleaning
6. CARE & CLEANING Cooking Cooking Shelf Cooking time Recipe Serving size T°C 6.1. GENERAL RECOMMENDATIONS program accessory position (min) Mixed Regular cleaning can extend the lifecycle of your appliance. Wait for the oven to cool before carrying 1 tray Vegetables 190°C Metal grid... - Page 18 6.2.2. OUTSIDE THE OVEN: removal and cleaning the glass door Aquactiva The Aquactiva function is designed to effortlessly tackle light dirt and provide a quick and eco-friend- ly solution for cleaning your oven cavity using the power of steam. Position the door at 90°. Rotate the hinge locking tabs outward from the oven.
- Page 19 6.3 CLEANING OF ACCESSORIES Ensure that you clean the accessories thoroughly after every use and dry them using a towel. For per- Insert the glass panels, making sure that sistent residues, consider soaking the accessories in a mixture of water and soap for approximately 30 the “Low-E”...
-
Page 20: Maintenance
Changing the lateral bulb: 6.4 MAINTENANCE Disconnect the oven from mains supply. Use a flat-head screwdriver by positioning it to the side of the protective glass and gently apply COMPONENTS REPLACEMENT pressure to remove it. Carefully grasp the bulb from its base. Changing the bulb on top: Insert the new one. -
Page 21: Troubleshooting
8. ENVIRONMENTAL PROTECTION & DISPOSAL 7. TROUBLE SHOOTING 8.1. APPLIANCE DISPOSAL If, during oven use, an error occurs, the display will show the code “ER” followed by two digits, which will identify the error. This appliance is labelled in accordance with European Directive 2012/19/EU regarding Proceed by turn off the oven and un-plug it, wait for a few minutes, and then reconnect it. -
Page 22: Installation
9. INSTALLATION 11 0 m 8 , 5 4 , 5 INSTALLATION DIMENSIONI FORNO x . 5 575 570 484,5 Vista posteriore Vista laterale EN 42 EN 43... - Page 23 FISSAGGIO IN COLONNA x . 5 EN 44 EN 45...
- Page 24 WILLKOMMEN BIENVENUE Vielen Dank, dass Sie sich für unser Produkt entschieden haben. Um Merci d’avoir choisi notre produit. Pour garantir votre sécurité et Ihre Sicherheit zu gewährleisten und die besten Ergebnisse zu erzie- obtenir les meilleurs résultats, veuillez lire attentivement ce manuel, len, lesen Sie bitte dieses Handbuch, einschließlich der Sicherheit- y compris les consignes de sécurité, et le conserver afin de pouvoir le shinweise, sorgfältig durch und bewahren Sie es zum späteren Nach-...
- Page 25 BENVENUTI Grazie per aver scelto il nostro prodotto. Per garantire la sicurezza e ottenere i migliori risultati, leggere attentamente questo manua- le, comprese le istruzioni di sicurezza, e conservarlo per riferimenti futuri. Prima di installare il forno, prendere nota del numero di serie, in quanto potrebbe essere necessario in caso di riparazioni.
Need help?
Do you have a question about the CA6 N5B3EYTX and is the answer not in the manual?
Questions and answers