Table of Contents
Advertisement
User manual
for Spectrum One
This manual provides information on monitor features,
setting up and using the monitor, and technical
specifications, for the following 27" IPS Spectrum One
monitors developed by Dough:
ES07D03, ES07DC9, ES07E30
Friday, 15 December, 2023
Dough Spectrum One user manual rev. 87
Advertisement
Table of Contents

Related Manuals for DOUGH Spectrum One


Summary of Contents for DOUGH Spectrum One
- Page 1 User manual for Spectrum One This manual provides information on monitor features, setting up and using the monitor, and technical specifications, for the following 27” IPS Spectrum One monitors developed by Dough: ES07D03, ES07DC9, ES07E30 Friday, 15 December, 2023 Dough Spectrum One user manual rev. 87...
- Page 2 The information contained herein is subject to change without notice. The only warranties for Dough products and services are set forth in the express warranty statements accompanying such products and services. Nothing herein should be construed as constituting an additional warranty.
-
Page 3: About This Manual
About this manual CAUTION Indicates there's a hazardous situation that could be dangerous and cause injury or even death. It's important to follow the instructions closely to avoid this risk. IMPORTANT Indicates that the information is significant, but not necessarily hazardous. It could relate to the proper functioning of your device or avoiding property damage or data loss. -
Page 4: Table Of Contents
About this manual ........................3 Table of contents ........................4 Getting started ........................8 Important safety information ..........................8 About Spectrum One ............................9 Front components ............................... 10 Rear components ..............................10 Rear components ..............................11 Setting up Spectrum ......................12 Installing the Spectrum Stand .......................... - Page 5 Select video input source ..........................37 Volume ................................37 Split-screen mode ............................37 Secondary input source ..........................37 Audio source ..............................38 USB Type-C port mode ..........................38 HDMI port 1 mode ............................38 HDMI port 2 mode ............................38 DisplayPort mode ............................
- Page 6 Performance menu ............................46 Low-latency mode ............................46 Adaptive-Sync / VRR ............................46 Response time overdrive ..........................46 User-defined overdrive ..........................46 Backlight strobing ............................46 User-defined pulse width ..........................46 User-defined pulse phase ..........................46 OSD menu ................................47 Language ................................
- Page 7 Image quality ..............................61 Speed .................................. 61 Technology ................................62 Ports ..................................62 Video input .................................62 USB hub ................................63 Audio .................................. 63 Features ................................63 Adjustment ................................64 Stand ..................................64 Size and weight ..............................64 Electrical and operating requirements ......................65 Limited warranty..............................
-
Page 8: Getting Started
Getting started Important safety information Only use the power cord and AC adapter that came with your monitor. They're designed to work together and have been tested to ensure they're safe. Always plug the power cord into an outlet that's easy to reach. When you need to unplug the monitor, hold the plug firmly and pull it out of the outlet. -
Page 9: About Spectrum One
About Spectrum One At Dough, we believe in putting product decisions in the hands of the end-user. Each and every aspect throughout the development process has been debated and discussed together with our community, a gathering of 10 000 tech enthusiasts who love premium devices with bleeding-edge technology. -
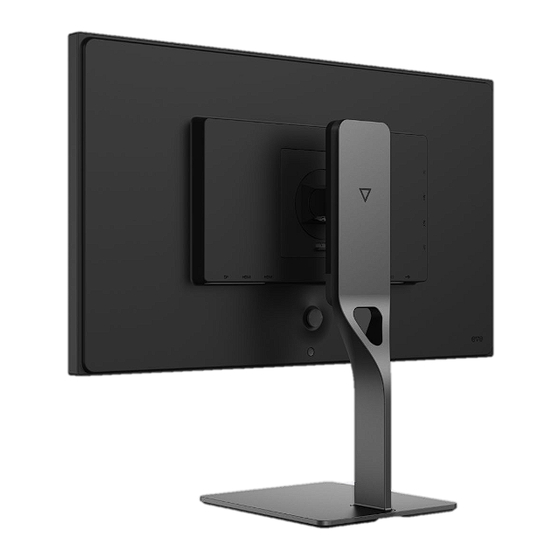
Page 10: Front Components
Front components Component Description Indicator light Identifies the current state of the monitor. Rear components Component Description Stand/VESA connector Allows you to connect the Spectrum Stand or a VESA-compatible mounting device OSD joystick Opens the OSD menu, selects an item from the menu, or closes the OSD menu. -
Page 11: Rear Components
Rear components Component Description DisplayPort 1.4 port Connect a DisplayPort cable to a source device such as a computer. HDMI 2.1 port 1 Connect an HDMI cable to a source device such as a computer or game console. HDMI 2.1 port 2 Connect an HDMI cable to a source device such as a computer or game console. -
Page 12: Setting Up Spectrum
Setting up Spectrum It is important to set up your monitor correctly. That way you keep your gear and yourself safe, so you can focus on enjoying your equipment without worry. IMPORTANT To prevent damage to the monitor, do not touch the surface of the LCD panel. Pressure on the panel may cause nonuniformity of color or disorientation of the liquid crystals. - Page 13 3. Insert the top of the stand into the back of the monitor cabinet at an angle, then press down. The stand will click into place. NOTE The Dough Spectrum Stand (model ES07D04) is sold separately. Setting up Spectrum...
-
Page 14: Removing The Spectrum Stand
To prevent the screen from getting scratched, defaced, or broken, cover your work surface with protective sheet foam or a non-abrasive cloth. 3. Slide up the quick-release button on the stand and lift the stand away from the monitor. NOTE The Dough Spectrum Stand (model ES07D04) is sold separately. Setting up Spectrum... -
Page 15: Attaching A Vesa Mount
Attaching a VESA mount Spectrum is compatible with most VESA mounting arms and mounts (sold separately). The VESA mount must support the 100×100mm VESA Mounting Standard and should be rated to hold at least 5.0kg of weight. IMPORTANT You might need additional tools such as a screwdriver (purchased separately) when you attach a mounting device. - Page 16 IMPORTANT These are generic instructions that may not apply to your mounting device. Always follow the mounting device manufacturer’s instructions when mounting the monitor to a wall or swing arm. Spectrum comes with four M4×10mm screws. To ensure that your monitor is mounted securely, you may need to use screws of a different length, that may or may not have been provided with your mounting device.
-
Page 17: Connecting The Power Cable
Connecting the power cable Connect the power cord to the AC adapter and plug the other end into a grounded AC outlet. Then connect the adapter to the DC power connector on the rear of the monitor. CAUTION To reduce the risk of electric shock or damage to the equipment: Only use the power cord and AC adapter that came with your monitor. -
Page 18: Connecting Video Cables
Connecting video cables • Connect one end of an HDMI cable to one of the HDMI ports along the bottom of the monitor, and the other end to the HDMI port on the source device; • Connect one end of a DisplayPort cable to the DisplayPort connector along the bottom of the monitor, and the other end to the DisplayPort connector on the source device;... - Page 19 NOTE The monitor automatically determines which inputs have valid video signals. You can also select inputs manually using the on-screen display (OSD) menu. With so many ports available, it isn’t surprising that not everyone intends to use the same cable types or cable lengths. Our surveys show that because of this, more than half the cables we could have included in the box would have gone to waste.
-
Page 20: Connecting Usb Devices
Connecting USB devices The built-in USB hub Spectrum has a built-in USB hub that allows you to connect multiple devices to your computer with a single cable. The USB hub lets you plug in many devices at once, even if your computer doesn't have enough built-in ports. -
Page 21: Connecting Peripheral Devices
Connecting peripheral devices The side of the monitor provides one USB Type-C and two USB Type-A downstream ports. You can use these to connect devices such as a mouse, keyboard, phone, external hard drive or solid-state drive, and practically anything that is USB-connected. The monitor can also charge attached devices, at up to 15W through the USB Type-C port, or up to 10W through the USB Type-A ports. -
Page 22: Connecting To The Usb Host Device(S)
Connecting to the USB host device(s) The bottom of the monitor provides one USB Type-B and one USB Type-C upstream port. Either can be used to connect the built-in USB hub to a host device. Connecting both USB ports along the bottom to two separate host devices simultaneously allows you to select which of the connected host devices controls the USB hub from the on-screen display (OSD) menu. - Page 23 NOTE You must connect either one of, or both the USB upstream ports along the bottom of the monitor to the host device (computer, laptop, gaming console) to make use of USB ports of the built-in USB hub. When connected by a single USB Type-C cable, Spectrum may not be able to simultaneously operate the built-in USB hub at its full speed and run the display at its maximum resolution, refresh rate, and color depth due to technical limitations.
-
Page 24: Connecting An Audio Device
Connecting an audio device Spectrum has a built-in digital-to-analog converter (DAC) that sends audio signals from the video source device to the amplified 3.5mm audio jack connector on the rear of the monitor. • Connect the 3.5mm audio jack plug to the audio port on the rear of the monitor to make use of your speakers, headphones, or other audio device. -
Page 25: Installing A Security Cable
Installing a security cable You can secure the monitor to a fixed object with an optional security cable available from third parties. • Connect the lock to the Kensington Security Slot on the rear of the monitor and use the key provided to attach and remove the lock. -
Page 26: Setting Up Your Workspace
Setting up your workspace …or setting up your battle station. When setting up your workspace, whether it's for work or gaming, it's important to prioritize your safety and health. This means maintaining proper posture, health, and work habits, as well as setting up an ergonomic workspace with a properly positioned monitor. -
Page 27: Stay Active
Stay active Reposition your monitor as you adjust your working posture throughout the workday. Don’t stay in one fixed posture for too long, but avoid slouching or leaning, and get up to move around regularly. To avoid discomfort and injury, it's important to take regular breaks while using the computer. Go outside, take a few deep breaths of fresh air, stretch, and exercise to take care of your body. -
Page 28: Watch Your Eyes
Prolonged exposure to flickering screens may lead to loss of focus, fatigue, headaches, and blurred vision, especially in individuals who are sensitive to such visual stimuli. The LED backlight unit used in Spectrum One is based on technologies that do not produce flicker during normal use, and does not rely on pulse-width modulation (PWM). -
Page 29: Using The Monitor
Using the monitor Turning on the monitor 1. Press the power button on the computer to turn it on. 2. Press the power button on the rear of the monitor to turn it on. When the monitor is first turned on, the monitor automatically scans the signal inputs for an active input and uses that input for the screen. -
Page 30: Turning Off The Monitor
Turning off the monitor 1. Press the power button on the rear of the monitor to turn it off. NOTE If there is no video signal for a prolonged period, the monitor will enter standby mode. This means that the monitor is not turned off and will resume operation once a video signal is available again. -
Page 31: Cool Features
Cool features One-cable solution Typically, separate cables are needed to connect your monitor to your computer for video, audio, and USB data. Additionally, yet another cable is required to charge your laptop or other mobile device. With USB Type-C, you can do all of that with just one cable, simplifying the setup process. It's also a neat and straightforward way to declutter your desk from a tangle of cables. - Page 32 IMPORTANT The host computer must be able to support the USB Power Delivery protocol over the USB Type-C connector to be charged or powered by Spectrum. The host computer must be able to support DisplayPort Alternate Mode over the USB Type- C connector to provide Spectrum with an image signal.
-
Page 33: Quick Actions
Quick actions If the OSD menu, crosshair overlay, and frame rate counter overlay are not active, pressing the joystick in any direction will perform quick actions. This lets you quickly enable or disable features, or cycle through available options: • Pressing down will cycle video input sources. -
Page 34: Using The On-Screen Display
Using the on-screen display Use the on-screen display (OSD) menu to display information about your monitor, or to adjust the picture properties and monitor features based on your preferences. Controlling the OSD menu While the monitor is turned on, you can access the menu and make adjustments using the joystick on the rear of the monitor by reaching underneath the bottom bezel. - Page 35 4. To close the OSD menu, depress the joystick. Alternatively, pressing the joystick left whilst in the main menu will close the menu. Finally, if no control inputs are given for a prolonged time, the OSD menu will close automatically. NOTE You can adjust the duration of this time-out in the ‘OSD’...
-
Page 36: Osd Components
OSD components Live information display The live information display along the top shows the currently active signal source. Here you can quickly find information about your active inputs, resolution, refresh rate, and the use of HDR. OSD menu The OSD menu contains the settings that control your monitor’s behavior. Here you can change the color qualities of the displayed image, as well as a slew of settings that allow you to fine-tune the features of the monitor. -
Page 37: Input/Output Menu
Input/Output menu Select video input source Selects from which port the video source device is connected. When set to ‘Select automatically’, the monitor automatically switches to an active input, if the current input is not active. NOTE When set to ‘Select automatically’, the monitor may need more time to resume from sleep, as it will cycle through the available ports on by one, looking for a signal. -
Page 38: Audio Source
Audio source Selects from which of the two active input sources the audio is played in split-screen mode. This setting is only available when ‘Split-screen mode’ is set to ‘On’. USB Type-C port mode Selects between maximum video signal bandwidth, or maximum USB hub data bandwidth for the USB Type-C port. -
Page 39: Usb Hub Menu
USB hub menu NOTE On model ES07D03, to access this menu, Spectrum must be updated to firmware version 108 or newer. Some features may still be available elsewhere in the OSD. Host device override Forces the monitor to ignore individual port settings and always use either the USB Type-B or Type- C port to connect to the built-in USB hub to its upstream host device. -
Page 40: Hdmi 1 Host Device
HDMI 1 host device Selects from which port the USB hub upstream host device is connected, when HDMI port 1 is the active video signal input port. HDMI 2 host device Selects from which port the USB hub upstream host device is connected, when HDMI port 2 is the active video signal input port. -
Page 41: Gaming Menu
Gaming menu Frame rate counter Enables or disables a live display of the current input frame rate. NOTE While the OSD menu is active, the frame rate counter cannot be displayed. If enabled, it will appear once the menu is closed. By default, you can quickly toggle the frame rate counter on and off by pressing the joystick left when the OSD menu is not active. -
Page 42: Crosshair Color
Crosshair color Selects the color of the crosshair. Crosshair style Selects the style of the crosshair. 'Dot' style 'Cross' style 'Eve' style Crosshair position Adjusts the height at which the crosshair appears on the screen. (100 places the crosshair at the center of the display.) NOTE You can quickly adjust the position of the crosshair by pressing the joystick up or down... -
Page 43: Presets Menu
Presets menu Load factory defaults Overwrites all monitor settings with those stored in the factory setting profile for the monitor, restoring default values. This does not overwrite the user presets. Load user preset 1 Overwrites all monitor settings with those stored in user-generated setting profile 1. This does not overwrite any user presets. -
Page 44: Picture Menu
Picture menu NOTE While HDR is enabled, the only option available in this menu is ‘Sharpness’. Color space Selects the color space in which the monitor operates. P3 is the native color space of the display panel, and offers the widest range of colors. In sRGB mode colors are adjusted to avoid overshoot in colors. -
Page 45: Gamma
Gamma Adjusts the brightness curve between light and dark areas of the monitor. Backlight dimming Selects the backlight dimming behavior. • When HDR is active, this setting defaults to ‘Local’, where individual zones of the backlight are dimmed or brightened to increase the dynamic contrast between lighter and darker areas of the image. -
Page 46: Performance Menu
Performance menu Low-latency mode Selects between the compatibility of a traditional frame buffer, or a line buffer to streamline input and output refresh rate. Adaptive-Sync / VRR Enables or disables support for variable refresh rates (VRR) through adaptive-sync technology. This feature enables AMD FreeSync, NVIDIA G-SYNC, VESA Adaptive-Sync, and HDMI-VRR features. -
Page 47: Osd Menu
OSD menu Language Selects the language in which the OSD menu is displayed. language displayed as English English 中文 Chinese French Français German Deutsch 日本語 Japanese Spanish Español NOTE The OSD sub-menu is always called ‘OSD’. The ‘Language’ option in any language is followed by the word ‘language’... -
Page 48: Indicator Light Menu
Indicator light menu On Behavior Selects the behavior of the indicator light when the monitor is on. indicator light behavior Steady Always on Slow pulse Very slowly breathes on and off Fast pulse Quickly breathes on and off Slow blink Slowly but repeatedly turns on and off Fast blink Quickly and repeatedly turns on and off... -
Page 49: Information Menu
Information menu Model Displays the monitor’s model and model number. Serial number Displays the monitor’s unique serial number. Firmware version Displays the monitor’s current firmware version. Using the on-screen display... -
Page 50: Support And Troubleshooting
Support and troubleshooting Cable requirements There are many different cables on the market, and not all of them will give you the best experience with your monitor. Here are some specifications and certifications you should keep in mind when purchasing a new cable for your monitor. DisplayPort DisplayPort is an audio/video interface that was first introduced in 2006 to provide a unified, easy to produce replacement for the variety of monitor connectors that were in use at the time. -
Page 51: Hdmi
HDMI HDMI is an audio/video interface that was first introduced in 2002 to provide a convenient, digital connection between video devices and displays. It has quickly become a wide-spread standard and has evolved over time, with each new version introducing higher bandwidth support and a broader feature set. -
Page 52: Usb Type-C
USB Type-C USB Type-C is a data connector that was first introduced in 2014 as a replacement for the existing Type-A and Type-B connectors and their variants. The connector is compact and reversible, making it convenient to use and suitable for small mobile devices. Though developed as the new connector for carrying the USB data protocol, USB Type-C is also capable of transmitting video data using the DisplayPort standard and it can transfer high amounts of power. - Page 53 Connect a computer Certification: to the built-in USB hub Use a cable that is certified ‘Certified USB’. Connectors: The cable can have a USB Type-C connector on both ends, or can have a USB Type-C connector on the monitor side and a USB Type- A connector on the computer side.
-
Page 54: Solving Common Problems
Solving common problems The following table lists possible problems, the possible cause of each problem, and the recommended solutions. Problem Possible cause Solution Screen is blank. Power cord is disconnected. Connect the monitor power cord. Monitor is off. Press the monitor power button Screen is blank, or Monitor video cable is Connect the appropriate video cable... -
Page 55: Updating Firmware
You can download the latest firmware updates from the Downloads section of our support page at https://www.dough.tech/pages/downloads. Special instructions may be included, so keep an eye out for instructions.pdf. Firmware is a specific class of software that provides low-level control for the device’s specific hardware. - Page 56 Some new features were introduced through firmware updates. The following table lists certain features that may require a firmware update before you can use them on your monitor. Alongside each feature, the firmware version is listed that your Spectrum model requires to use them. feature model model...
-
Page 57: Contacting Support
Locating the model and serial number The serial number and product number are located on a label on the rear of the monitor. You may need these numbers when contacting Dough about your issue. The model number is a seven-digit alphanumerical code starting with ‘ES’. -
Page 58: Maintaining The Monitor
• If the monitor is not operating properly or has been dropped or damaged, contact an authorized Dough dealer, reseller, or service provider. This includes situations where: the power cord or plug is damaged, cut or frayed; liquid was spilled into the product;... -
Page 59: Cleaning
Cleaning 1. Turn off the monitor and unplug the power cord from the AC outlet. 2. Dust the monitor by wiping the screen and the cabinet with a soft, clean antistatic cloth, for example microfiber. 3. When dealing with more than dust, use a cleaning solution specifically designed for LCD panels to dampen your cloth. -
Page 60: Technical Specifications
Technical specifications For the latest specifications or additional specifications on this product, go to https://www.dough.tech/products/spectrum-4k-144hz and click Specs. NOTE All specifications represent the typical specifications provided by Dough’s component manufacturers; actual performance may vary either higher or lower. Technical specifications... -
Page 61: Display
Display Size monitor size 27" (diagonal) display area 597×336mm aspect ratio 16 : 9 Image quality native resolution 3840×2160 pixels 4K Ultra-HD pixel pitch 0.1557mm pixel density 163ppi brightness 450cd/m² typical 750cd/m² peak HDR10 Media Profile VESA DisplayHDR600 certified displayable colors 1.07 billion color gamut 98% DCI-P3... -
Page 62: Technology
Technology panel technology Nano IPS Oxide TFT LCD backlight technology Bottom edge-lit white LED with KSF nano-particle layer Flicker free backlight without pulse-width modulation (PWM) backlight dimming No dynamic dimming in SDR mode 16-zone local dimming in HDR mode curved panel touch-enabled pen-enabled Ports... -
Page 63: Usb Hub
USB hub USB Type-C (1×) SuperSpeed USB 10Gbps (USB 3.1 Gen 2, up to 10Gbps) Power output up to 5V 3A (15W) USB Type-A (2×) SuperSpeed USB 10Gbps (USB 3.1 Gen 2, up to 10Gbps) Power output up to 5V 2A (10W) USB Type-B upstream (1×) SuperSpeed+ USB (USB 3.1 Gen 2, up to 10Gbps) upstream... -
Page 64: Adjustment
/ landscape rotation 90° left, 90° right height adjust 122mm removable Yes, with quick-release button NOTE The Dough Spectrum Stand (ES07D04) is sold separately. Size and weight dimensions, monitor with stand 607×571×227mm landscape, highest (W×H×D) 607×449×227mm landscape, lowest 351×707×227mm portrait, highest 351×617×227mm portrait, lowest... -
Page 65: Electrical And Operating Requirements
3 years limited warranty ‘Zero bright dot’ pixel policy NOTE For warranty details or instructions, please refer to the warranty policy available on https://www.dough.tech/pages/dough-spectrum-limited-warranty In the box Dough Spectrum Power adapter Power cable Quick start guide Color calibration report Technical specifications...
Need help?
Do you have a question about the Spectrum One and is the answer not in the manual?
Questions and answers