
Related Manuals for DOUGH Spectrum ES07D02


Summary of Contents for DOUGH Spectrum ES07D02
- Page 1 Dough Spectrum ES07D02 & ES07DCA User Manual Friday, 10 March, 2023 Dough Spectrum ES07D02 & ES07DCA User Manual Rev. 12...
- Page 2 Microsoft Corporation in the United States and/or other countries. The information contained herein is subject to change without notice. The only warranties for Dough products and services are set forth in the express warranty statements accompanying such products and services. Nothing herein should be construed as constituting an additional warranty.
-
Page 3: About This Manual
About this manual This manual provides information on monitor features, setting up the monitor, and technical specifications, for the following models: ES07D02, ES07DCA CAUTION: Indicates a hazardous situation that, if not avoided, could result in death or injury. IMPORTANT: Indicates information considered important but not hazard- related (for example, messages related to property damage). -
Page 4: Table Of Contents
Table of contents About this manual ........................3 Table of contents ........................4 Getting started ........................... 6 Important safety information ....................6 About Spectrum........................8 Features ........................... 8 Front components ........................9 Rear components ........................9 Rear components ......................... 10 Setting up Spectrum ......................... - Page 5 Technical specifications ......................45 Display ............................45 Ports ............................46 Features ..........................47 Adjustment ..........................47 Dough Spectrum Stand ....................... 47 Size and weight ........................48 Electrical and operating requirements ................48 Limited warranty ......................... 48 In the box ..........................49...
-
Page 6: Getting Started
Getting started Important safety information Only use the power cord and AC adapter included with the monitor, it provides the correct type of power and was tested for use with your product. Plug the power cord into an AC outlet that is always easily accessible. Disconnect the monitor by grasping the plug firmly and pulling it from the AC outlet. - Page 7 Do not drop the monitor or place it on an unstable or vibrating surface. Use the appropriate and correctly sized furniture designed to properly support your Dough Spectrum. Monitors that are inappropriately situated on dressers, bookcases, shelves, desks, speakers, chests, or carts may fall over and cause damage or personal injury.
-
Page 8: About Spectrum
About Spectrum At Dough, we believe in putting product decisions in the hands of the end-user. Each and every aspect throughout the development process has been debated and discussed together with dough.community, a gathering of 10 000 tech enthusiasts who love premium devices with bleeding-edge technology. By putting our minds together with hardcore gamers, coders, and designers, we built the ultimate monitor: Spectrum. -
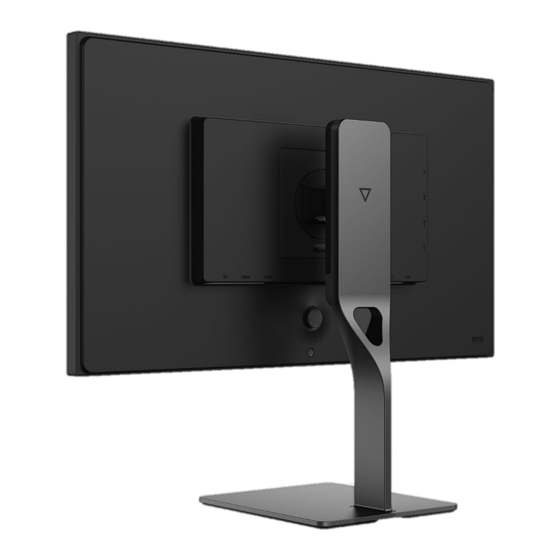
Page 9: Front Components
Front components Component Description Indicator light Identifies the current state of the monitor. Rear components Component Description Stand/VESA connector Allows you to connect the Spectrum Stand or a VESA-compatible mounting device OSD joystick Opens the OSD menu, selects an item from the menu, or closes the OSD menu. -
Page 10: Rear Components
Rear components Component Description DisplayPort 1.4 port Connect a DisplayPort cable to a source device such as a computer. HDMI 2.1 port 1 Connect an HDMI cable to a source device such as a computer or game console. HDMI 2.1 port 2 Connect an HDMI cable to a source device such as a computer or game console. -
Page 11: Setting Up Spectrum
Setting up Spectrum It is important to set up your monitor correctly. That way you keep your gear and yourself safe, so you can focus on enjoying your equipment without worry. IMPORTANT: To prevent damage to the monitor, do not touch the surface of the LCD panel. - Page 12 3. Insert the top of the stand into the back of the monitor cabinet at an angle, then press down. The stand will click into place. NOTE: The Dough Spectrum Stand (model ES07D04) is sold separately. Setting up Spectrum...
-
Page 13: Removing The Spectrum Stand
3. Slide up the quick-release button on the stand and lift the stand away from the monitor. NOTE: The Dough Spectrum Stand (model ES07D04) is sold separately. Setting up Spectrum... -
Page 14: Attaching A Vesa Mount
Attaching a VESA mount Spectrum is compatible with most VESA mounting arms and mounts (sold separately). The VESA mount must support the 100×100mm VESA Mounting Standard and should be rated to hold at least 4.7kg of weight. IMPORTANT: You might need additional tools such as a screwdriver (purchased separately) when you attach a mounting device. -
Page 15: Connecting Cables
Connecting cables You want ports? Spectrum’s got ports! Let’s go over the various things you can connect to it. NOTE: With so many ports available, it isn’t surprising that not everyone intends to use the same cable types or cable lengths. Our surveys show that because of this, more than half the cables we could have included in the box would have gone to waste. - Page 16 2. Connect a video cable. • Connect one end of an HDMI cable to one of the HDMI ports on the rear of the monitor and the other end to the HDMI port on the source device. • Connect one end of a DisplayPort cable to the DisplayPort connector on the rear of the monitor and the other end to the DisplayPort connector on the source device.
- Page 17 3. Connect an upstream cable for the built-in USB hub. • If you connected Spectrum to the video source device using USB Type-C, this same cable can double as the upstream cable for the built-in USB hub. • If you connected Spectrum to the video source device using HDMI or DisplayPort, you will need to connect the Type-B connector on a USB upstream cable to the USB Type-B upstream port on the rear of the monitor.
- Page 18 4. Connect the AC adapter and power cord. Connect the power cord to the AC adapter and plug the other end into a grounded AC outlet. Then connect the adapter to the DC power connector on the rear of the monitor.
-
Page 19: Connecting Usb Devices
Connecting USB devices Spectrum has a built-in USB hub that allows you to connect multiple devices with a single cable. The rear of the monitor provides one USB Type-C and one USB Type-B upstream port. Either can be used to connect the built-in USB hub to a host device. You can select which of the connected host devices controls the USB hub from the on-screen display (OSD) menu. -
Page 20: Connecting An Audio Device
Connecting an audio device Spectrum has a built-in digital-to-analog converter (DAC) that sends audio signals from the video source device to the amplified 3.5mm audio jack connector on the rear of the monitor. • Connect the 3.5mm audio jack plug to the audio port on the rear of the monitor to make use of your speakers, headphones, or other audio device. -
Page 21: Installing A Security Cable
Installing a security cable You can secure the monitor to a fixed object with an optional security cable available from third parties. • Connect the lock to the Kensington Security Slot on the rear of the monitor and use the key provided to attach and remove the lock. IMPORTANT: If these instructions do not apply to your security cable, then follow the lock manufacturer’s instructions when securing the monitor. -
Page 22: One-Cable Solution
One-cable solution You can attach a computer, notebook, or similar device to the monitor with a single USB Type-C cable. This USB Type-C cable then provides connectivity for high-speed data, audio and video, and up to 100W of power or charging. •... - Page 23 NOTE: When connected by a single USB Type-C cable, Spectrum may not be able to simultaneously operate the built-in USB hub at its full speed and run the display at its maximum resolution and refresh rate due to technical limitations. You can learn more about the potential limitations and how to change your bandwidth priority preferences on page 31.
-
Page 24: Setting Up Your Workspace
Setting up your workspace …or setting up your battle station. Whether you’re hard at work or clicking heads, it’s important to stay safe and healthy. That includes maintaining proper posture, health, and work habits. And of course, an ergonomic workspace with a properly set up monitor. -
Page 25: Watch Your Eyes
4. Reposition your monitor as you adjust your working posture throughout the workday. Don’t stay in one fixed posture for too long, but avoid slouching or leaning, and get up to move around regularly. NOTE: The perfect working posture may require third-party accessories such as adjustable or ergonomic chairs, footrests, or specialized peripherals. -
Page 26: Using The Monitor
Using the monitor Turning on the monitor 1. Press the power button on the computer to turn it on. 2. Press the power button on the rear of the monitor to turn it on. When the monitor is first turned on, the monitor automatically scans the signal inputs for an active input and uses that input for the screen. -
Page 27: Turning Off The Monitor
Turning off the monitor 1. Press the power button on the rear of the monitor to turn it off. NOTE: If there is no video signal for a prolonged period, the monitor will enter standby mode. This means that the monitor is not turned off and will resume operation once a video signal is available again. -
Page 28: Using The On-Screen Display (Osd) Menu
Using the on-screen display (OSD) menu Use the on-screen display (OSD) menu to adjust the monitor screen image based on your preferences. You can access and make adjustments in the OSD menu using the joystick on the rear of the monitor by reaching underneath the bottom bezel. To change Spectrum’s settings, do the following: 1. - Page 29 2. To access the OSD menu, depress the joystick to open the OSD. 3. Use the joystick to navigate, select, and adjust the menu choices. • Pressing up or down will change the current selection or adjust the current setting. •...
-
Page 30: Quick Actions
Quick actions Pressing the joystick in any direction when the OSD menu, crosshair overlay, and frame rate counter overlay are not active, will perform quick actions. These lets you quickly enable or disable features, or cycle through available options: • Pressing down will cycle video input sources. -
Page 31: Input/Output Menu
Input/Output menu Select input source Selects from which port the video source device is connected. When set to ‘Select automatically’, the monitor automatically switches to an active input, if the current input is not active. NOTE: You can quickly cycle through the various input sources by pressing the joystick up when the OSD menu is not active. -
Page 32: Usb Hub Menu
HDMI port 2 mode Selects between the maximum performance of HDMI 2.1, or maximum compatibility with previous HDMI versions for HDMI port 2. DisplayPort mode Selects between the maximum performance of DisplayPort 1.4, or maximum compatibility with previous DisplayPort versions for the DisplayPort and USB Type-C ports. -
Page 33: Gaming Menu
Gaming menu Frame rate counter Enables or disables a live display of the current input frame rate. NOTE: You can quickly toggle the frame rate counter on and off by pressing the joystick left when the OSD menu is not active. NOTE: You can adjust the position of the frame rate counter by pressing the joystick up or down when frame rate counter overlay is active. -
Page 34: Presets Menu
Crosshair position Adjusts the height at which the crosshair appears on the screen. (100 places the crosshair at the center of the display.) NOTE: You can quickly adjust the position of the crosshair by pressing the joystick up or down when the crosshair overlay is active. Presets menu Load factory defaults Overwrites all monitor settings with those stored in the factory setting profile for... -
Page 35: Picture Menu
Picture menu NOTE: While HDR is enabled, the only option available in this menu is ‘Sharpness’. Color space Selects the color space in which the monitor operates. In emulated sRGB mode, a look-up table (LUT) is applied that maps the colors to their calibrated DCI-P3 values, thus avoiding overshoot in colors. -
Page 36: Performance Menu
Aspect ratio Selects the method used for displaying content below native resolution. image upscaling behavior 1 : 1 the image is displayed exactly as per the input signal, even if that only uses a small portion of the screen. Pixel perfect the image is scaled up by duplicating pixels at an integer ratio, as large as will fit on the display. -
Page 37: Osd Menu
OSD menu Language Selects the language in which the OSD menu is displayed. The name of each language is always displayed in its own language, so that users who do not speak the currently selected language can find the setting to change it. language displayed as English... -
Page 38: Indicator Light Menu
Indicator light menu On Behavior Selects the behavior of the indicator light when the monitor is on. indicator light behavior Steady Always on Slow pulse Very slowly breathes on and off Fast pulse Quickly breathes on and off Slow blink Slowly but repeatedly turns on and off Fast blink Quickly and repeatedly turns on and off... -
Page 39: Updating Firmware
You can download the latest firmware updates from the Downloads section of our support page at https://www.dough.tech/pages/downloads. Special instructions may be included, so keep an eye out for instructions.pdf. Firmware is a specific class of software that provides low-level control for the device’s specific hardware. -
Page 40: Support And Troubleshooting
Support and troubleshooting Solving common problems The following table lists possible problems, the possible cause of each problem, and the recommended solutions. Problem Possible cause Solution Screen is blank or Power cord is Connect the monitor power cord. video is flashing. disconnected. -
Page 41: Contacting Support
Locating the model and serial number The serial number and product number are located on a label on the rear of the monitor. You may need these numbers when contacting Dough about your issue. The model number is a seven-digit alphanumerical code starting with ‘ES’. -
Page 42: Maintaining The Monitor
Adjust only those controls that are covered in the operating instructions. • If the monitor is not operating properly or has been dropped or damaged, contact an authorized Dough dealer, reseller, or service provider. This includes situations where: the power cord or plug is damaged, cut or frayed;... -
Page 43: Cleaning
Cleaning 1. Turn off the monitor and unplug the power cord from the AC outlet. 2. Dust the monitor by wiping the screen and the cabinet with a soft, clean antistatic cloth, for example microfiber. 3. When dealing with more than dust, use a cleaning solution specifically designed for LCD panels to dampen your cloth. -
Page 44: Shipping
Shipping Keep the original packing box in a storage area. You may need it later if you wish to move or ship the monitor. Disposal Spectrum was built to bring you joy for years to come. Should the day come that it is time to discard it, do not throw this electronic device into the trash. -
Page 45: Technical Specifications
For the latest specifications or additional specifications on this product, go to Tech Specs https://www.dough.tech/products/spectrum-qhd-280hz and click NOTE: All specifications represent the typical specifications provided by Dough’s component manufacturers; actual performance may vary either higher or lower. Display Size monitor size 27"... -
Page 46: Ports
Speed response time 5ms (gray-to-gray) typical 1ms (gray-to-gray) overdrive frequency range 48 – 280Hz adaptive sync VESA AdaptiveSync Display certified NVIDIA G-SYNC Compatible certified AMD FreeSync Premium Pro certified Technology panel technology Nano IPS Oxide TFT LCD backlight technology Bottom edge-lit white LED with KSF nano-particle layer ∇∇∇... -
Page 47: Features
Dough Spectrum Stand material Cast aluminum alloy vertical tilt 7° down, 23° up horizontal swivel pivot / landscape rotation 90° left, 90° right height adjust 122mm removable Yes, with quick-release button NOTE: The Dough Spectrum Stand (ES07D04) is sold separately. Technical specifications... -
Page 48: Size And Weight
External power adapter power supply input 110 – 240V 3.5A 50 – 60Hz Limited warranty 3 years limited warranty ‘Zero bright dot’ pixel policy NOTE: For warranty details or instructions, please refer to the warranty policy available on https://www.dough.tech/pages/dough-spectrum- limited-warranty. Technical specifications... -
Page 49: In The Box
In the box Dough Spectrum Power adapter Power cable Quick start guide Color calibration report ∇ ∇∇ Model ES07D02 only. ∇∇∇ Model ES07DCA only. Planned feature, pending firmware update. Technical specifications...
Need help?
Do you have a question about the Spectrum ES07D02 and is the answer not in the manual?
Questions and answers