ProBreeze PB-H06 - Oil Filled Radiator Manual
- Instruction manual (45 pages) ,
- Instruction manual (76 pages) ,
- Instruction manual (45 pages)
Advertisement
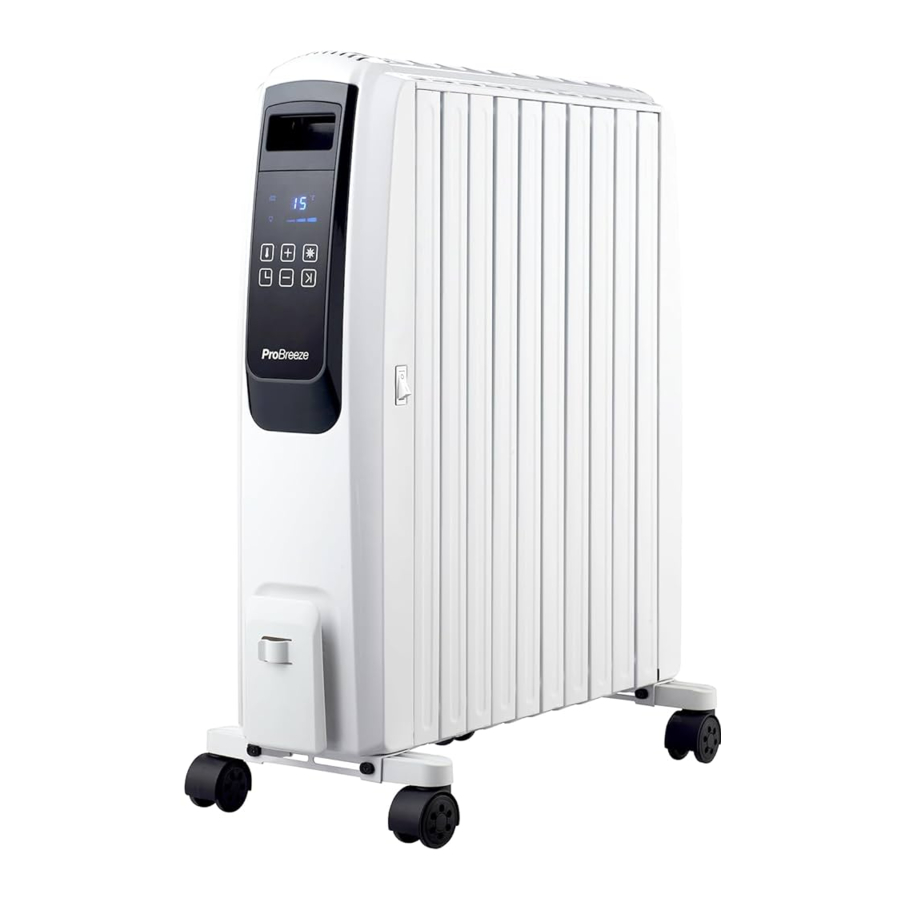
PARTS

- Front Carry Handle
- Rear Carry Handle
- Control Panel
- Digital Display
- On/Off Switch
- Radiator Fins
- Cord Storage
- Castor Wheels
- Remote Control
- Temperature Sensor
SPECIFICATION
- Rated Voltage and Frequency: 220-240V, 50Hz
- Wattage: 2500W
- Size: 55cm x 26cm x 67cm
- Net Weight: 15.4kg
SAFETY CONTROLS
This heater has three levels of overheat protection.
- Automatic Thermal Cut-Off: If set to High power mode and overheating is detected the automatic thermal cut-off switches the heater from High power mode to Medium power mode. Once the temperature drops to a normal level the heater will automatically return to High power mode.
- Thermal Fuse: If the automatic thermal cut-off fails to operate, the thermal fuse will activate and cut the power to the heater. This is a non-resettable switch that will have to be professionally replaced.
- Safety Tip-Over Switch: If the heater tips over the safety tip-over switch will activate and cut the power to the heater. Once the heater is returned to the upright position it will enter stand-by mode and the settings must be reset for operation to resume.
ASSEMBLY
- Turn the radiator upside-down on a scratch-free and stable surface to prevent damage to the paint finish or your floor surfacing.
- Gently extend the wheels from the closed position to the open position until they click into place.

- Turn the radiator back upright.


Only operate the radiator when in its normal upright position with the wheels in the open position.
CONTROL PANEL

- Thermostat Button
- Increase Temperature and Increase Timer Button
- Mode Button
- Timer Button
- Decrease Temperature and Decrease Timer Button
- Standby Button
- ECO Mode Indicator
- Temperature Indicator
- Timer Indicator
- Power On Indicator
- Mode Indicator (Low, Medium, High)
OPERATING THE UNIT USING THE CONTROL PANEL
This heater features a tip-over switch on the bottom, so be sure to place the unit on a flat, even surface.
Switching on and setting temperature
- Place the heater upright on a flat, steady and heat resistant surface.
- Insert the plug into a suitable socket.
- Press the On/Off switch located on the side of the radiator to the "I" ON position.
A beep will sound and the Power On indicator light will illuminate on the control panel. - Press the Standby button to begin operating the radiator.
Note: It is normal for the radiator to make crackling noises when first turned on.
Switching off
- Whilst the heater is operating press the Standby button. The display screen will turn off but the Power On indicator light will remain illuminated.
- Press the On/Off switch to the "O" OFF position. The Power On indicator light will turn off.
- Unplug the heater from the socket when it is left unattended or is not in use.
Modes
- LOW power. Heater automatically enters LOW power mode upon being switched on.
![]()
- Press the Mode button once to select MEDIUM power.
![]()
- Press the Mode button twice to select HIGH power.
![]()
- Press the Mode button three times to select ECO mode.
![]()


ECO Mode: Allows you to set a desired room temperature. Once the desired temperature has been reached, power will reduce to save energy. Temperature will default to 23°C if not set manually in ECO mode.
Notes: The higher the power setting, the faster the desired temperature will be reached but the higher the power consumption.
For long-term use, it is recommended to use the Low power setting to reduce power consumption.
Thermostat Function
The thermostat function can only be used whilst in ECO mode. The available temperature range is 10°C to 30°C. To set the thermostat:
- Ensure ECO mode has been selected.
- Press the Thermostat button. The temperature digits (°C) will blink.
- Use the "+" and "-" buttons to set the desired temperature. The temperature digits will stop blinking and show the current room temperature.
- The heater will adjust the power level automatically to achieve the set temperature.
Note: Once the set temperature is reaches the heater will turn off automatically. Similarly, once the room temperature falls beneath the set temperature the heater will turn on automatically and work to achieve the set temperature.
Timer Functions
The heater can be set to turn ON and OFF at the time you want.
Setting the Auto-On Timer
- Switch the radiator on as per the "Switching On" instructions but do not press the Standby Button.
- Press the Timer button. The time digits (H) will blink.
- Use the "+" and "-" buttons to set the desired time (1-24 hours) prior to auto-on.
Between 0-5 hours, time increases by increments of 0.5 hours. Between 5-24 hours, time increases by increments of 1 hour. - The time digits will stop blinking and show the remaining time till auto-on.
- Set the desired mode or temperature prior to auto-on by pressing the Mode button immediately after the timer digits stop blinking and following steps 1-4 under Mode. If ECO mode is selected, set the desired temperature at time of auto-on by following steps 1-4 under Thermostat Function.
Note: If no mode or temperature is set when setting an auto-on timer the heater will start on the Low power setting.
Setting the Auto-Off Timer
- Whilst the heater is operating press the Timer button. The time digits (H) will blink.
- Use the "+" and "-" buttons to set the desired time (1-24 hours) prior to auto-off.
Between 0-5 hours, time increases by increments of 0.5 hours. Between 5-24 hours, time increases by increments of 1 hour. - The time digits will stop blinking and show the remaining time till auto-off.
- The heater will automatically shut off when the time runs out.
OPERATING THE UNIT USING THE REMOTE CONTROL
- Ensure the heater is switched to the "I" ON position at the On/Off switch.
- The remote control functions in the same way as the control panel and should be used as such.
- The effective range of the remote control is 5m from the radiator and should be directed towards the front of the radiator when in use.
CLEANING TIPS

Always turn the heater OFF, unplug the power cord from the electrical outlet and allow the appliance to completely cool down before handling or cleaning it.


Do not allow water or other liquids to run into the interior of the heater, as this could create a fire and/or electrical hazard.
Do not use any abrasive cleaners or solvents, as heater damage will occur.
- Clean the exterior surface of the heater by wiping it with a soft, damp cloth. Dry the heater with a soft clean cloth.
- To store your product out of season, we recommend using the original or similar size box.
- Do not kink or wrap the power cord and plug around the appliance, as this may cause the insulation to weaken or split, particularly where it enters the appliance.
- Store the heater in a safe, clean and dry place when not in use.
| 2500W Oil Filled Radiator | Model PB-H06 | |||
| Heat output | Symbol | Value | Unit |
| Nominal heat output | Pnom | 2.5 | kW |
| Minimum heat output (indicative) | Pmin | 1.2 | kW |
| Maximum continuous heat output | Pmax, c | 2.5 | kW |
| Auxiliary electricity consumption | |||
| At nominal heat output | elmax | N/A | kW |
| At minimum heat output | elmin | N/A | kW |
| In standby mode | elsb | 0.00017 | kW |
| Type of heat input, for electric storage local space heaters only (select one) | Unit | ||
| Manual heat charge control, with integrated thermostat. | No | ||
| Manual heat charge control with room and/or outdoor temperature feedback. | No | ||
| Electronic heat charge control with room and/or outdoor temperature feedback. | No | ||
| Fan assisted heat output. | No | ||
| Type of heat output/room temperature control | Unit | ||
| Single stage heat output and no room temperature control. | No | ||
| Two or more manual stages, no room temperature control. | No | ||
| With mechanic thermostat room temperature control. | No | ||
| With electronic room temperature control. | Yes | ||
| Electronic room temperature control plus day timer. | No | ||
| Electronic room temperature control plus week timer. | No | ||
| Other control options | Unit | ||
| Room temperature control, with presence detection. | No | ||
| Room temperature control, with open window detection. | No | ||
| With distance control option. | No | ||
| With adaptive start control. | No | ||
| With working time limitation. | Yes | ||
| With black bulb sensor | No | ||
IMPORTANT SAFETY INSTRUCTIONS

When using electrical appliances, basic safety precautions should always be followed to reduce the risk of fire, electric shock, and injury to persons, including the following:
DO NOT COVER THE HEATER.


To avoid the risk of electrical shock, fire or injury to people, always make sure the heater is unplugged from the electrical outlet before relocating, servicing, or cleaning it.

Some parts of this product can become very hot and cause burns.
Particular attention has to be taken where children and vulnerable people are present.
![burn hazard]()
![shock hazard]()
Use this heater only as described in this manual. Any other use not recommended by the manufacturer may cause fire, electric shock, or injury to persons.- The appliance is not to be used by persons (including children) with reduced physical, sensory or mental capabilities, or lack of experience and knowledge, unless they have been given supervision or instruction.
- The appliance must have a minimum 50cm clearance around all sides of the appliance.
- Children must be supervised not to play with the appliance.
- Children of less than 3 years should be kept away unless continuously supervised.
- Do not leave children alone or unattended in the area where the appliance is in use.
- Cleaning and user maintenance shall not be made by children unless continuously supervised.
- Place the appliance on a flat, stable, heat-resistant surface. Operating the product in any other position could cause a hazard.
- In order to avoid overheating, do not cover the heater
- Do not use this heater to dry or heat clothes.
- Ensure the heater is not located immediately below a socket-outlet.
- Do not use this heater near water or in the immediate surroundings of a bath, a shower or a swimming pool. Never locate the heater where it may fall into a bathtub or other water container. Do not use the heater in damp areas.
![burn hazard]()
![shock hazard]()
Do not allow water or other liquids to run into the interior of the heater, as this could create a fire and/or electrical hazard.- This heater is intended for indoor household use and similar applications. Do not use outdoors.
- Never leave the heater unattended while in use. Always turn the heater off and unplug when not in use.
- Do not use the heater while sleeping or place it near a person who is sleeping.
- Do not place this heater near flammable materials, surfaces or substances. Keep combustible materials, such as furniture, pillows, bedding, papers, clothes, and curtains at least 3 feet (0.9m) from the heater.
- Use the heater in a well-ventilated area.
![]()
This heater is hot when in use. To avoid burns, do not let bare skin touch hot surfaces. If provided, use handles when moving the heater. Use gloves or oven mitts to avoid serious injury.- Prior to cleaning or other maintenance, the appliance must be disconnected from the power supply.
- Allow the heater to thoroughly cool down before handling or cleaning.
- Do not use any abrasive cleaners or solvents, as heater damage will occur.
- To disconnect the heater from the mains power, first turn the controls to the OFF position and then remove the plug from the socket.
- Ensure the heater is switched off and the power cord is unplugged from the electrical outlet before cleaning the heater.
- Never insert fingers or metal objects into the vents and openings of the heater.
- Avoid placing the power cord in areas where it can become a tripping hazard. Do not place the power cord under carpeting or cover it with rugs, runners or similar.
- To avoid a circuit overload when using this heater, do not operate another high-wattage heater on the same electrical circuit.
![burn hazard]() Always plug the heater directly into a wall socket. Avoid using extension leads where possible as they may overheat and cause a risk of fire.
Always plug the heater directly into a wall socket. Avoid using extension leads where possible as they may overheat and cause a risk of fire.- Do not use this appliance with an external programmer, timer switch or any other devise which would switch the device on automatically unless this has already been pre-built into the appliance by the manufacturer.
- Do not kink or wrap the power cord and plug around the appliance, as this may cause the insulation to weaken or split, particularly where it enters the appliance.
- Ensure the mains cable is fully extended before use and arrange it so that it is not in contact with any part of the appliance.
- Do not pull on the mains cable. Never move, carry or hang the appliance by the mains cable.
- The heater should not be used in a room, of which the floor area is less than 5m².
- Do not operate the appliance with any safety guards removed.
- Do not operate the appliance if there are signs of damage to the appliance, power cord, or any of the accessories.
- If the supply cord is damaged, it must be replaced by the manufacturer, its service agent or a similarly qualified person in order to avoid a hazard.
- Do not attempt to repair or adjust any electrical or mechanical elements in the appliance. Doing so may be unsafe and will void your warranty.
- Ensure that the mains supply (including voltage, frequency and power) complies with the rating label of the appliance.
- Do not use the appliance near petrol, paints, flammable gases, ovens, or other heating sources.
- This heater is filled with a precise quantity of special oil. Repairs requiring opening of the oil container are only to be made by the manufacturer or his service agent who should be contacted if there is an oil leak.
- Regulations concerning the disposal of oil when scrapping the appliance have to be followed.
BATTERIES
This product is supplied with CR2025 Li-ion disposable batteries.
PLEASE READ AND SAVE THESE IMPORTANT SAFETY INSTRUCTIONS
BATTERY WARNING: KEEP OUT OF REACH OF CHILDREN
Choking hazard. Do not swallow. Harmful if swallowed. Swallowing can lead to chemical burns, perforation of soft tissue, and death. Severe burns can occur within 2 hours of ingestion. If you think batteries might have been swallowed or placed inside any part of the body, seek immediate medical attention.
- This product only uses a CR2025 Li-ion battery. It is not compatible with other battery types.
- Do not allow children to handle batteries.
- If the battery compartment does not close securely, stop using the product and keep it away from children.
- Ensure that the battery is installed with the correct polarity (+ and –).
- Remove exhausted battery promptly.
- Always inspect new batteries before use. Damaged or weak batteries may leak acid.
Discontinue use if batteries show signs of leakage, damage, or weakness at any time. - Ensure the battery compartment is correctly and securely closed after installing the batteries.
- Wash hands after handling batteries.
- Disposable batteries are not rechargeable and must be recycled or disposed of separately from household waste. Always dispose of batteries at an official collection point and according to your local environmental laws and guidelines.
Documents / ResourcesDownload manual
Here you can download full pdf version of manual, it may contain additional safety instructions, warranty information, FCC rules, etc.
Advertisement


Need help?
Do you have a question about the PB-H06 and is the answer not in the manual?
Questions and answers