
Related Manuals for Kärcher KB 9040


Summary of Contents for Kärcher KB 9040
- Page 1 KB 9040 5.961-090 (2006988-11-03) PLEASE READ THIS LEAFLET CAREFULLY BEFORE OPERATING YOUR MACHINE...
- Page 2 THANK YOU FOR PURCHASING A KARCHER PRESSURE WASHER PLEASE READ THIS LEAFLET CAREFULLY BEFORE OPERATING YOUR MACHINE. WHAT IS A PRESSURE WASHER? A Pressure Washer is essentially a powerful electric motor driving a set of pistons that force water through a small nozzle, thus creating a pressurised jet of water.
-
Page 3: Table Of Contents
INDEX APPLICATIONS SAFETY INSTRUCTIONS GETTING STARTED 3.1 Contents 3.2 Water Connection 3.3 Electrical Connection 3.4 Suction Mode 3.5 Detergent OPERATING YOUR PRESSURE WASHER 4.1 High Pressure Operation 4.2 Adding detergent 4.3 Low Pressure Operation With Brush 4.4 End Of Operation 4.5 Storage IMPORTANT –... - Page 4 1. APPLICATIONS The main applications for this product are DOMESTIC cleaning tasks: • Cars, motorbikes, caravans, boats and bicycles • Patio’s, fences, garden walls, pathways, driveways and house facades – particularly useful for cleaning block driveways • Removal of algae and moss from roofs, brickwork and guttering •...
- Page 5 2. SAFETY INSTRUCTIONS BEFORE STARTING UP YOUR PRESSURE WASHER PLEASE CHECK YOU HAVE THE FOLLOWING: We recommend you purchase these items from a reputable store • RCD plug and socket that will interrupt electrical supply in an emergency. • A typical garden hose (minimum length 7.5 metres) with suitable hose connection (Hoselock/Gardena type) to match the coupling on the machine (hose and connector not supplied).
- Page 6 2. SAFETY INSTRUCTIONS Never use defect connection or extension lines! If the connection line is damaged, it must be replaced with a special connection line that is available from the manufacturer or his customer service. Please make sure that the connection or extension lines are not damaged by being ran over, pulled or dragged.
- Page 7 The appliance is not intended for use by young children or infirm persons without supervision. Young children should be supervised to ensure that they do not play with the appliance. The operator must use the appliance properly. He must take the local conditions into consideration and must pay attention to third persons, in particular children, while working with the appliance.
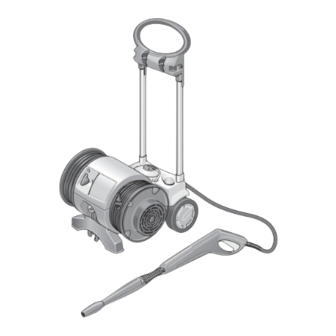
- Page 8 3. GETTING STARTED 3.1 Contents Upon opening the carton, if you do not Assembly have all the items as detailed please see Page 21 contact the Customer Helpline. Assembly see Page 21 Assembly see Page 21 1 Transport Bracket 9 Support Leg 2 High Pressure Hose Reel 10 Inlet Water Connection 3 High Pressure Hose...
-
Page 9: Water Connection
Please follow these instructions carefully for troublefree cleaning. Use the diagram on Page 8 for reference purposes. 3.2 Water Connection • The minimum length of supply hosepipe advised for maximum user convenience is 7.5 metres with a diameter of 12.5 mm (1/2") to allow free flow of inlet water to the machine so avoiding backpressure and any associated potential damage to your machine. -
Page 10: Detergent
3.5 Detergent Only cleaning agents recommended by Karcher (UK) Ltd. should be used. Unsuitable detergents could damage your Pressure Washer and the object being cleaned. Recommended Detergents 1. Detergent tablets Karcher Clean Tabs (10 tablets per box): 10 Tablets dissolved in clean water provide 5 litres of cleaning detergent. -
Page 11: Operating Your Pressure Washer
4. OPERATING YOUR PRESSURE WASHER If you have followed all the instructions so far, you are now ready to have fun cleaning the KARCHER way!!! • Turn on the supply water and press the Spray Gun lever (No.11) until the water flows freely and removes all air locks from the hoses. •... -
Page 12: High Pressure Operation
4.1 High Pressure Operation • Switch on the pressure washer (No.4) • Ensure the Spray Lance with the Pressure Regulator (No.13) is attached securely to the Spray Gun (No.11) and the nozzle is set to the required setting (+). • Aim the lance towards the object to be cleaned making sure the recommended working distance is used (for reference see Page 11). -
Page 13: Low Pressure Operation With Brush
We recommend the following cleaning method: Step 1: Remove loose dirt by washing over the surface to be cleaned with the high pressure jet. Step 2: Spray on the detergent and leave for 1-4 minutes, so assisting the easy removal of fine dirt and associated greasy adhesions. Step 3: Finally, spray off the loosened dirt with the high pressure spray. -
Page 14: End Of Operation
4.4 End Of Operation ALWAYS REMEMBER TO RINSE YOUR PRESSURE WASHER AFTER USING DETERGENT BY FILLING THE DETERGENT CONTAINER WITH CLEAN WATER AND RUN THE PUMP FOR APPROXIMATELY ONE MINUTE In the event of a break of 5 minutes in the operation of your Karcher Pressure Washer, always switch off the pump to avoid damage due to overheating. - Page 15 Failure to do this will seriously damage your machine and invalidate the warranty. • Connect the water supply hose and, without the lance attached, squeeze the Spray Gun lever to run water through your pressure washer until the water flow is constant. Then plug in to the electric supply.
- Page 16 6. ACCESSORIES A wide range of popular accessories are available from your local store selling Karcher Pressure Washers. 4.763-228 Dirt Blaster/Rotary Jet A rapidly rotating pencil jet used to remove loose paint, stubborn algae and moss from hard surfaces. 4.760-269 Triple Nozzle Lance An integral fan jet, pencil jet and low pressure chemical jet in one unit allows optimal nozzle selection.
-
Page 17: Accessories / Spare Parts
6. Spare Parts In the event that your Karcher Pressure Washer requires replacement parts – please refer to the diagram below AND identify the particular model of your machine by reference to the data plate on the underside. Please write, email or fax Karcher (see page 19) with any parts order you wish to place. - Page 18 7. PROBLEM CHECKLIST The machine you have chosen is of the highest quality. Correctly stored away from frost it should operate without problems. If a problem does arise, please check the following chart as a solution may be at hand. PROBLEM POSSIBLE CAUSE CORRECTION...
-
Page 19: Help-Line
8. HELP - LINE Karcher (UK) Limited operate a help-line allowing customers to discuss any problems experienced with our products. The help-line operates during normal business hours, if you have diffi- culty getting through, please understand that there are peak periods during the day when our consultants are unable to take all calls coming in. -
Page 20: Technical Data
9. TECHNICAL DATA Power Connection Voltage ............230-240 V (AC) Current .............. 1~50 Hz Connected/Load ..........2.0 KW Mains Fuse ............13 AMP Water Connection Supply Temperature (Max) ........40 °C Supply Rate (Min) ..........10 litres per minute Supply Pressure (Max) ......(6 bar) ..0,6 MPa Supply Hose Length .......... -
Page 21: Assembly
10.ASSEMBLY 10.1 Changing the High Pressure Hose ( No.3) - Page 22 EU Declaration of Conformity We hereby declare that the equipment described below conforms to the relevant fundamental safety and health requirements of the appropriate EU Directives, both in its basic design and construction as well as in the version marketed by us. This declaration will cease to be valid if any modifications are made to the machine without our express approval.
- Page 23 Notes...
Need help?
Do you have a question about the KB 9040 and is the answer not in the manual?
Questions and answers