
Related Manuals for PROLiNK IPS Series


Summary of Contents for PROLiNK IPS Series
- Page 1 User Guide IPS Inverter Series IPS1202, IPS2402 Version 2.00 (English | Indonesian)
-
Page 2: Package Contents
Package Contents (Coupling cable, only for IPS2402) Note: 1. The illustrations in this document may appear different from your model. 2. If any of above item is not packed in your package, please consult your seller immediately. Overview IPS1202/IPS2402 Front View Rear View Legend: LED indicator... -
Page 3: Installation
Installation Safety Clearance The minimum clearance to the wall shall be larger than 30cm in order to ensure proper ventilation. In the event the ambient temperature is high, it’s recommended to increase the distance of safety clearance to improve the heat dissipation. Mounting Inverter on the wall The inverter is designed to either be placed on horizontal surface or be mounted on the wall (as shown below). - Page 4 Installation Connect the battery cables The gauge of battery cables shall be no less than 6 AWG with 105˚C rating. 2. No matter how the batteries are connected (in series or in parallel), make sure the cables terminal voltage is consistent with the inverter’s specification (12VDC for 1200VA model and 24VDC for 2200VA model).
-
Page 5: Connect Ac Input Cables And Loads
Installation The user may connect the batteries in parallel in order to increase the total battery capacity without changing the battery voltage. The example below shows parallel connection of multiple 12VDC batteries. While the total capacity is times by the number of battery, the terminal voltage remains 12VDC (only for 12VDC model). - Page 6 Operations After connecting batteries, AC input cables, and loads, the inverter is now ready for use. Power On/O Once the inverter has been properly installed, press the power switch to turn on the unit. The unit will work automatically in line mode or inverter mode according to input utility power’s status.
-
Page 7: Function Keys
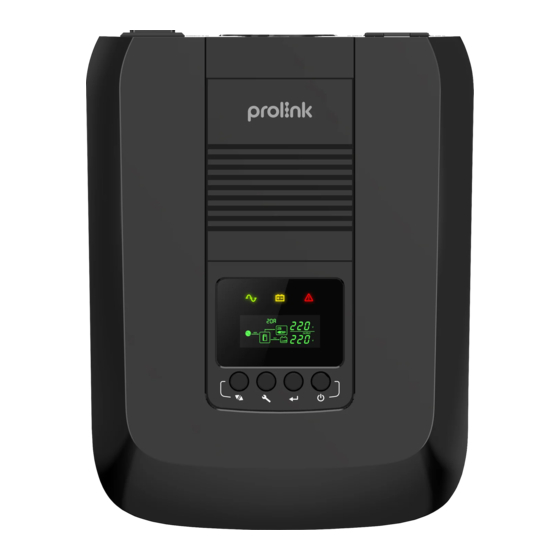
Operations Function Keys Function Keys Description To power On/O To enter the setting mode or exit setting mode To go to the next selection page To confirm the selection in setting mode LCD Display LCD displays the power flow and input/output readings in a visualized graphic design which allows the user to understand the operation status easily. -
Page 8: Lcd Setting
Operations Icon Function Output information Indicates output voltage, load in Watt Battery Information Indicates battery level by 0-24%, 25-49%, 50-74% and 75-100% in battery mode and charging status Load Information Indicates the load level by 0-24%, 25-49%, 50-74% and 75-100% Mode operation information Indicates the unit connects to the mains Charging Information... - Page 9 Operations Operating Mode Description Operating mode LCD Default Display Utility input bypass to output, and battery can be charged without switching on the unit. The icon will flash every 0.5 seconds Standby Charging Mode Utility input bypass to output, and battery can be charged when switching on the unit Line Mode The backup power to load comes only from battery...
- Page 10 Operations Setting Items Icons Description Setting range is from 10.0VDC to 11.0VDC for 12VDC model and 20.0VDC to 22.0VDC for 24VDC model. Low cut-o voltage will be fixed to setting value no matter what percentage of load is connected. Battery Available options in 12VDC model : shutdown 10.0VDC (default)/10.2VDC/10.4VDC/10.6VDC/...
- Page 11 Operations Battery Charging Status 1.2 KVA Status Battery voltage Floating Bat=13.7VDC Solid on Solid on Solid on Solid on 14.2>=Bat>=13.65VDC Solid on Solid on Solid on Flashing Bat>13.5VDC Solid on Solid on Flashing Flashing 13.5>=Bat>13.0VDC Solid on Flashing Flashing Flashing Bat<=13.0VDC Flashing Flashing...
-
Page 12: Troubleshooting
Troubleshooting Problem Possible Cause Remedial Action Recharge the battery and check if the battery cables are Battery voltage is low well connected No LCD display Battery is defective Replace the batteries Press and hold the power Power button is not pressed button Mains are normal Check the connection of... -
Page 13: Specification
Specification Model IPS1202 IPS2402 Capacity VA/W 1200VA / 1000 W 2200 VA / 1800 W 12VDC 24VDC Nominal Battery Voltage Line Mode Nominal Voltage 220-240VAC Wide mode: 90VAC-280VAC (default) Input Voltage Range Narrow model: 170VAC-280VAC Normal Frequency 40-70 Hz (auto sensing) Voltage Follow the Utility Output... - Page 14 Isi Perangkat (Kabel kopling, hanya untuk IPS2402) Nota: 1. Ilustrasi dalam dokumen ini mungkin tampak berbeda dari model Anda. 2. Jika salah satu item di atas tidak dikemas dalam paket Anda, harap segera berkonsultasi dengan penjual Anda. Keterangan Gambar IPS1202/IPS2402 Tampak Hadapan Tampak Belakang Legend:...
- Page 15 Instalasi Izin Keselamatan Jarak minimum ke dinding harus lebih besar dari 30cm untuk memastikan kesesuaian ventilasi. Jika suhu sekitar tinggi, disarankan untuk dinaikkan jarak aman untuk meningkatkan pembuangan panas. Memasang Inverter di dinding Inverter dirancang untuk ditempatkan pada permukaan horizontal atau dipasang pada dinding (seperti gambar di bawah).
- Page 16 Instalasi Hubungkan kabel baterai Ukuran kabel baterai tidak boleh kurang dari 6 AWG dengan peringkat 105°C. 2. Tidak peduli bagaimana baterai terhubung (seri atau paralel), pastikan kabelnya tegangan terminal konsisten dengan spesifikasi inverter (12VDC untuk model 1200VA dan 24VDC untuk model 2200VA). 3.
- Page 17 Instalasi Pengguna dapat menghubungkan baterai secara paralel untuk meningkatkan kapasitas baterai total tanpa mengubah tegangan baterai. Contoh di bawah ini menunjukkan koneksi paralel dari beberapa baterai 12VDC. Sedangkan kapasitas total dikalikan dengan jumlah baterai terminal tegangan tetap 12VDC (Hanya untuk model 12VDC). Hubungkan Kabel input AC dan Beban Sambungkan kabel input AC dan beban ke stopkontak seperti yang ditunjukkan di bawah ini.
- Page 18 Operasi Setelah menghubungkan baterai, kabel input AC, dan beban, inverter siap digunakan. Hidupkan/Matikan Setelah inverter terpasang dengan benar, tekan sakelar daya untuk menyalakan unit. Unit akan bekerja secara otomatis dalam mode garis atau mode inverter sesuai dengan utilitas input status kekuasaan. Untuk mematikan unit, tekan sakelar daya lagi. Indikator LED Mode operasi inverter dapat dengan mudah dipahami oleh indikator LED.
- Page 19 Operasi Tombol Fungsi Tombol Fungsi Keterangan Untuk menghidupkan/mematikan Untuk masuk ke mode pengaturan atau keluar dari mode pengaturan Untuk pergi ke halaman pilihan berikutnya Untuk mengonfirmasi pilihan dalam mode pengaturan Layar LCD LCD menampilkan aliran daya dan pembacaan input/output dalam desain grafis yang divisualisasikan yang memungkinkan pengguna untuk memahami status operasi dengan mudah.
- Page 20 Operasi Ikon Fungsi Informasi keluaran Menunjukkan tegangan output, beban dalam Watt Informasi Baterai Menunjukkan level baterai menurut 0-24%, 25-49%, 50-74% dan 75-100% dalam mode baterai dan status pengisian daya Memuat Informasi Menunjukkan tingkat beban 0-24%, 25-49%, 50-74% and 75-100% Informasi operasi mode Menunjukkan unit terhubung ke listrik Informasi Pengisian Menunjukkan arus pengisi daya AC disetel ke Maksimum...
- Page 21 Operasi Deskripsi Mode Operasi Modus operasi Tampilan Standar LCD Input utilitas memotong ke output, dan baterai dapat diisi tanpa menyalakan unit. Ikon akan berkedip setiap 0.5 detik Bersiap mengisi daya mode Input utilitas memotong ke output, dan baterai dapat diisi saat beralih pada unit Jalur modus Daya cadangan untuk memuat hanya berasal dari baterai...
- Page 22 Operasi Mengatur Item Ikon Keterangan Rentang pengaturan dari 10V hingga 11VDC untuk model 12VDC dan 20VDC ke 22VDC untuk model 24VDC. Cut-off rendah tegangan akan ditetapkan Baterai ke nilai pengaturan apa pun yang terjadi persentase beban terhubung. menutup Pilihan yang tersedia dalam model 12VDC: pengaturan 10.0VDC (standar)/10.2VDC/10.4VDC/10.6VDC/ tegangan...
- Page 23 Operasi Status Pengisian Baterai 1.2 KVA Status Tegangan baterai Apung Bat=13.7VDC Padat Aktif Padat Aktif Padat Aktif Padat Aktif 14.2>=Bat>=13.65VDC Padat Aktif Padat Aktif Padat Aktif Berkedip Bat>13.5VDC Padat Aktif Padat Aktif Berkedip Berkedip 13.5>=Bat>13.0VDC Padat Aktif Berkedip Berkedip Berkedip Bat<=13.0VDC Berkedip Berkedip...
-
Page 24: Penyelesaian Masalah
Penyelesaian masalah Masalah Kemungkinan penyebabnya Tindakan perbaikan Isi ulang baterai dan periksa apakah kabel baterai Tegangan baterai rendah terhubung dengan baik Tidak ada layar LCD Baterai rusak Ganti baterainya Tekan dan tahan daya Tombol daya tidak ditekan tombol Listrik normal tetapi Periksa sambungan dari bekerja dalam cadangan Masukan AC tidak ada... - Page 25 Spesifikasi Model IPS1202 IPS2402 Kapasitas VA/W 1200VA / 1000 W 2200 VA / 1800 W 12VDC 24VDC Tegangan Baterai Nominal Modus Garis Tegangan Nominal 220-240VAC Modus lebar: 90VAC-280VAC (standar) Input Rentang Tegangan Modus sempit: 170VAC-280VAC Frekuensi Biasa 40-70 Hz (penginderaan otomatis) Voltase Ikuti Utilitas Keluaran...
- Page 26 Register online for your Product Warranty at www.prolink2u.com Prolink is a registered trademark of Fida International (S) Pte Ltd. Other brands and product names are trademarks or registered trademarks of their respective holders. Product images are purely for illustrative purposes and may defer from the actual product. Specifications are subjected...
- Page 27 Kami mengucapkan terima kasih atas kepercayaan Anda memilih produk DAFTAR LAYANAN PURNA JUAL : kami dan selaku Distributor di Indonesia, kami memberikan garansi Jasa 1. PT. PROLINK INTIDATA NUSANTARA | JL. Perbaikan dan Penggantian Suku Cadang dengan ketentuan sebagai CIDENG BARAT NO. 79, JAKARTA PUSAT 10150 |...
- Page 28 Kota: Kode Pos: Toko Tel / Fax: Kota Pelanggan PT. Prolink Intidata Nusantara Cap Toko Kartu Garansi harus diisi lengkap, kirimkan paling lambat 14 hari setelah Tgl. Pembelian Telp. : (62-21) 34831777 Alamat Pengiriman PT. PROLINK INTIDATA NUSANTARA : (62-21) 34830788 JI.
Need help?
Do you have a question about the IPS Series and is the answer not in the manual?
Questions and answers